My neighbor, Mrs. Gable, watched me trying to roll lopsided cake balls for a holiday party and didn’t say anything at first. Then she just reached over, took the bowl from my hands, and said, “You’re fighting the crumbs. Let them rest in the fridge first.” She’s this tiny, no-nonsense woman in her seventies who still bakes every single weekend. The cake pops she pulled out of her own kitchen later that week were perfect—round, smooth, and standing at attention on their sticks like little soldiers. I mean, honestly, I had been making such a mess of it. My kitchen looked like a red velvet crime scene. But she showed me that the secret wasn’t in some fancy technique or expensive equipment. It was just about being patient and letting the ingredients do their thing. That conversation on my front porch, with her explaining how she learned to make them for her grandkids, changed how I approach any cake pop recipe. These kid-friendly red velvet Christmas cake pops on a stick are my version of her recipe, adapted for busy families who want something special without losing their minds in the process. Maybe you’ve been there—covered in chocolate, wondering why your cake balls look more like sad meatballs than cute little treats. I get it. This recipe fixes all of that. It’s the one that finally made me feel like I knew what I was doing.
Why You’ll Love This Recipe
Let me tell you, I’ve tested this recipe more times than I care to count. My kids have been my official taste testers, and they are brutally honest. If something isn’t good, they just push the plate away. But these red velvet cake pops? They disappear. Every single time.
- Kid-Friendly & Fun: This is the kind of recipe that gets little hands excited. They can help roll the balls, dip them, and add sprinkles. It’s a whole family activity, not just something you do alone in the kitchen.
- Simple Ingredients: You probably have most of these in your pantry already. No weird specialty items that cost a fortune. I buy everything from my regular grocery store, and it works perfectly.
- Perfect for Christmas: The red color is just so festive. It screams Christmas without being over-the-top. Plus, they look gorgeous on a dessert table or wrapped up as little homemade gifts.
- Crowd-Pleaser: I’ve brought these to school parties, church potlucks, and family gatherings. Adults go nuts for them too. There’s something about food on a stick that makes everyone happy.
- Unbelievably Delicious: The combo of moist red velvet cake and creamy cream cheese frosting, all covered in white chocolate? It’s next-level comfort food. Honestly, I have to hide some in the freezer or my family will eat them all before the party.
What makes this recipe different from the rest is that it actually works. I’ve tried the ones that fall apart, the ones that taste dry, and the ones that look like a mess. This version uses a little trick—chilling the cake balls twice—that makes all the difference. It’s not just another cake pop recipe. It’s the one you’ll come back to year after year, the one your kids will ask for by name when the holidays roll around.
What Ingredients You Will Need
This recipe uses simple, wholesome ingredients to deliver that classic red velvet flavor and moist texture without any fuss. Most of these are pantry staples you probably already have on hand, especially if you do any holiday baking.
- For the Cake:
- 1 box (15.25 oz) red velvet cake mix (I prefer Duncan Hines for the best color and texture)
- 3 large eggs, room temperature
- 1 cup whole milk (adds richness)
- 1/2 cup vegetable oil
- 1 teaspoon vanilla extract (pure, not imitation, if you have it)
- For the Frosting:
- 1/2 cup unsalted butter, softened
- 4 oz cream cheese, softened (full-fat works best for stability)
- 2 cups powdered sugar
- 1 teaspoon vanilla extract
- Pinch of salt
- For the Coating & Decoration:
- 12 oz white chocolate melting wafers (I use Ghirardelli, they melt so smooth)
- 1 tablespoon coconut oil or vegetable shortening (helps thin the chocolate)
- Red and green sprinkles (jimmies work best, not the round ones)
- 24 lollipop sticks (6-inch size is perfect)
- Optional: edible glitter or gold star sprinkles for extra festivity
For the cake mix, look for one that has a deep red color. Some brands are more brownish, and that won’t give you that vibrant Christmas look. If you want to make it from scratch, go for it, but honestly, the box mix works great here and saves time. For the cream cheese, make sure it’s really softened to room temperature. Cold cream cheese will leave lumps in your frosting, and nobody wants that. If you’re dairy-free, you can use a plant-based cream cheese and butter substitute, but the texture might be a little softer. I’ve tried it with oat milk in the cake, and it worked fine. Just keep everything at room temperature for the best results.
Equipment Needed
You don’t need a fancy bakery setup for these cake pops. Here’s what I use, and most of it is probably already in your kitchen.
- 9×13 inch baking pan (or two 8-inch rounds)
- Large mixing bowls (at least two)
- Electric hand mixer or stand mixer
- Rubber spatula
- Cookie scoop (1.5 tablespoon size is perfect for even balls)
- Baking sheet lined with parchment paper
- Lollipop sticks (24 of them)
- Styrofoam block or a cardboard box with holes poked in it (for drying)
- Microwave-safe bowl or double boiler for melting chocolate
- Small deep cup or mug for dipping (a tall coffee mug works great)
If you don’t have a cookie scoop, just use a tablespoon and roll the balls by hand. I actually prefer the scoop because it makes everything the same size, which helps them all chill evenly. For the Styrofoam block, I just used a piece of thick cardboard last year and poked holes in it with a pencil. It worked fine. Honestly, you can get creative here. The key is having something to hold the pops upright while they set.
Preparation Method
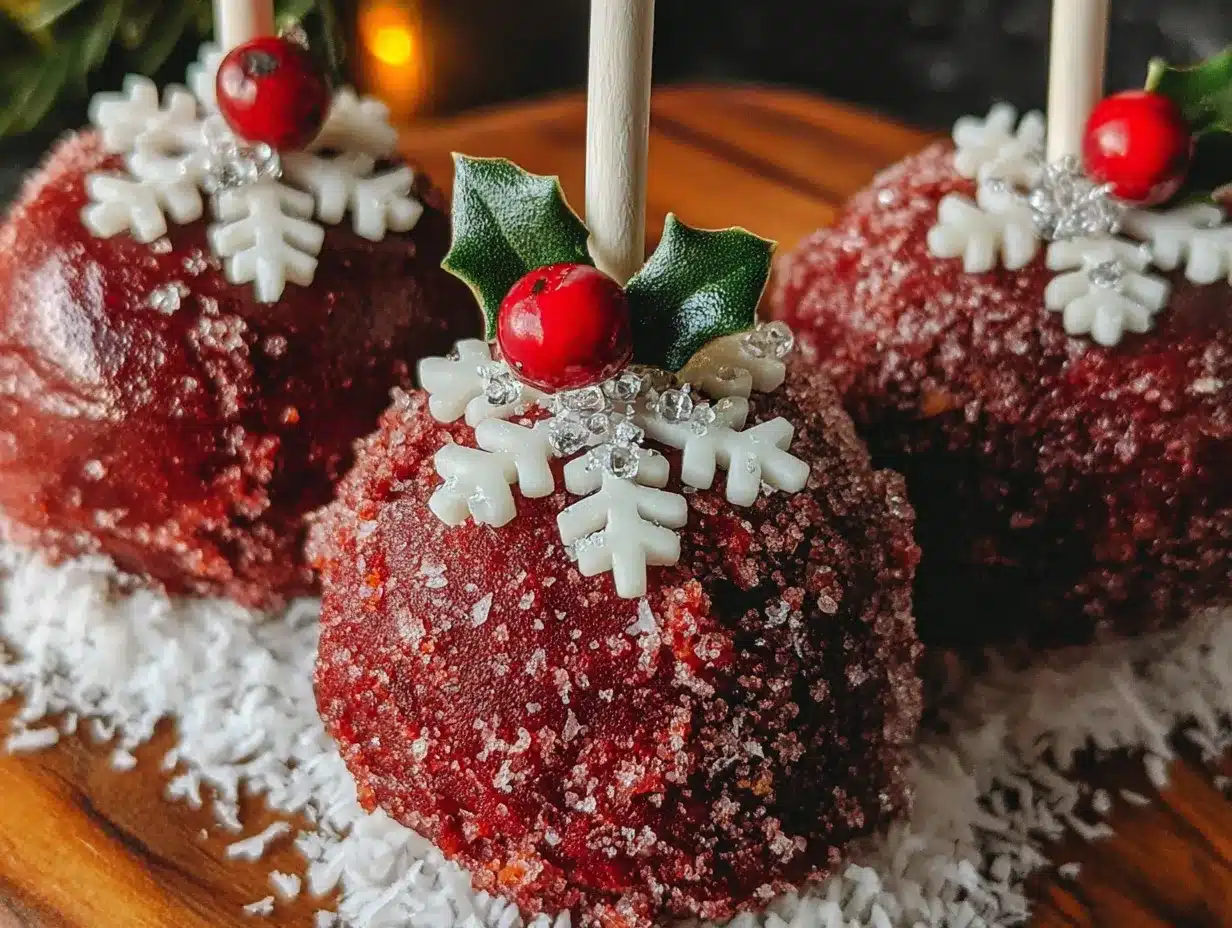
Okay, let’s get to the good part. Follow these steps, and you’ll have perfect cake pops every time. I promise.
- Bake the Cake: Preheat your oven to 350°F (175°C). Grease your 9×13 pan with butter or cooking spray. In a large bowl, combine the cake mix, eggs, milk, oil, and vanilla. Beat with an electric mixer on medium speed for about 2 minutes, until smooth. Pour the batter into the prepared pan and bake for 25-30 minutes, or until a toothpick inserted in the center comes out clean. Let the cake cool completely in the pan on a wire rack. This is important—if it’s even a little warm, your frosting will melt and you’ll get a sticky mess.
- Make the Frosting: While the cake cools, beat the softened butter and cream cheese together in a bowl until smooth and fluffy, about 2 minutes. Add the powdered sugar, one cup at a time, beating on low speed to avoid a sugar cloud. Then add the vanilla and salt, and beat on medium-high for another minute until light and creamy. Set aside.
- Crumble the Cake: Once the cake is completely cool, break it into large chunks and place them in a large bowl. Use your hands to crumble the cake into fine crumbs. I mean really fine—no big chunks left. This takes about 3-4 minutes. It’s messy, but kind of satisfying, honestly.
- Mix with Frosting: Add about 3/4 cup of the cream cheese frosting to the cake crumbs. Start with less—you can always add more. Use a spatula or your hands to mix it together until the mixture holds together when you squeeze it. It should feel like damp sand or play-doh. If it’s too dry, add a little more frosting, a tablespoon at a time. If it’s too wet, add a few more cake crumbs.
- Roll the Balls: Using your cookie scoop or a tablespoon, portion out the mixture and roll it into smooth balls between your palms. Aim for about 1.5 inches in diameter. Place them on the parchment-lined baking sheet. You should get about 24 balls. Pop the sheet in the fridge for at least 30 minutes, or up to an hour. This first chill is crucial—it firms them up so they don’t fall apart when you dip them.
- Insert the Sticks: After the balls have chilled, melt about 2 tablespoons of your white chocolate in the microwave (15-second intervals, stirring between each). Dip the tip of each lollipop stick into the melted chocolate, then insert it about halfway into a cake ball. The chocolate acts like glue, holding the stick in place. Return the cake pops to the fridge for another 15 minutes to set the chocolate.
- Melt the Coating: Place the remaining white chocolate wafers and the coconut oil in a microwave-safe bowl. Microwave in 30-second intervals, stirring each time, until completely smooth. Don’t overheat it, or the chocolate will seize up and get lumpy. If that happens, stir in a teaspoon of vegetable shortening to smooth it out.
- Dip the Pops: This is the fun part. Hold a cake pop by the stick and dip it into the melted chocolate, covering it completely. Gently tap the stick on the edge of the bowl to let excess chocolate drip off. Don’t swirl it around too much, or the ball might fall off the stick. Use a spoon to help coat the top if needed.
- Decorate: While the chocolate is still wet, sprinkle on your red and green sprinkles. Work quickly, because the chocolate sets fast. If you’re using edible glitter, add that now too.
- Let Them Set: Stick the finished cake pop into your Styrofoam block or cardboard stand. Repeat with all the pops. Let them sit at room temperature for about 30 minutes, until the chocolate is completely hard and set. Don’t put them in the fridge to speed this up—it can cause the chocolate to bloom and get white streaks.
When you’re dipping, if a cake ball starts to slide off the stick, don’t panic. Just push it back into place gently and let it set. I’ve had that happen a dozen times. It’s not the end of the world. The sensory cue you’re looking for is a smooth, even coating that covers the entire ball. The chocolate should feel thick but not gloppy. If it’s too thick, add a little more coconut oil to thin it out.
Cooking Tips & Techniques
I’ve learned a few things the hard way so you don’t have to. Here are my best tips for cake pop success.
Don’t Overmix the Cake and Frosting: This is a mistake I made for years. You want the mixture to hold together, but if you overwork it, the cake pops get dense and heavy. Just mix until it comes together, then stop. You’re not making bread dough.
Chill Twice, Not Once: I know it seems like extra work, but that second chill after inserting the sticks is a game-changer. It makes the cake ball solid enough that it won’t wobble or fall off when you dip it. I learned this after losing three cake balls in the chocolate bowl in one afternoon. So frustrating.
Use a Tall, Narrow Cup for Dipping: A coffee mug or a tall drinking glass works so much better than a wide bowl. You can submerge the entire cake pop in one smooth motion without having to tilt it. This gives you a much cleaner, more even coating.
Tap, Tap, Tap: After dipping, tap the stick gently on the edge of your mug to remove excess chocolate. Do it a few times, rotating the pop slightly. This prevents those annoying chocolate drips from pooling at the bottom of the pop.
Work in Small Batches: Don’t try to dip all 24 cake pops at once. The chocolate will start to set, and you’ll end up with thick, uneven coatings. Melt half the chocolate, dip 12 pops, then melt the other half. It takes a little longer, but the results are worth it.
If the Chocolate Seizes Up: This happened to me once when I was rushing. The chocolate turned into a thick, grainy paste. I thought I ruined everything. But a friend told me to stir in a teaspoon of vegetable shortening and microwave for 10 seconds. It smoothed right out. Saved the whole batch.
Variations & Adaptations
One of the best things about this recipe is how easy it is to change it up. Here are some ways I’ve adapted it over the years.
Chocolate Lover’s Version: Instead of white chocolate, use dark or milk chocolate melting wafers for the coating. It gives the cake pops a richer, more decadent flavor. My husband prefers this version. I just swap out the white chocolate and use the same method. The red cake peeking through the dark chocolate looks really striking.
Gluten-Free Option: Use a gluten-free red velvet cake mix. I’ve tried a couple of brands, and King Arthur’s works the best. The texture is a little more delicate, so be extra gentle when rolling and dipping. Everything else stays the same. My friend with celiac disease loves these.
Peppermint Twist: Add 1/2 teaspoon of peppermint extract to the melted white chocolate coating. Then crush up some candy canes and sprinkle them on top instead of the regular sprinkles. It gives the pops that classic Christmas minty flavor. Just make sure the candy canes are crushed really fine, or they’ll be too hard to bite into.
Vegan Adaptation: Use a vegan cake mix, flax eggs (1 tablespoon ground flaxseed mixed with 3 tablespoons water per egg), plant-based milk, and vegan cream cheese and butter for the frosting. For the coating, use vegan white chocolate chips. I’ve tested this version, and it works. The texture is a little less fluffy, but the flavor is still great.
Mini Cake Balls: If you want bite-sized treats for a party, roll the mixture into smaller balls, about 1 inch in diameter. You’ll get about 36 mini pops. Reduce the chilling time by 10 minutes for each step. They’re perfect for little kids who can’t manage a full-sized pop.
Serving & Storage Suggestions
These cake pops are best served at room temperature. The chocolate coating is snappy, and the inside is soft and moist. If they’ve been in the fridge, let them sit out for about 15 minutes before serving. I usually arrange them on a festive platter, standing upright in a small block of Styrofoam covered with wrapping paper. It looks so pretty on a dessert table.
For presentation, you can also wrap each cake pop individually in a clear cellophane bag tied with a red ribbon. They make adorable party favors or little gifts for neighbors. I did this last year for my daughter’s class, and the teacher said they were the hit of the party.
Storage: Store leftover cake pops in an airtight container in the refrigerator for up to 5 days. Place them in a single layer, or use parchment paper between layers to prevent sticking. If you need to stack them, make sure the chocolate is completely set first.
Freezing: These freeze beautifully. Place the finished cake pops in a single layer on a baking sheet and freeze for 1 hour. Then transfer them to a freezer-safe bag or container. They’ll keep for up to 3 months. To thaw, just move them to the fridge overnight, then let them come to room temperature before serving. The flavor actually gets better after freezing, I think. The cake becomes even more moist.
Reheating: You don’t really reheat cake pops, but if the chocolate gets a little soft, just pop them in the fridge for 10 minutes to firm up again. The flavors actually develop more over time. Day-old cake pops are often even better than fresh ones, honestly. The cake and frosting have had time to meld together.
Nutritional Information & Benefits
Let’s be real—these are a treat, not a health food. But here’s the approximate nutritional breakdown for one cake pop, based on the recipe making 24 pops.
| Nutrient | Amount per serving |
|---|---|
| Calories | 195 |
| Total Fat | 10g |
| Saturated Fat | 5g |
| Cholesterol | 35mg |
| Sodium | 180mg |
| Total Carbohydrates | 26g |
| Sugars | 19g |
| Protein | 2g |
On the plus side, the cream cheese frosting does provide a little calcium and protein. And if you make them with a gluten-free mix, they’re safe for those with gluten sensitivities. The red velvet cake mix usually contains cocoa, which has antioxidants. But honestly, I make these because they make my kids smile, not because they’re a superfood. Everything in moderation, right? If you’re watching sugar, you can use a sugar-free cake mix and frosting, but the texture will be a bit different. I’ve tried it, and it’s okay, but not as good as the real thing.
Conclusion
These kid-friendly red velvet Christmas cake pops on a stick are more than just a dessert. They’re a memory in the making. I think about Mrs. Gable every time I make them, and about how she took the time to show me something she loved. That’s what the holidays are about, honestly—sharing little bits of joy with the people around you. This recipe is forgiving enough for beginners, special enough for celebrations, and simple enough that you can actually enjoy the process instead of stressing out. I hope you make them with your kids, get a little messy, and end up with something beautiful that you’re proud of. And if your first batch isn’t perfect, that’s okay. Mine wasn’t either. The second batch will be better. That’s how cooking works. So go ahead, preheat that oven, and let’s make some memories together. I’d love to hear how yours turn out—drop a comment below or tag me in your photos. Happy holidays, friends!
Frequently Asked Questions
Can I use a homemade red velvet cake instead of a box mix?
Absolutely. If you have a favorite homemade red velvet recipe, use it. Just make sure the cake is completely cool before you crumble it. The texture might be a little different, but the process is the same. I’ve done it both ways, and honestly, the box mix is just easier for busy families.
Why did my cake pops fall off the stick when I dipped them?
This usually happens when the cake balls aren’t chilled enough, or when the chocolate is too hot. Make sure your balls are cold and firm before inserting the sticks. Also, don’t dip them into chocolate that’s too warm—let it cool for a minute after melting. The stick should also have a little melted chocolate on the tip to act as glue.
Can I make these ahead of time for a party?
Yes, you can make them up to 3 days in advance. Store them in an airtight container in the fridge. For best results, let them come to room temperature for about 15 minutes before serving. You can also freeze them for up to 3 months. I often make a double batch in December and freeze half for Christmas Eve.
How do I get the chocolate coating perfectly smooth?
The key is to use good-quality melting wafers and add a little coconut oil or shortening. This thins out the chocolate so it coats evenly. Also, tap the stick gently after dipping to remove excess. If you’re still having trouble, try using a spoon to drizzle the chocolate over the cake pop instead of dipping it.
My cake mixture is too dry. What should I do?
Just add a little more cream cheese frosting, one tablespoon at a time, until the mixture holds together when squeezed. It should feel like damp sand. If it gets too wet, add a few more cake crumbs. The ratio is about 3/4 cup of frosting per full cake, but it can vary depending on how moist your cake is. Don’t be afraid to adjust it.
Pin This Recipe!

Easy Red Velvet Cake Pops: Best Christmas Treat for Kids
These kid-friendly red velvet Christmas cake pops on a stick are moist, delicious, and perfect for holiday parties. With a simple box mix and cream cheese frosting, they come together easily and are sure to be a crowd-pleaser.
- Prep Time: 30 minutes
- Cook Time: 30 minutes
- Total Time: 1 hour 30 minutes (includes chilling time)
- Yield: 24 servings 1x
- Category: Dessert
- Cuisine: American
Ingredients
- 1 box (15.25 oz) red velvet cake mix (preferably Duncan Hines)
- 3 large eggs, room temperature
- 1 cup whole milk
- 1/2 cup vegetable oil
- 1 teaspoon vanilla extract (pure, if available)
- 1/2 cup unsalted butter, softened
- 4 oz cream cheese, softened (full-fat)
- 2 cups powdered sugar
- 1 teaspoon vanilla extract
- Pinch of salt
- 12 oz white chocolate melting wafers (e.g., Ghirardelli)
- 1 tablespoon coconut oil or vegetable shortening
- Red and green sprinkles (jimmies style)
- 24 lollipop sticks (6-inch size)
- Optional: edible glitter or gold star sprinkles
Instructions
- Preheat oven to 350°F (175°C). Grease a 9×13 inch baking pan.
- In a large bowl, combine cake mix, eggs, milk, oil, and vanilla. Beat with an electric mixer on medium speed for about 2 minutes until smooth.
- Pour batter into prepared pan and bake for 25-30 minutes, or until a toothpick inserted in the center comes out clean. Let cool completely in the pan on a wire rack.
- While cake cools, make frosting: Beat softened butter and cream cheese together until smooth and fluffy, about 2 minutes. Add powdered sugar one cup at a time, beating on low, then add vanilla and salt. Beat on medium-high for 1 minute until light and creamy. Set aside.
- Once cake is completely cool, crumble it into fine crumbs in a large bowl using your hands (about 3-4 minutes).
- Add about 3/4 cup of the cream cheese frosting to the cake crumbs. Mix until the mixture holds together when squeezed (like damp sand). Add more frosting if too dry, or more crumbs if too wet.
- Using a cookie scoop or tablespoon, portion the mixture into 1.5-inch balls and roll smooth. Place on a parchment-lined baking sheet. Refrigerate for at least 30 minutes (first chill).
- Melt about 2 tablespoons of white chocolate in the microwave (15-second intervals, stirring). Dip the tip of each lollipop stick into the melted chocolate, then insert halfway into a cake ball. Return to fridge for 15 minutes (second chill).
- Melt remaining white chocolate wafers and coconut oil in a microwave-safe bowl in 30-second intervals, stirring until smooth.
- Hold a cake pop by the stick and dip into melted chocolate, covering completely. Gently tap the stick on the edge of the bowl to remove excess chocolate.
- While chocolate is still wet, sprinkle with red and green sprinkles (and optional glitter).
- Place finished cake pop into a Styrofoam block or cardboard stand to set. Repeat with all pops. Let set at room temperature for about 30 minutes until chocolate is hard.
Notes
Chill the cake balls twice for best results. Use a tall, narrow cup for dipping to get an even coating. If chocolate seizes, stir in a teaspoon of vegetable shortening and microwave for 10 seconds. Store in an airtight container in the fridge for up to 5 days, or freeze for up to 3 months.
Nutrition
- Serving Size: 1 cake pop
- Calories: 195
- Sugar: 19
- Sodium: 180
- Fat: 10
- Saturated Fat: 5
- Carbohydrates: 26
- Protein: 2
Keywords: red velvet cake pops, Christmas treats, kid-friendly desserts, cake pops on a stick, holiday baking


