My neighbor asked why I couldn’t just stir the cranberries into the dry flour before adding the wet ingredients. I started to explain why that wouldn’t work—something about coating them in sugar instead so they wouldn’t sink to the bottom. Then I stopped. Honestly? I had no real reason. It was just how I’d always done it.
She shrugged and said, “Seems like flour would work the same.” And you know what? She was right. That tiny moment of being humbled by a perfectly logical suggestion changed how I make these cranberry orange scones forever. I’d been overcomplicating things for years, convinced my way was the only way. Now I toss the dried cranberries in a bit of the flour mixture before adding the cream, and they stay perfectly suspended throughout the dough. No sinking. No fuss. Just better scones.
This whole recipe came together on a Tuesday afternoon when the sky was that particular shade of gray that makes you want to bake something warm. I had a bag of fresh cranberries in the fridge, an orange that was about to turn, and a craving for something that felt like a hug. The vanilla glaze? That was an accident—I was trying to make a simple powdered sugar drizzle and added a little too much vanilla extract. Best mistake I’ve made in a long time.
Maybe you’ve been there—standing in your kitchen, staring at ingredients, wondering if you should just give up and order something. Let me tell you, these cozy cranberry orange scones are worth the tiny bit of effort. They’re the kind of thing that makes your whole house smell like a bakery and your whole mood shift toward something softer, warmer, better. I keep making them because they remind me that sometimes the best recipes come from being willing to be wrong.
Why You’ll Love This Recipe
These aren’t just any scones. They’re the kind that make you close your eyes after the first bite—the kind that feel like a warm blanket on a cold morning. I’ve tested this recipe at least a dozen times, tweaking the orange zest amount and the glaze consistency until everything landed just right. Here’s why these scones deserve a permanent spot in your baking rotation:
- Quick & Easy: From start to oven in about 20 minutes. No stand mixer required—just a bowl, your hands, and a little patience.
- Simple Ingredients: You probably already have flour, butter, sugar, and cream in your kitchen. The cranberries and orange are the only special additions, and they’re easy to find this time of year.
- Perfect for Cozy Mornings: These scones were made for slow weekends, holiday brunches, or those days when you need something comforting before the sun comes up.
- Crowd-Pleaser: I’ve brought these to three different gatherings now, and every single time someone asks for the recipe. Kids love the sweetness; adults appreciate the tart cranberry pop.
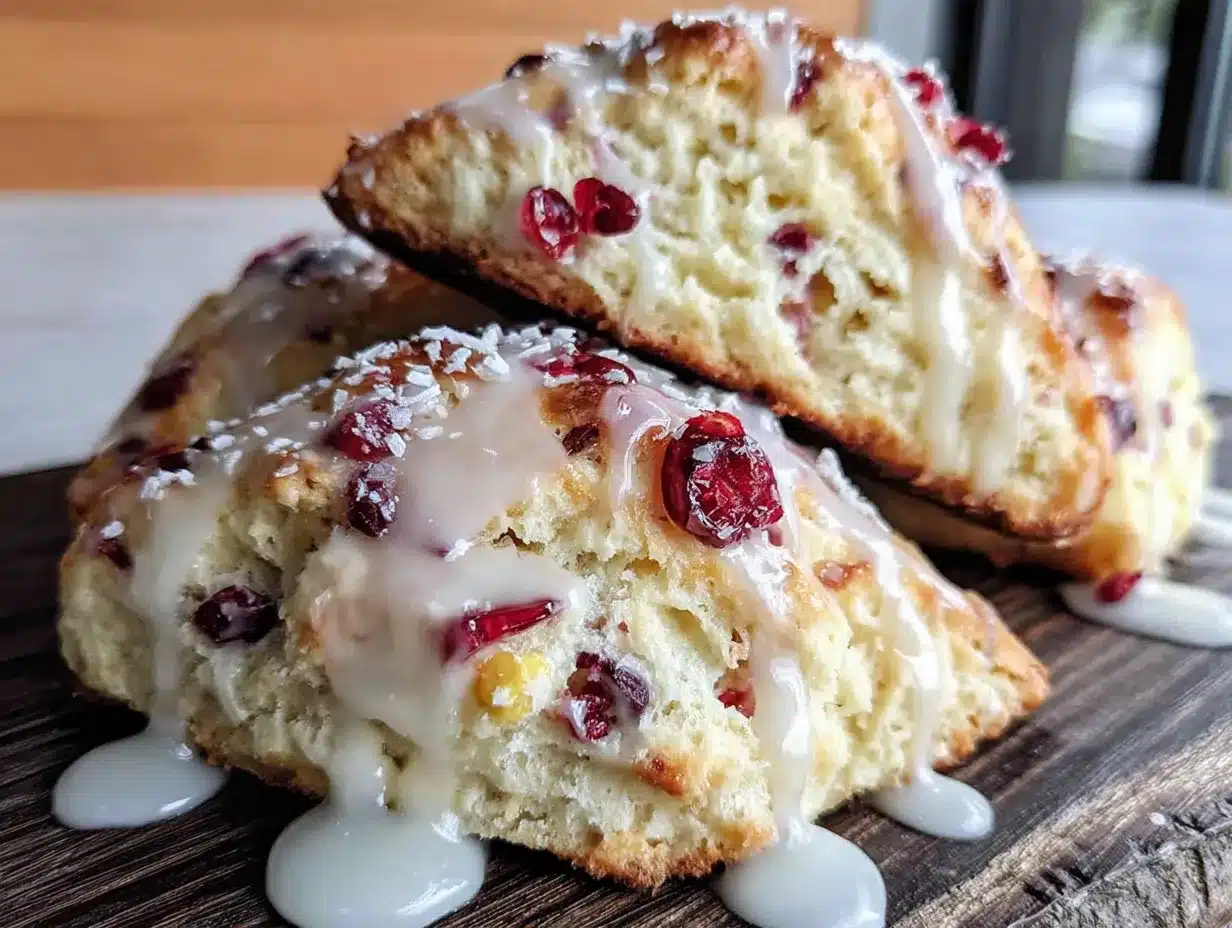
- Unbelievably Delicious: The texture is exactly what a scone should be—tender on the inside, slightly crisp on the outside, with pockets of tart cranberry and bright citrus running through every bite. And that vanilla glaze? It soaks in just enough to add sweetness without making things soggy.
What makes these different from every other scone recipe out there is the technique. Most recipes tell you to cut cold butter into the flour until it looks like coarse meal. That’s fine, but I’ve found that leaving a few slightly larger butter pieces—about the size of small peas—gives you those flaky, tender layers that make bakery scones so good. It’s a small change, but it makes a huge difference.
This is comfort food at its best. It’s the kind of recipe that doesn’t demand perfection—just a willingness to get a little flour on your counter and enjoy the process. Whether you’re baking for yourself or for people you love, these scones deliver that soul-soothing satisfaction we all need sometimes.
What Ingredients You Will Need
This recipe uses simple, wholesome ingredients to create something truly special. Most of these are pantry staples, and the few that aren’t are worth picking up for the flavor they bring. Here’s everything you’ll need:
For the Scones
- All-purpose flour, 2 cups (250g) – Spoon and level for accuracy. I prefer King Arthur Flour for consistent results.
- Granulated sugar, ⅓ cup (67g) – Adds just enough sweetness without overpowering the tart cranberries.
- Baking powder, 1 tablespoon – Make sure it’s fresh. Old baking powder is the number one reason scones don’t rise properly.
- Salt, ½ teaspoon – Balances the sweetness and enhances the orange flavor.
- Unsalted butter, 6 tablespoons (85g), cold and cubed – This is non-negotiable. Cold butter creates steam pockets as it melts, giving you those flaky layers. I like using European-style butter like Kerrygold for extra richness.
- Heavy cream, ¾ cup (180ml), plus more for brushing – Full-fat is best here. The fat content is what makes scones tender.
- Fresh cranberries, 1 cup (100g), roughly chopped – Fresh gives you that bright tartness that dried cranberries just can’t match. If you’re using frozen, don’t thaw them first—just chop them while they’re still frozen.
- Orange zest, 2 tablespoons (from about 2 oranges) – This is where the magic happens. Zest the oranges before you juice them, and make sure you only get the orange part—the white pith is bitter.
- Vanilla extract, 1 teaspoon – Pure vanilla, not imitation. It makes a difference.
For the Vanilla Glaze
- Powdered sugar, 1 cup (120g), sifted – Sifting prevents lumps. Trust me on this one.
- Heavy cream, 2-3 tablespoons (30-45ml) – You can use milk in a pinch, but cream makes the glaze richer and creamier.
- Vanilla extract, 1½ teaspoons – Yes, that’s more than usual. This glaze is meant to taste distinctly like vanilla.
- Pinch of salt – Just a tiny one. It keeps the glaze from tasting one-dimensional.
Substitution notes: If you can’t find fresh cranberries, dried cranberries work—just reduce the sugar in the scone dough to ¼ cup since dried cranberries are already sweetened. For a dairy-free version, use cold coconut oil instead of butter and full-fat coconut cream instead of heavy cream. The texture will be slightly different, but still delicious. And if you’re out of oranges, lemon zest makes a lovely substitute—you’ll get a brighter, slightly different citrus flavor that pairs beautifully with the cranberries.
Equipment Needed
You don’t need a fancy kitchen to make these scones. Here’s what you’ll actually use:
- Large mixing bowl – Any bowl works, but a wide one makes it easier to work the butter into the flour.
- Pastry cutter or two forks – A pastry cutter is faster, but forks do the job just fine. I actually prefer using my hands—you can feel when the butter is the right size.
- Box grater or zester – For the orange zest. A microplane is ideal, but the small side of a box grater works in a pinch.
- Sharp knife or bench scraper – For cutting the scones. A bench scraper gives you cleaner edges, which helps the scones rise evenly.
- Baking sheet – Line it with parchment paper for easy cleanup. I’ve used the same battered baking sheet for years, and it still works perfectly.
- Pastry brush – For brushing cream on top. If you don’t have one, just use your fingers—it’s less elegant but works the same.
- Cooling rack – Important for letting the glaze set without the bottoms getting soggy. If you don’t have one, let them cool on the baking sheet for 5 minutes, then transfer to a plate.
That’s it. No stand mixer, no food processor, no special scone pan. Just basic tools and a little elbow grease. The whole process takes about 20 minutes of active time, which is part of why I love this recipe so much.
Preparation Method
Making these scones is straightforward, but a few key steps make the difference between good and great. Here’s how to do it:
- Preheat your oven to 400°F (200°C) and line a baking sheet with parchment paper. Getting the oven hot before you start mixing is important—cold dough hitting a hot oven creates that initial burst of steam that makes scones rise tall.
- Zest your oranges before you do anything else. I learned this the hard way after juicing an orange and then trying to zest the slippery, deflated skin. Not fun. Zest two oranges directly into a small bowl, then set aside.
- Chop the cranberries into roughly quarters. They don’t need to be perfect—just small enough that you get cranberry in every bite. If you’re using frozen cranberries, chop them while they’re still frozen and work quickly so they don’t thaw and turn everything purple.
- In a large bowl, whisk together the flour, sugar, baking powder, and salt. Make sure the baking powder is evenly distributed—I usually whisk for about 20 seconds to be safe.
- Add the cold butter cubes to the flour mixture. Using a pastry cutter, two forks, or your fingertips, work the butter into the flour until the mixture looks like coarse meal with some pea-sized butter pieces remaining. This should take about 2-3 minutes. Don’t overwork it—those bigger butter pieces are what create flaky layers.
- Toss the chopped cranberries with about a tablespoon of the flour mixture from the bowl. This is the trick my neighbor taught me—it keeps the cranberries from sinking to the bottom of the scones. Add the cranberries and orange zest to the bowl and toss gently to distribute.
- Make a well in the center of the flour mixture and pour in the heavy cream and vanilla extract. Stir with a fork or your hands until the dough just comes together. It will look shaggy and a little dry—that’s exactly what you want. If it’s too dry to come together, add another tablespoon of cream. If it’s sticky, add a tablespoon more flour.
- Turn the dough out onto a lightly floured surface. Gently bring it together with your hands, kneading just 2-3 times—any more and you’ll develop gluten, which makes scones tough. Pat the dough into a circle about ¾-inch thick and 8 inches in diameter.
- Cut the dough into 8 wedges using a sharp knife or bench scraper. For the cleanest cuts, wipe the blade clean between each cut. This helps the scones rise evenly instead of leaning to one side.
- Place the scones on the prepared baking sheet, spacing them about 2 inches apart. Brush the tops with a little extra heavy cream—this helps them brown beautifully in the oven.
- Bake for 15-18 minutes, until the scones are golden brown on the edges and firm to the touch. The centers should spring back when gently pressed. Let them cool on the baking sheet for 5 minutes, then transfer to a cooling rack.
- While the scones cool, make the glaze: In a small bowl, whisk together the sifted powdered sugar, 2 tablespoons of heavy cream, vanilla extract, and a pinch of salt. Add more cream a teaspoon at a time until the glaze is thick but pourable—it should slowly drip off the whisk.
- Drizzle the glaze over the slightly warm scones. I like to use a spoon and let it fall in zigzag patterns, but you can also dip the tops directly into the glaze for a thicker coating. Let the glaze set for about 10 minutes before serving.
A few visual cues: your dough should be slightly tacky but not sticky. When you cut the scones, the edges should be clean, not smeared. And when they come out of the oven, the bottoms should be golden brown—lift one up to check if you’re unsure.
Cooking Tips & Techniques
I’ve made these scones more times than I can count, and I’ve made every mistake in the book. Here’s what I’ve learned:
The butter temperature is everything. I once left my butter on the counter for an hour before making these, thinking it would be easier to cut in. It wasn’t. The scones spread out instead of rising up, and they turned out dense and greasy. Cold butter is non-negotiable—it should be straight from the fridge, and if your kitchen is warm, pop the cubed butter in the freezer for 10 minutes before you start.
Don’t overmix the dough. This is the most common mistake I see. When you stir the cream into the flour mixture, stop as soon as it comes together. A few dry spots are fine—they’ll work themselves out when you pat the dough into a circle. Overmixing develops gluten, and gluten makes scones tough. You want tender, not tough.
Use a sharp knife to cut the scones. A dull blade drags through the dough, sealing the edges and preventing the scones from rising evenly. If your knife isn’t sharp, a bench scraper works even better because it cuts cleanly without dragging. I actually prefer the bench scraper now—it gives me the cleanest cuts and the tallest scones.
Chill the shaped scones for 15 minutes before baking. This is a pro tip I picked up from a pastry chef friend. After you cut the scones, pop the baking sheet in the fridge while the oven finishes preheating. This firms up the butter again, which means more steam during baking and taller, flakier scones. I do this every time now, and it makes a noticeable difference.
Bake from cold. If you’re making these ahead, shape the scones and freeze them on the baking sheet for an hour, then transfer to a freezer bag. Bake directly from frozen, adding 2-3 minutes to the baking time. Fresh scones whenever you want them—it’s a game changer.
Variations & Adaptations
One of the best things about this recipe is how adaptable it is. Here are some variations I’ve tried and loved:
Gluten-Free Version: Substitute the all-purpose flour with a good 1:1 gluten-free baking flour blend. I’ve had the best results with King Arthur Measure for Measure. Add 1 teaspoon of xanthan gum if your blend doesn’t already include it. The texture will be slightly more delicate, so handle the dough gently. The flavor is still fantastic.
White Chocolate Cranberry: Add ½ cup of white chocolate chips along with the cranberries. The sweetness of the white chocolate balances the tart cranberries beautifully. This version is especially good during the holidays—it feels extra special without being complicated.
Lemon Blueberry: Swap the orange zest for lemon zest and the cranberries for fresh or frozen blueberries. Use lemon extract instead of vanilla in the glaze for a bright, sunny version that’s perfect for spring mornings. Blueberries can bleed a bit into the dough, but that just adds to the rustic look.
Savory Option: Reduce the sugar to 2 tablespoons, omit the orange zest and cranberries, and add ½ cup of shredded cheddar cheese and 2 tablespoons of chopped fresh rosemary. Brush with cream and bake as directed. Skip the glaze, obviously. These are incredible with soup or as a breakfast side.
Spiced Cranberry Orange: Add ½ teaspoon of cinnamon and ¼ teaspoon of nutmeg to the flour mixture. The warm spices complement the orange and cranberry perfectly, making these scones taste even cozier. I make this version from November through January, and it always disappears fast.
My personal favorite variation? I once added a tablespoon of Grand Marnier to the glaze instead of extra cream. It was for a grown-up brunch, and honestly, it was incredible. The orange liqueur deepened the citrus flavor without making things boozy. Just a thought if you’re feeling adventurous.
Serving & Storage Suggestions
These scones are best served slightly warm, with the vanilla glaze still a little soft. The contrast between the warm, tender scone and the sweet, creamy glaze is pure comfort. I like to serve them on a simple plate with a cup of strong coffee or a pot of Earl Grey tea. They’re also wonderful with a dollop of clotted cream or a spoonful of lemon curd on the side.
For a cozy brunch spread, arrange the scones on a wooden board with fresh fruit, a small dish of honey butter, and maybe some thick-cut bacon or scrambled eggs. They’re not overly sweet, so they work beautifully alongside savory dishes.
Storage: Keep leftover scones in an airtight container at room temperature for up to 2 days. After that, they start to dry out. If you’ve already glazed them, place a piece of parchment paper between layers to prevent sticking. I don’t recommend refrigerating them—the fridge dries out baked goods faster than anything.
Freezing: You can freeze unglazed scones for up to 3 months. Wrap each scone individually in plastic wrap, then place them in a freezer bag. To serve, thaw at room temperature for about 30 minutes, then warm in a 300°F oven for 5-7 minutes. Glaze after warming. The texture is nearly as good as fresh.
Reheating: The best way to revive day-old scones is in the oven. Pop them in a 300°F oven for 5 minutes—they’ll taste almost freshly baked. The microwave works in a pinch, but it makes them soft rather than crisp. If you’re glazing leftovers, warm the scones first, then drizzle the glaze on top.
The flavors actually develop a bit overnight. I’ve found that day-old scones taste even more orange-forward, as the zest has had time to infuse the dough. They’re not quite as tender as fresh, but the flavor is lovely.
Nutritional Information & Benefits
Here’s the approximate nutritional breakdown for one scone with glaze (based on 8 servings):
- Calories: 345
- Total Fat: 16g
- Saturated Fat: 10g
- Carbohydrates: 47g
- Fiber: 2g
- Sugar: 24g
- Protein: 4g
These numbers are estimates—your actual values will vary based on ingredient brands and any substitutions you make.
While these scones are definitely a treat, they do offer some nutritional bright spots. Cranberries are packed with antioxidants and vitamin C, which support immune health. Oranges provide even more vitamin C, plus fiber and potassium. The heavy cream and butter add calcium and vitamin A. And honestly? There’s something to be said for the mental health benefits of taking time to bake something beautiful. That counts for a lot.
If you’re watching your sugar intake, you can reduce the sugar in the scone dough to ¼ cup and use a lighter hand with the glaze. The cranberries provide plenty of tartness that balances the sweetness, so you won’t miss the extra sugar as much as you’d think.
These scones are vegetarian and can be made gluten-free and dairy-free with the substitutions listed above. They contain dairy, gluten, and eggs are not used in this recipe, so they’re naturally egg-free.
Conclusion
These cozy cranberry orange scones with vanilla glaze have become my go-to recipe for so many reasons. They’re simple enough for a Tuesday morning but special enough for holiday brunch. They use real ingredients that actually taste like something. And they remind me that sometimes the best lessons come from being willing to try someone else’s way of doing things.
I hope you’ll make these scones your own—adjust the citrus, swap the fruit, play with the spices. Baking should feel creative, not rigid. The recipe is a starting point, not a rulebook. If you end up with a slightly different version that makes you happy, that’s a win in my book.
When you make these, I’d love to hear how they turn out. Leave a comment below and tell me about your experience—did you try a variation? Did your kitchen smell amazing? Did someone ask for the recipe? Those are the moments that make sharing recipes worth it.
Until next time, happy baking. And remember—sometimes the best thing you can do is let someone else show you a better way.
Frequently Asked Questions
Can I use dried cranberries instead of fresh?
Yes, you can. Dried cranberries are sweeter and chewier than fresh, so reduce the sugar in the dough to ¼ cup. You don’t need to rehydrate them—just toss them in the flour mixture like you would fresh cranberries. The texture will be different—less tart pop and more chewy sweetness—but still delicious.
Why did my scones turn out dry?
Dry scones usually come from one of three things: too much flour, overmixing, or overbaking. Make sure you’re measuring your flour correctly by spooning it into the measuring cup and leveling it off. Mix the dough only until it comes together, and start checking the scones at 15 minutes. Every oven runs a little differently, so your bake time might be shorter than the recipe suggests.
Can I make the dough ahead of time?
Absolutely. Shape the scones, place them on a parchment-lined baking sheet, and refrigerate for up to 24 hours. Cover them loosely with plastic wrap so they don’t dry out. When you’re ready to bake, you can put them straight into the oven—just add 2-3 minutes to the baking time. You can also freeze the shaped scones for up to 3 months and bake from frozen.
How do I get my scones to rise tall?
Three things help: cold butter, a hot oven, and clean cuts. Keep your butter cold so it creates steam instead of melting into the dough. Make sure your oven is fully preheated to 400°F before the scones go in. And use a sharp knife or bench scraper to cut the scones—dull blades seal the edges and prevent rising. Chilling the shaped scones for 15 minutes before baking also helps.
Can I skip the glaze?
You can, but I wouldn’t recommend it if you can help it. The glaze adds sweetness that balances the tart cranberries, and it gives the scones that beautiful bakery-style finish. If you’re cutting back on sugar, try a lighter drizzle or skip the glaze and sprinkle the scones with coarse sugar before baking instead. That gives you a crunchy top without the extra sweetness of a full glaze.
Pin This Recipe!

Cozy Cranberry Orange Scones with Easy Vanilla Glaze

These tender, flaky scones are packed with tart fresh cranberries and bright orange zest, then drizzled with a rich vanilla glaze. Perfect for cozy mornings, holiday brunches, or any time you need a warm, comforting treat.
- Prep Time: 20 minutes
- Cook Time: 15-18 minutes
- Total Time: 35-38 minutes
- Yield: 8 servings 1x
- Category: Breakfast, Brunch, Dessert
- Cuisine: American
Ingredients
- 2 cups (250g) all-purpose flour
- ⅓ cup (67g) granulated sugar
- 1 tablespoon baking powder
- ½ teaspoon salt
- 6 tablespoons (85g) unsalted butter, cold and cubed
- ¾ cup (180ml) heavy cream, plus more for brushing
- 1 cup (100g) fresh cranberries, roughly chopped
- 2 tablespoons orange zest (from about 2 oranges)
- 1 teaspoon vanilla extract
- 1 cup (120g) powdered sugar, sifted
- 2–3 tablespoons (30-45ml) heavy cream (for glaze)
- 1½ teaspoons vanilla extract (for glaze)
- Pinch of salt (for glaze)
Instructions
- Preheat your oven to 400°F (200°C) and line a baking sheet with parchment paper.
- Zest your oranges before doing anything else. Set aside.
- Chop the cranberries into roughly quarters.
- In a large bowl, whisk together the flour, sugar, baking powder, and salt.
- Add the cold butter cubes to the flour mixture. Using a pastry cutter, two forks, or your fingertips, work the butter into the flour until the mixture looks like coarse meal with some pea-sized butter pieces remaining (about 2-3 minutes).
- Toss the chopped cranberries with about a tablespoon of the flour mixture from the bowl. Add the cranberries and orange zest to the bowl and toss gently to distribute.
- Make a well in the center of the flour mixture and pour in the heavy cream and vanilla extract. Stir with a fork or your hands until the dough just comes together. It will look shaggy and a little dry.
- Turn the dough out onto a lightly floured surface. Gently bring it together with your hands, kneading just 2-3 times. Pat the dough into a circle about ¾-inch thick and 8 inches in diameter.
- Cut the dough into 8 wedges using a sharp knife or bench scraper, wiping the blade clean between each cut.
- Place the scones on the prepared baking sheet, spacing them about 2 inches apart. Brush the tops with a little extra heavy cream.
- Bake for 15-18 minutes, until the scones are golden brown on the edges and firm to the touch. Let them cool on the baking sheet for 5 minutes, then transfer to a cooling rack.
- While the scones cool, make the glaze: In a small bowl, whisk together the sifted powdered sugar, 2 tablespoons of heavy cream, vanilla extract, and a pinch of salt. Add more cream a teaspoon at a time until the glaze is thick but pourable.
- Drizzle the glaze over the slightly warm scones. Let the glaze set for about 10 minutes before serving.
Notes
For best results, keep butter very cold. Chill shaped scones for 15 minutes before baking for taller, flakier scones. Use fresh cranberries for best tartness; if using frozen, chop while still frozen. The vanilla glaze is intentionally extra-vanilla flavored. Scones can be frozen unglazed for up to 3 months.
Nutrition
- Serving Size: 1 scone with glaze
- Calories: 345
- Sugar: 24
- Sodium: 280
- Fat: 16
- Saturated Fat: 10
- Carbohydrates: 47
- Fiber: 2
- Protein: 4
Keywords: cranberry orange scones, vanilla glaze, easy scone recipe, holiday scones, breakfast pastry, brunch recipe, homemade scones


