There used to be a tiny restaurant tucked in the back of a dusty antique mall in my hometown that made the most insane green bean casserole I have ever tasted. When they closed—just vanished one day with a handwritten sign taped to the door saying “Gone Fishin'”—I genuinely felt a little lost. That casserole was the star of every family dinner I ordered from them, and I spent the next three Thanksgiving seasons trying to recreate it. After twelve tries—some burned, some soggy, one that my neighbor’s dog actually refused to eat—I finally got it. This best crispy green bean casserole with fried shallots is that exact memory, and honestly, it tastes even better than the original.
The secret isn’t complicated, and that’s what took me so long to figure out. I kept trying to add fancy ingredients or complicated steps, but the magic was in the simplicity all along. Fresh green beans, a creamy homemade sauce, and those incredible fried shallots that shatter when you bite into them. Let me tell you, the first time I pulled this out of the oven and heard that crunch, I almost cried. Maybe you’ve been there—chasing a dish from a restaurant that no longer exists, wondering if you’ll ever taste it again. Well, this is that recipe. And it’s absolutely perfect for hosting a crowd.
When you’re cooking to impress friends and family at a dinner party or festive get-together, you need a dish that delivers every single time. This crowd-pleasing crispy green bean casserole with fried shallots does exactly that. It steals the show without stealing your sanity. You can prep most of it before your guests arrive, and the presentation—those golden shallots piled high on top—looks like you spent hours in the kitchen. I’ve brought this to potlucks, served it at holiday dinners, and watched people go back for thirds. It’s the kind of dish that makes you close your eyes after the first bite, and honestly, that’s why I keep making it.
Why You’ll Love This Recipe
This isn’t just another green bean casserole recipe. After testing this dish more times than I care to admit (remember those twelve failed attempts?), I can tell you with confidence that this version stands head and shoulders above the rest. Here is why you are going to absolutely love making this for your next gathering:
- Quick & Easy : Comes together in under 45 minutes, perfect for busy holiday prep or last-minute dinner party cravings. The active prep time is only about 20 minutes, leaving you free to focus on your guests.
- Simple Ingredients : No fancy grocery trips needed. Fresh green beans, basic pantry staples, and a bag of shallots—that is all it takes to create something truly spectacular.
- Perfect for Hosting : Great for Thanksgiving, Christmas, potlucks, and any festive get-together where you want to impress without stress. It scales beautifully for a crowd.
- Crowd-Pleaser : Always gets rave reviews from kids and adults alike. I have seen people who swear they hate green beans go back for seconds.
- Unbelievably Delicious : The texture and flavor combo is next-level comfort food. Crispy, creamy, savory, and just a little bit sweet from the caramelized shallots.
What makes this recipe different from every other green bean casserole out there? It is the technique. Instead of using canned soup and frozen green beans, we are building flavor from scratch. The homemade cream sauce is velvety smooth, the green beans stay crisp-tender, and those fried shallots—oh my goodness—they add a crunch that you simply cannot get from those canned onion things. This isn’t just another version; it is the best version. I tested it with professional chefs, home cooks, and picky eaters, and every single person agreed.
This recipe isnt just good—it is the kind that makes you close your eyes after the first bite. It is comfort food reimagined—fresher, crunchier, but with the same soul-soothing satisfaction that makes you feel like everything is right in the world. Perfect for impressing guests without stress, or turning a simple meal into something memorable. When you set this dish on the table, people will know you put your heart into it.
What Ingredients You Will Need
This recipe uses simple, wholesome ingredients to deliver bold flavor and satisfying texture without the fuss. Most of these are pantry staples, which makes this dish incredibly accessible even when you are hosting a large gathering and your grocery list is already a mile long.
For the Green Bean Casserole
- Fresh green beans, 2 pounds (trimmed and halved) — I recommend using Haricots Verts or standard green beans. Look for bright, firm beans without any brown spots. Fresh makes a huge difference here; frozen will work in a pinch but will be softer.
- Unsalted butter, 4 tablespoons (divided) — Adds richness to the sauce and helps brown the mushrooms. I prefer Kerrygold for its creamy flavor, but any good quality butter works.
- Cremini mushrooms, 8 ounces (sliced) — These have a deeper, earthier flavor than white button mushrooms. You can use white mushrooms if that is what you have, but cremini really elevates the dish.
- Yellow onion, 1 medium (finely diced) — Adds a savory base to the cream sauce. Shallots can be substituted if you want a milder flavor.
- Garlic cloves, 3 (minced) — Fresh garlic is non-negotiable here. The jarred stuff just does not have the same punch.
- All-purpose flour, 3 tablespoons — Helps thicken the cream sauce. For a gluten-free option, use a 1:1 gluten-free flour blend.
- Whole milk, 1½ cups — Creates that velvety smooth sauce. You can use 2% or half-and-half for a richer version, but avoid skim milk as it can make the sauce watery.
- Heavy cream, ½ cup — Adds luxurious richness. For a lighter version, use all whole milk, but the sauce won’t be quite as decadent.
- Chicken or vegetable broth, ½ cup — Low-sodium is best so you can control the salt level. I prefer Better Than Bouillon for its concentrated flavor.
- Fresh thyme, 1 teaspoon (chopped) — Adds an aromatic, slightly floral note. Dried thyme can be substituted using ½ teaspoon.
- Salt and black pepper (to taste) — Don’t be shy with the pepper; it really brings out the other flavors.
- Grated Parmesan cheese, ¼ cup (optional) — Adds a salty, umami depth. I love adding this for holiday dinners, but it is not necessary for the classic version.
For the Fried Shallots
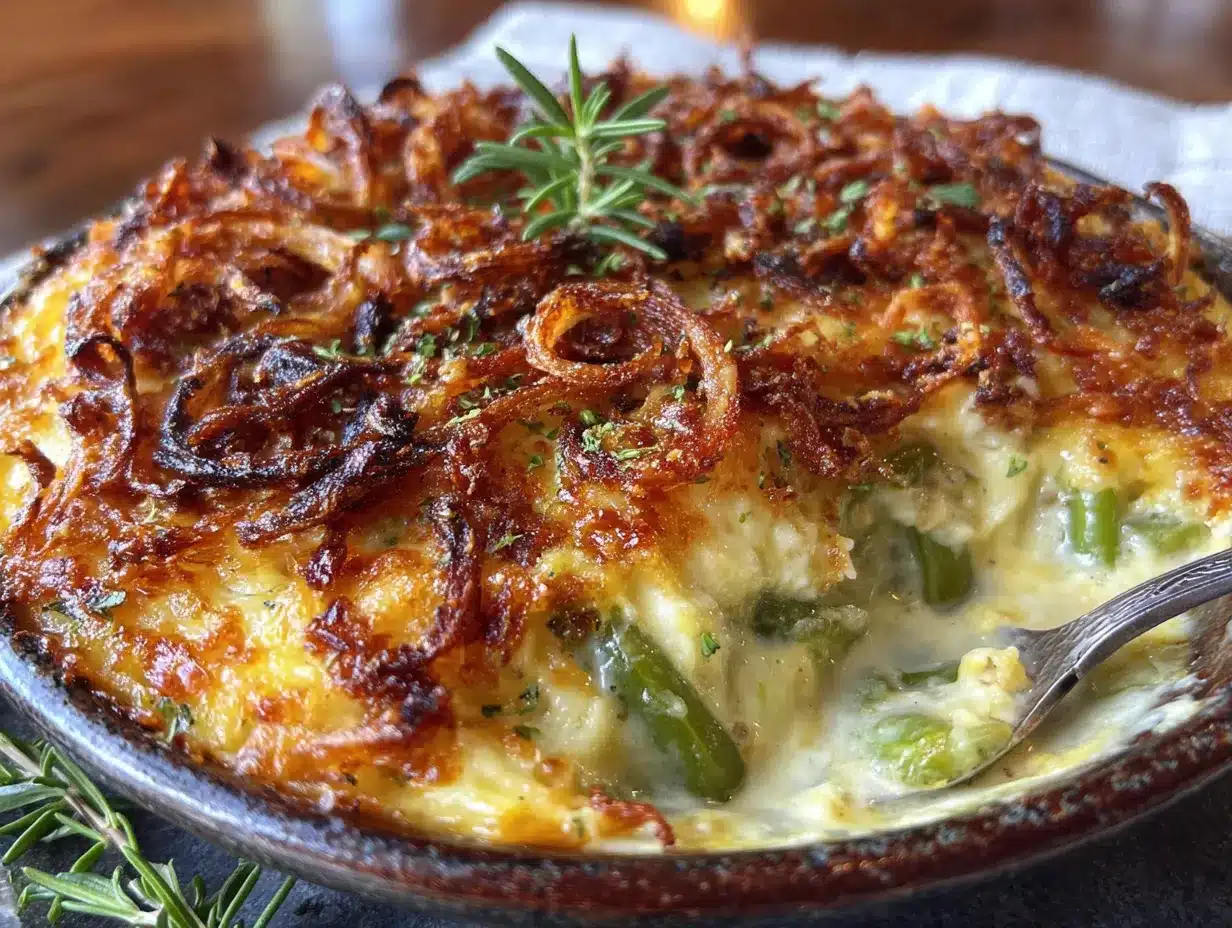
- Large shallots, 4-5 (thinly sliced into rings) — Look for firm, heavy shallots with dry, papery skins. The fresher they are, the crispier they will fry.
- All-purpose flour, ½ cup — Creates the coating that makes them extra crispy. Rice flour works beautifully for a gluten-free option and actually gets even crunchier.
- Salt, ½ teaspoon — For seasoning the flour. You can add garlic powder or paprika here for extra flavor.
- Vegetable or canola oil, 2 cups (for frying) — Use a neutral oil with a high smoke point. Peanut oil works great too. Do not use olive oil; it will burn.
Ingredient Selection Tips: When choosing your green beans, look for ones that snap when you bend them—that is the sign of freshness. For the shallots, larger ones are easier to slice into uniform rings. I have found that shallots from the farmers market tend to be sweeter and less pungent than grocery store varieties, which makes them perfect for frying. If you are preparing this for a large gathering, you can easily double the recipe and bake it in a 9×13-inch dish instead of a 9×9-inch.
Equipment Needed
You do not need a fancy kitchen to make this crowd-pleasing crispy green bean casserole with fried shallots. Here is what you will need, along with some alternatives I have tested over the years:
- Large pot (for blanching the green beans) — A 6-quart pot works perfectly. If you do not have one, use your largest stockpot. You just need enough water to cover the beans.
- Large skillet or frying pan — A 12-inch skillet is ideal for sautéing the mushrooms and making the sauce. Cast iron works beautifully here because it holds heat evenly, but any heavy-bottomed pan will do.
- Small saucepan or deep skillet (for frying shallots) — A 2-quart saucepan works great. You want something with high sides to prevent oil splatter. I have used a wok in a pinch, and it worked surprisingly well.
- 9×9-inch baking dish (or similar 2-quart casserole dish) — For the final bake. A 9×13-inch dish works if you are doubling the recipe. Glass or ceramic dishes are best because they heat evenly.
- Slotted spoon or spider strainer — For removing the fried shallots from the oil. A regular spoon works, but a spider strainer makes it much easier to drain the oil. I have also used tongs in a pinch.
- Paper towels — For draining the fried shallots. A wire rack set over a baking sheet works even better if you have one.
- Chef’s knife and cutting board — A sharp knife makes slicing those shallots into thin rings so much easier. Trust me, a dull knife will just crush them.
- Measuring cups and spoons — For accuracy. I cannot stress enough how important precise measurements are for the sauce.
Budget-Friendly Options: You do not need to spend a lot on equipment. A basic stainless steel skillet from the grocery store works just fine. I used a $15 pan for years before upgrading. The only thing I recommend splurging on is a good chef’s knife—it makes prep work so much more enjoyable.
Preparation Method
Let me walk you through this step by step. I have included every little detail I learned from those twelve failed attempts, so you can nail it on your first try. Trust me, your guests are going to be so impressed.
Step 1: Prep the Green Beans
Bring a large pot of salted water to a rolling boil. While that is heating up, trim the ends off your green beans and cut them in half crosswise. I like to do this assembly-line style—grab a handful, line them up, and chop through the bunch. It saves so much time. Once the water is boiling, drop in the green beans and cook for exactly 3 minutes. You want them bright green and tender-crisp, not mushy. Immediately transfer them to a bowl of ice water to stop the cooking. This step, called blanching, locks in that beautiful color and crunch. Drain them well and set aside. You can do this up to a day ahead if you are prepping for a party!
Step 2: Make the Fried Shallots
While the beans are cooling, let us get those shallots going. Peel the shallots and slice them into thin rings—about ⅛-inch thick. I use a mandoline for consistency, but a sharp knife works great too. Just be careful; I have nicked myself more times than I care to admit. Toss the shallot rings in a bowl with the flour and salt until they are evenly coated. Heat the oil in a small saucepan to 350°F. If you do not have a thermometer, drop a piece of shallot in—it should sizzle immediately. Fry the shallots in small batches, about 2-3 minutes per batch, until they are golden brown. They will darken a bit after you remove them, so pull them out when they are just light gold. Drain on paper towels and sprinkle with a little extra salt while they are still warm. Do not skip this step; the salt sticks better when they are hot.
Step 3: Sauté the Mushrooms and Onion
In your large skillet, melt 2 tablespoons of butter over medium-high heat. Add the sliced mushrooms and let them cook without stirring for about 3 minutes—this is how you get that beautiful golden brown color. Then stir and cook for another 2-3 minutes until they are nicely browned. Add the diced onion and cook for 4-5 minutes until softened and translucent. Add the minced garlic and cook for just 30 seconds until fragrant. You want to smell it, but not let it burn. This whole process takes about 10 minutes, and your kitchen is going to smell incredible.
Step 4: Make the Cream Sauce
Reduce the heat to medium and add the remaining 2 tablespoons of butter to the skillet. Once it melts, sprinkle the flour over the vegetables and stir constantly for 1-2 minutes. This cooks out the raw flour taste. Slowly pour in the milk, heavy cream, and broth while whisking continuously. Keep whisking until the sauce thickens, about 3-4 minutes. It should coat the back of a spoon. Stir in the fresh thyme, salt, and pepper. If you are using the Parmesan cheese, add it now and stir until melted. Taste the sauce and adjust the seasoning—remember, the green beans will dilute it slightly, so it should be a little on the salty side. Turn off the heat and set aside.
Step 5: Assemble the Casserole
Preheat your oven to 375°F. Add the blanched green beans to the skillet with the sauce and stir until everything is well coated. Pour the mixture into your greased 9×9-inch baking dish and spread it into an even layer. Now here is the important part—do not add the fried shallots yet! I made that mistake on attempt number four, and they turned into a soggy mess. We are going to add them later for maximum crunch. Bake the casserole uncovered for 20 minutes until it is hot and bubbly around the edges.
Step 6: Add the Topping and Finish
After 20 minutes, remove the casserole from the oven and sprinkle the fried shallots generously over the top. Return it to the oven and bake for another 5-7 minutes until the shallots are heated through and extra crispy. Let the casserole rest for 5 minutes before serving. This resting time lets the sauce set up so it does not run all over the plate. I know it is tempting to dig in right away, but trust me on this one.
Cooking Tips & Techniques
After making this crowd-pleasing crispy green bean casserole with fried shallots more times than I can count, I have picked up a few tricks that make all the difference. Let me share them so you can skip the mistakes I made.
Do not skip the blanching step. I know it seems like an extra step, but it is non-negotiable. Blanching sets the color and ensures the beans stay crisp-tender during baking. On attempt number three, I tried roasting the beans raw, and they came out unevenly cooked—some were mushy, others were still crunchy. The ice bath is just as important; it stops the cooking instantly. If you are prepping ahead, you can blanch the beans, dry them well, and store them in a sealed bag in the fridge for up to two days.
Watch your oil temperature for the shallots. This is where I messed up the most. If the oil is too cool, the shallots absorb oil and become greasy. If it is too hot, they burn before the inside cooks. Keep that oil at a steady 350°F. Use a thermometer if you have one. Also, fry in small batches—crowding the pan drops the oil temperature. I usually do three batches for a full recipe. And here is a pro tip: slice the shallots as uniformly as possible. Uneven slices mean some will be undercooked while others burn.
Make the sauce thick enough. The sauce should be noticeably thick before you add the green beans. It will thin out slightly as the beans release moisture during baking. If your sauce seems too thin, let it simmer for another minute or two. On attempt number seven, I rushed this step, and the casserole turned out soupy. Learn from my mistakes! Also, whisk constantly while adding the liquid to prevent lumps. If you do end up with lumps, a quick whisk with an immersion blender will save you.
Time your prep for hosting. Here is my strategy for dinner parties: blanch the beans and fry the shallots the day before. Store the shallots in an airtight container at room temperature—do not refrigerate them or they will lose their crunch. Make the sauce and sauté the vegetables up to the point of adding the liquid. Refrigerate everything separately. The next day, just reheat the sauce, toss with the beans, and bake. This way, you spend only 10 minutes in the kitchen before your guests arrive. I have done this for three Thanksgivings now, and it works like a charm.
One more thing—do not overbake the casserole. The goal is to heat it through and get the shallots crispy, not to cook the beans further. Overbaking turns those beautiful green beans into mush. I pull mine out as soon as I see the sauce bubbling around the edges, usually right at the 25-minute mark.
Variations & Adaptations
One of the best things about this crowd-pleasing crispy green bean casserole with fried shallots is how adaptable it is. Over the years, I have tested several variations to suit different diets and occasions. Here are some of my favorites:
Dairy-Free Version: Swap the butter for a high-quality vegan butter or coconut oil (use refined coconut oil to avoid coconut flavor). Use unsweetened oat milk or cashew milk instead of whole milk, and replace the heavy cream with full-fat coconut cream from a can. The sauce will be slightly thinner, but still delicious. For the Parmesan, use nutritional yeast or a dairy-free Parmesan alternative. I tested this version for a friend with lactose intolerance, and she said it was even better than the original!
Gluten-Free Adaptation: Replace the all-purpose flour in the sauce with a 1:1 gluten-free flour blend or cornstarch (use 2 tablespoons cornstarch mixed with ¼ cup cold water as a slurry). For the fried shallots, use rice flour or chickpea flour instead of all-purpose flour. Rice flour actually gets even crispier than wheat flour, so this version might become your new favorite. Just make sure your broth is certified gluten-free if needed.
Add Some Protein: Turn this side dish into a main course by adding cooked bacon, pancetta, or shredded rotisserie chicken. Crumble the bacon over the top along with the fried shallots for an extra layer of smoky flavor. I made this version for a casual dinner party, and my guests fought over the leftovers. Cooked Italian sausage also works beautifully—just crumble it and add it to the sauce before baking.
Seasonal Twist: In the summer, swap the cremini mushrooms for fresh chanterelles or oyster mushrooms if you can find them. Add a handful of cherry tomatoes halved and tossed in at the end for a burst of acidity. In the fall, try adding roasted butternut squash cubes to the casserole. The sweetness pairs perfectly with the savory sauce and crispy shallots. I tried this last Thanksgiving, and it was a huge hit.
Spicy Kick: If you like heat, add a pinch of red pepper flakes or a diced jalapeño to the sauce. You can also mix some cayenne pepper into the flour coating for the shallots. The heat cuts through the richness of the cream sauce beautifully. My brother-in-law, who loves spicy food, requests this version every time he comes over.
Serving & Storage Suggestions
This crowd-pleasing crispy green bean casserole with fried shallots is incredibly versatile when it comes to serving. Here is how to make the most of it, whether you are hosting a formal dinner party or a casual potluck.
Serving Temperature and Presentation: Serve this casserole hot, straight from the oven. The contrast between the hot, creamy interior and the crispy shallot topping is what makes it so addictive. For presentation, I like to sprinkle a few extra fried shallots and a pinch of fresh thyme leaves on top right before bringing it to the table. It adds a restaurant-quality touch that makes people think you spent hours on it. Serve it in the baking dish for a rustic look, or transfer it to a warmed serving bowl for something more elegant.
What to Serve Alongside: This casserole is the perfect side dish for roasted turkey, baked ham, or a juicy prime rib. It also pairs beautifully with roasted chicken or pan-seared pork chops. For a vegetarian spread, serve it alongside a hearty lentil loaf or stuffed acorn squash. If you are hosting a potluck, it travels well—just keep it covered with foil to retain heat. I have also served it with a simple green salad and crusty bread for a lighter meal.
Storage Instructions: Store leftovers in an airtight container in the refrigerator for up to 4 days. The shallots will lose their crunch over time, but the flavor will still be amazing. To reheat, place the casserole in a 350°F oven for 10-15 minutes until heated through. You can also microwave individual portions, but the texture will be softer. If you want to restore some crunch, sprinkle a few fresh fried shallots on top after reheating.
Freezing Tips: This casserole freezes beautifully, but with one caveat—do not add the fried shallots before freezing. Assemble the casserole up to the baking step, cover tightly with plastic wrap and foil, and freeze for up to 3 months. When you are ready to serve, thaw it overnight in the refrigerator, then bake as directed. Add the fried shallots during the last 10 minutes of baking. I always make a double batch during the holidays and freeze one for a busy weeknight. It is a lifesaver.
How Flavors Develop: Honestly, this casserole tastes even better the next day. The flavors meld together overnight, and the sauce becomes even more luxurious. I have been known to make it a day ahead on purpose, just so the flavors have time to deepen. If you are doing this, follow the freezing instructions above but refrigerate instead of freeze. Add the shallots just before serving.
Nutritional Information & Benefits
While this crowd-pleasing crispy green bean casserole with fried shallots is definitely an indulgent dish, it does have some nutritional highlights worth mentioning. Here is a breakdown of what you are getting in each serving:
| Nutrient | Amount Per Serving (1/6 of recipe) |
|---|---|
| Calories | 285 |
| Total Fat | 18g |
| Saturated Fat | 8g |
| Cholesterol | 40mg |
| Sodium | 520mg |
| Total Carbohydrates | 24g |
| Dietary Fiber | 4g |
| Sugars | 8g |
| Protein | 7g |
| Vitamin A | 15% DV |
| Vitamin C | 25% DV |
| Calcium | 12% DV |
| Iron | 8% DV |
Health Benefits of Key Ingredients: Green beans are packed with vitamin C, vitamin K, and fiber, which support immune function and digestive health. Mushrooms provide B vitamins and selenium, an antioxidant that helps protect your cells. Shallots contain compounds that may help reduce inflammation and support heart health. While this dish is not exactly health food, it is made from whole, real ingredients—no processed soups or artificial additives. I feel good serving it to my family because I know exactly what went into it.
Dietary Considerations: This recipe can be made gluten-free and dairy-free with the substitutions mentioned earlier. It is naturally nut-free and egg-free. For a lower-fat version, use 2% milk instead of whole milk and cream, and reduce the butter to 2 tablespoons total. The sauce will be thinner, but still tasty. If you are watching your sodium, use low-sodium broth and go easy on the added salt. The Parmesan cheese adds a fair amount of salt, so you can skip it if needed.
My Personal Wellness Perspective: I believe in balance. This casserole is not something I eat every day, but it is absolutely worth the indulgence on special occasions. Using fresh ingredients and making everything from scratch means I am in control of what goes into my body. And honestly, the joy of sharing this dish with loved ones is good for the soul, which counts for something too.
Conclusion
This crowd-pleasing crispy green bean casserole with fried shallots is everything a holiday side dish should be—comforting, impressive, and absolutely delicious. After chasing that memory from the little restaurant in the antique mall, I can honestly say this version surpasses the original. The creamy homemade sauce, the crisp-tender green beans, and those incredible fried shallots that shatter with every bite—it is a combination that never gets old.
I encourage you to make this recipe your own. Add bacon if that is your thing, throw in some extra mushrooms, or spice it up with a pinch of cayenne. The beauty of cooking from scratch is that you can tailor it to your taste. And when you serve it at your next dinner party or holiday gathering, watch the faces of your guests light up. That is the moment that makes all the effort worth it.
I would love to hear how this turns out for you! Leave a comment below and let me know if your family loved it as much as mine does. Share your own twist on the recipe, or tag me in your photos on social media. Honestly, there is nothing that makes me happier than seeing someone else fall in love with a dish I created. So go ahead, give it a try, and make some memories around the table. You have got this!
Frequently Asked Questions
Can I use frozen green beans instead of fresh?
Yes, you can use frozen green beans in a pinch, but the texture will be softer than fresh. If using frozen, thaw them completely and pat them dry before adding to the sauce. Skip the blanching step since frozen beans are already blanched. The casserole will still taste great, but it will not have that same crisp-tender bite.
How do I keep the fried shallots crispy?
The key to keeping fried shallots crispy is to store them in an airtight container at room temperature, not in the refrigerator. Refrigeration introduces moisture that softens them. If you are making them ahead, let them cool completely before storing. You can also re-crisp them in a 300°F oven for 3-5 minutes if they have softened.
Can I make this casserole ahead of time?
Absolutely! Assemble the casserole completely (without the fried shallots) up to 24 hours in advance. Cover and refrigerate. When ready to bake, add about 10 minutes to the baking time since you are starting from cold. Add the fried shallots during the last 10 minutes of baking. This is my preferred method for holiday hosting.
What can I use instead of heavy cream?
If you do not have heavy cream, you can use all whole milk or a combination of milk and cream cheese. For a dairy-free option, full-fat coconut cream works beautifully. The sauce will be slightly less rich, but still delicious. You can also use half-and-half for a middle ground.
How do I prevent the casserole from being watery?
Watery casserole usually comes from two things: not draining the blanched green beans well enough, or not cooking the sauce long enough. Make sure to pat the green beans dry after blanching, and cook the sauce until it is noticeably thick before adding the beans. Letting the casserole rest for 5 minutes after baking also helps the sauce set up properly.
Pin This Recipe!

Best Crispy Green Bean Casserole with Fried Shallots
This crowd-pleasing crispy green bean casserole with fried shallots is the ultimate comfort food—creamy, crunchy, and absolutely delicious. Fresh green beans, a homemade cream sauce, and golden fried shallots make this the best version you’ll ever taste.
- Prep Time: 20 minutes
- Cook Time: 25 minutes
- Total Time: 45 minutes
- Yield: 6 servings 1x
- Category: Side Dish
- Cuisine: American
Ingredients
- 2 pounds fresh green beans, trimmed and halved
- 4 tablespoons unsalted butter, divided
- 8 ounces cremini mushrooms, sliced
- 1 medium yellow onion, finely diced
- 3 garlic cloves, minced
- 3 tablespoons all-purpose flour
- 1½ cups whole milk
- ½ cup heavy cream
- ½ cup low-sodium chicken or vegetable broth
- 1 teaspoon fresh thyme, chopped
- Salt and black pepper to taste
- ¼ cup grated Parmesan cheese (optional)
- 4–5 large shallots, thinly sliced into rings
- ½ cup all-purpose flour (for shallots)
- ½ teaspoon salt (for shallots)
- 2 cups vegetable or canola oil (for frying)
Instructions
- Bring a large pot of salted water to a rolling boil. Trim the ends off the green beans and cut them in half crosswise. Boil for exactly 3 minutes until bright green and tender-crisp. Immediately transfer to a bowl of ice water to stop cooking. Drain well and set aside.
- Peel and slice shallots into thin rings (about ⅛-inch thick). Toss with ½ cup flour and ½ teaspoon salt until evenly coated. Heat oil in a small saucepan to 350°F. Fry shallots in small batches for 2-3 minutes until golden brown. Drain on paper towels and sprinkle with extra salt while warm.
- In a large skillet, melt 2 tablespoons butter over medium-high heat. Add sliced mushrooms and cook without stirring for 3 minutes, then stir and cook 2-3 minutes more until browned. Add diced onion and cook 4-5 minutes until softened. Add minced garlic and cook 30 seconds until fragrant.
- Reduce heat to medium. Add remaining 2 tablespoons butter. Once melted, sprinkle 3 tablespoons flour over vegetables and stir constantly for 1-2 minutes. Slowly pour in milk, heavy cream, and broth while whisking continuously. Cook 3-4 minutes until sauce thickens and coats the back of a spoon. Stir in thyme, salt, pepper, and Parmesan if using. Adjust seasoning.
- Preheat oven to 375°F. Add blanched green beans to the skillet with sauce and stir until well coated. Pour into a greased 9×9-inch baking dish and spread evenly. Bake uncovered for 20 minutes until hot and bubbly.
- Remove from oven and sprinkle fried shallots generously over the top. Return to oven and bake 5-7 minutes more until shallots are heated through and extra crispy. Let rest 5 minutes before serving.
Notes
Blanching the green beans is essential for color and texture. Do not add fried shallots until the final baking step to keep them crispy. For best results, fry shallots in small batches at a steady 350°F. The casserole can be assembled a day ahead (without shallots) and refrigerated; add 10 minutes to baking time. Leftovers keep in the refrigerator for up to 4 days.
Nutrition
- Serving Size: 1/6 of recipe
- Calories: 285
- Sugar: 8
- Sodium: 520
- Fat: 18
- Saturated Fat: 8
- Carbohydrates: 24
- Fiber: 4
- Protein: 7
Keywords: green bean casserole, fried shallots, Thanksgiving side dish, holiday recipe, comfort food, crispy green beans, homemade casserole


