My neighbor, Mrs. Gable, watched me trying to wrestle a sheet of plastic wrap over a bowl of store-bought dip at our building’s holiday potluck. She didn’t say anything at first. Then she just reached over, gently took the roll from my hands, and said, “Honey, you’re overthinking it. The secret isn’t wrapping it tighter—it’s knowing what to put on the board in the first place.” She nodded toward my sad little bowl. “And that dip? We’re fixing that next week.”
That was three winters ago. The next Tuesday, she showed up at my door with a cutting board the size of a small coffee table, loaded with things I never would have thought to put together—roasted grapes, a block of cheese that cost less than my usual fancy wedge, and these little crackers I’d seen in the bulk bin and passed over. “Feeds my whole crew for under thirty bucks,” she said, shrugging like it was nothing. It wasn’t nothing, honestly. It was a revelation.
I’ve made this easy holiday charcuterie board at least a dozen times since then, for everything from Christmas Eve to New Year’s Day brunch. Maybe you’ve been there—standing in the fancy grocery aisle, looking at a pre-made board that costs more than the turkey, wondering if there’s a smarter way. There is. This one is designed to feed a crowd on a budget without looking like you cut corners. I mean, you won’t cut corners. You’ll just cut the cost.
Let me tell you, the first time I made it for my family, my brother-in-law—who can be a tough crowd—actually paused mid-conversation and said, “Wait, you made this?” That moment, right there, is why this recipe stayed with me. It’s not about showing off. It’s about realizing that feeding people well doesn’t have to mean spending a lot.
Why You’ll Love This Recipe
This easy holiday charcuterie board has become my go-to for every gathering, and I think it’ll become yours too. After testing it for three different holiday seasons (and one very memorable Super Bowl party), I can tell you it works every single time. Here’s why this version stands out from the rest:
- Quick & Easy: You can assemble this whole board in under 20 minutes. No cooking, no complicated steps—just smart arranging. Perfect for those chaotic holiday afternoons when you’re juggling a dozen things at once.
- Simple Ingredients: Everything on this board comes from regular grocery stores. No need to hunt down specialty shops or spend extra on imported goods. I promise, your local store has everything you need.
- Perfect for Holiday Gatherings: Whether it’s Christmas, Hanukkah, New Year’s Eve, or just a cozy family movie night, this board fits right in. It’s the kind of thing that makes people feel special without making you feel stressed.
- Crowd-Pleaser: I’ve served this at parties where half the guests were picky eaters and the other half were foodies. Everyone found something they loved. The kids go for the grapes and crackers, the adults hover around the cheese and salami.
- Unbelievably Delicious: The combination of sweet, savory, salty, and tangy hits every note. That roasted grape trick Mrs. Gable taught me? It’s a game-changer. People will ask you what you did to make them taste so good.
What makes this recipe different is the strategy behind it. Instead of loading up on expensive artisan cheeses and prosciutto, you focus on a few high-impact, affordable ingredients that look and taste impressive. The trick is in the arrangement—grouping things by color and texture so the board looks abundant even when you’re working with a modest budget. It’s comfort food reimagined for sharing, and it always gets rave reviews.
What Ingredients You Will Need
This easy holiday charcuterie board uses simple, budget-friendly ingredients to create a spread that feels generous and thoughtful. The key is choosing items that offer variety without breaking the bank. Here’s what you’ll need:
For the Cheese
- Sharp cheddar cheese, 8 ounces (225g), sliced or cubed – I recommend Tillamook or a store brand block you cut yourself (it’s cheaper than pre-sliced)
- Cream cheese, 8 ounces (225g), softened – This is your budget-friendly spreadable cheese. Look for blocks on sale around the holidays
- Gouda or Edam, 6 ounces (170g), sliced – These are often cheaper than brie and have a lovely mild flavor that pleases most palates
For the Meats
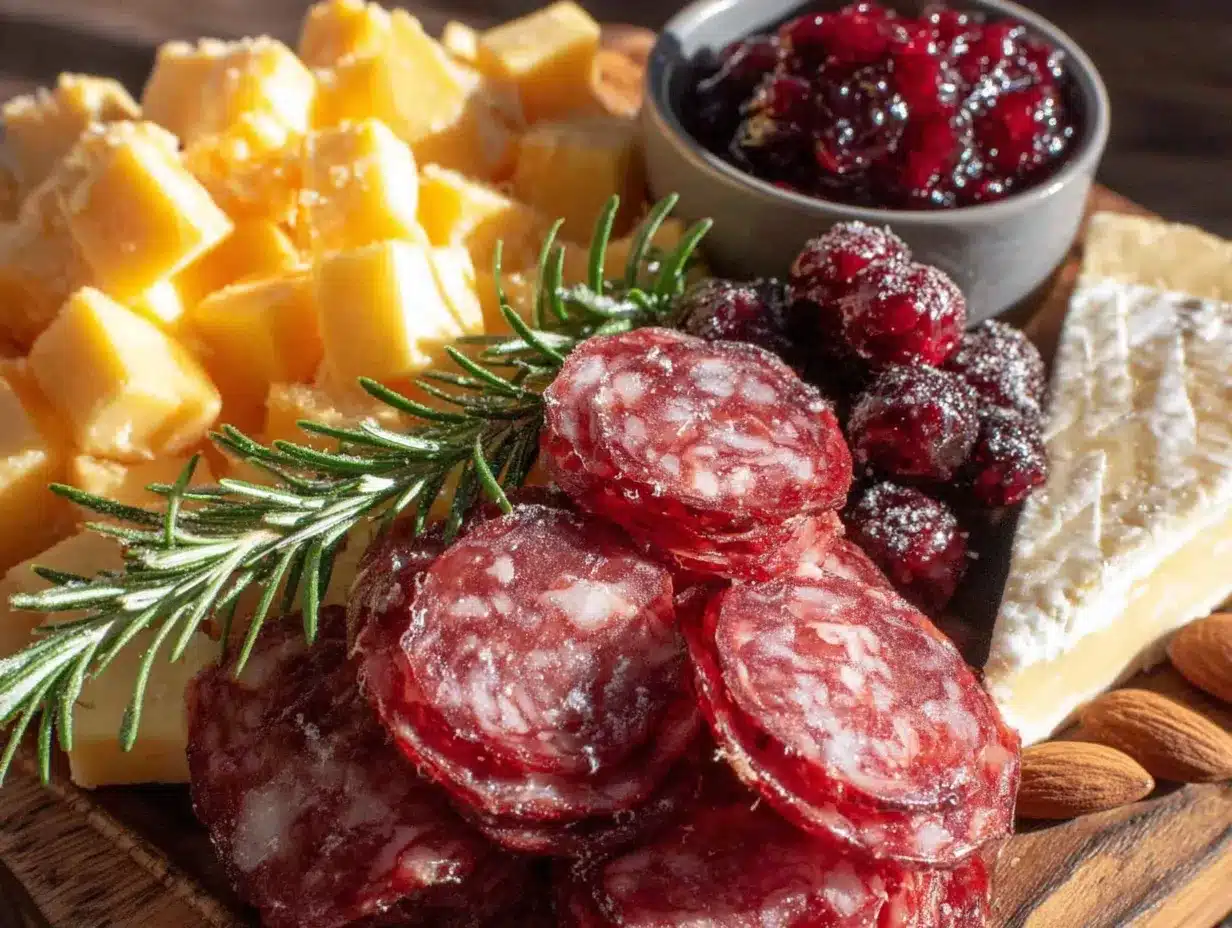
- Salami, 8 ounces (225g), thinly sliced – Genoa salami is usually affordable and widely available. Ask the deli counter to slice it thick enough to fold
- Pepperoni, 6 ounces (170g), sliced – A budget-friendly alternative to prosciutto that still adds that savory, salty punch
For the Fruits and Vegetables
- Red seedless grapes, 1 cup (150g) – Roast half of them for a sweet, caramelized surprise
- Green apples, 2 medium, sliced – Toss with a little lemon juice to keep them from browning
- Dried apricots or figs, ½ cup (80g) – These add a chewy sweetness and are usually cheaper than fresh figs
- Cherry tomatoes, 1 cup (150g) – Adds color and a burst of acidity
For the Crunch and Spread
- Assorted crackers, 8 ounces (225g) – Look for a mixed box with different shapes and flavors. Store brands work great
- Baguette, 1 small, sliced and lightly toasted – This stretches the board and adds a rustic feel
- Mixed nuts, 1 cup (140g) – Almonds, cashews, or a holiday mix. Buy from the bulk bin to save money
- Olives, ½ cup (75g) – Kalamata or green, pitted. A small jar goes a long way
For the Sweet Touch
- Honey, 3 tablespoons (60ml) – A drizzle over the cream cheese creates an instant fancy spread
- Dark chocolate, 3 ounces (85g), broken into pieces – A few squares add a touch of indulgence without the cost of a full dessert
I like to use store-brand items for most of these ingredients. Honestly, no one notices the difference once everything is arranged beautifully. The roasted grapes are my secret weapon—they look fancy but cost the same as regular grapes.
Equipment Needed
You don’t need a lot of special gear to make this easy holiday charcuterie board. Here’s what I use:
- Large cutting board or serving platter – A wooden board looks best, but a large ceramic platter or even a clean baking sheet works. I’ve used a rimmed baking sheet in a pinch, and it worked fine
- Small bowls – For olives, honey, and nuts. Ramekins or small custard cups work perfectly
- Cheese knife – A small, sharp knife for slicing. A paring knife works if you don’t have a dedicated cheese knife
- Baking sheet – For roasting the grapes. Any rimmed pan will do
- Parchment paper – For easy cleanup and to keep the board looking neat
- Tongs or small spoons – For serving. I use a set of inexpensive bamboo tongs I found at a dollar store
If you don’t have a large board, you can use two smaller platters placed side by side. I’ve done this when hosting larger crowds, and it actually looks more abundant. Just make sure you have enough space to arrange everything without crowding. A crowded board is harder to eat from and doesn’t look as inviting.
Preparation Method
Follow these steps to create your easy holiday charcuterie board. I’ve included time estimates and sensory cues so you know exactly what to look for at each stage.
- Roast the grapes (10 minutes)
Preheat your oven to 400°F (200°C). Wash and dry ½ cup of the grapes, then spread them on a baking sheet lined with parchment paper. Roast for 15-20 minutes, until they start to wrinkle and release their juices. You’ll know they’re done when they look slightly deflated and smell sweet and jammy. Let them cool while you prepare the rest of the board. - Prepare the cream cheese spread (2 minutes)
Take the cream cheese out of the fridge about 20 minutes before you start so it softens. Place it in a small bowl and drizzle with 2 tablespoons of honey. Sprinkle a pinch of flaky salt on top if you have it. This creates a sweet-salty spread that costs pennies but tastes like a fancy cheese shop find. - Slice the cheeses and fruits (5 minutes)
Cut the cheddar into thin slices or small cubes—about ½-inch (1 cm) pieces. Slice the Gouda into thin triangles. Core the apples and slice them into thin wedges, then toss with a squeeze of lemon juice to prevent browning. If the dried apricots are large, cut them in half. - Arrange the board (10 minutes)
Place the honey-drizzled cream cheese bowl and the olive bowl on the board first—these anchor the layout. Then arrange the sliced cheeses in small clusters around the board. Fold the salami and pepperoni slices into quarters or roll them into little cylinders and place them near the cheeses. Add the roasted grapes, fresh grapes, apple slices, and cherry tomatoes in small groups, spreading them out so there’s color in every section. Fill the gaps with crackers, baguette slices, and nuts. Tuck the dark chocolate pieces in a few spots for surprise bites. - Add final touches (2 minutes)
Drizzle a little extra honey over the Gouda if you like. Sprinkle the roasted grapes with a pinch of fresh thyme or rosemary (optional, but lovely). Check the board from all angles and adjust anything that looks sparse. You want every section to have a mix of colors and textures. - Serve immediately or chill briefly (optional)
This board is best served at room temperature. If you need to make it ahead, cover it loosely with plastic wrap and refrigerate for up to 2 hours. Take it out 20 minutes before serving to let the cheeses soften. Do not refrigerate the roasted grapes—they lose their magic texture.
A note on timing: If you’re serving this at a party, set the board out about 15 minutes before guests arrive. It gives you a moment to breathe and lets the board look its best. I’ve learned this the hard way—rushing the final arrangement always shows.
Cooking Tips & Techniques
Over the years, I’ve made plenty of mistakes with charcuterie boards. Here’s what I’ve learned so you don’t have to repeat my errors.
Don’t overthink the arrangement. The first time I made this easy holiday charcuterie board, I spent 30 minutes arranging everything in perfect rows. By the time guests arrived, the crackers had gone soft and the cheese looked sweaty. Now I just group things naturally—clusters of color, not straight lines. It looks more inviting and takes half the time.
Balance textures and flavors. A good board has something creamy (the honey cream cheese), something crunchy (the nuts and crackers), something chewy (the dried fruit), and something fresh (the grapes and apples). If you’re missing one of these elements, the board feels incomplete. I once forgot the nuts, and everyone kept asking where the crunch was.
Use the “rule of three” for each section. When placing items, group them in odd numbers—three slices of cheese here, five crackers there. It sounds silly, but it looks more natural and abundant. Even numbers can look stiff and planned.
Keep a small bowl for discarded items. Put out a tiny bowl for olive pits and toothpicks. It’s a small touch, but it keeps the board tidy and your guests comfortable. I learned this after watching someone awkwardly hold an olive pit for five minutes.
Toast the baguette slices lightly. If you have time, brush the baguette slices with olive oil and toast them at 350°F (175°C) for 5-7 minutes. They hold up better to spreads and don’t get soggy. I skip this step when I’m in a hurry, but it makes a noticeable difference.
Prep everything before you start assembling. Have all your ingredients washed, sliced, and ready to go. Once you start arranging, you don’t want to stop and wash grapes. I’ve done that mid-assembly, and it throws off the whole flow.
Variations & Adaptations
This easy holiday charcuterie board is endlessly adaptable. Here are some variations I’ve tried and loved:
- Vegetarian version: Skip the salami and pepperoni. Add more cheese—maybe a soft goat cheese or a smoked gouda—and extra roasted vegetables like bell peppers or zucchini. Roasted chickpeas make a great crunchy replacement for the meat.
- Gluten-free option: Use gluten-free crackers and skip the baguette. Add extra nuts and some vegetable chips for crunch. Most cheeses and meats are naturally gluten-free, so this is an easy swap.
- Seasonal twist: In summer, swap the apples for sliced peaches or nectarines, and use fresh figs instead of dried. In fall, add roasted pumpkin seeds and sliced pears. The basic structure stays the same, but the flavors change with the season.
- Spicy kick: Add a small bowl of jalapeño jelly or a drizzle of hot honey over the cream cheese. It pairs surprisingly well with the cheddar and salami. I tried this last New Year’s Eve, and it was a hit.
- Budget-stretcher version: If you’re feeding a really big crowd, add more crackers and bread. They’re the cheapest way to stretch the board. A bowl of popcorn on the side also works—it’s unexpected and fun.
I once made a version with all Trader Joe’s ingredients for under $25, and it fed eight people with leftovers. The key is staying flexible and using what’s on sale. Don’t be afraid to swap based on what looks good at the store.
Serving & Storage Suggestions
This easy holiday charcuterie board is best served at room temperature, so plan to take it out of the fridge about 20 minutes before guests arrive. The flavors really open up when the cheese isn’t cold.
Presentation tips: Place the board in the center of your table or counter where people can gather around it. Put out small plates and napkins, plus a few toothpicks for easy grabbing. I like to add a sprig of fresh rosemary or a few small pine branches around the edges for a festive touch—it costs nothing and looks beautiful.
Complementary dishes: This board pairs beautifully with a simple salad of mixed greens and a light vinaigrette. For drinks, a sparkling water with lemon or a bottle of affordable red wine works perfectly. If you’re serving it as a full meal, add some soup or a crusty loaf of bread on the side.
Storage instructions: If you have leftovers (which is rare in my house), separate the components into airtight containers. The cheeses and meats will keep in the fridge for 3-4 days. The roasted grapes are best eaten within 24 hours—they lose their texture after that. The crackers and nuts should be stored in a separate container to keep them crisp.
Reheating tips: The only thing you might want to reheat is the baguette slices. Pop them in a 350°F (175°C) oven for 3-4 minutes to crisp them back up. Everything else is best enjoyed cold or at room temperature.
Flavor development: Honestly, the flavors actually improve after a few hours at room temperature. The cheeses soften, the honey soaks into the cream cheese, and everything melds together. If you’re making this for a party, assembling it an hour ahead is ideal.
Nutritional Information & Benefits
This easy holiday charcuterie board is designed to be shared, so nutritional values will vary based on how much each person eats. Here’s an approximate per-serving breakdown (based on 8 servings):
- Calories: 380-450 per serving
- Protein: 18-22g
- Fat: 24-30g
- Carbohydrates: 28-35g
- Fiber: 4-6g
- Sugar: 12-16g (mostly from fruit and honey)
Health benefits: This board includes a variety of nutrients. The cheese provides calcium and protein, the nuts offer healthy fats and vitamin E, and the grapes and apples contribute antioxidants and fiber. The dark chocolate adds a small dose of magnesium and flavonoids. It’s not a health food, but it’s a balanced way to snack.
Dietary considerations: This recipe contains dairy and gluten. For a dairy-free version, use vegan cheese and skip the cream cheese. For a gluten-free version, use gluten-free crackers. The meats are naturally gluten-free and low-carb, making this a good option for keto-friendly gatherings.
Potential allergens: This board contains dairy (cheese), nuts, and gluten (crackers and bread). If you’re serving guests with allergies, label the components clearly and consider offering a small separate board with allergen-free options.
I personally love that this board lets everyone eat at their own pace. It’s not a plated meal—it’s a grazing experience. People can take what they like and leave what they don’t, which makes it one of the most inclusive ways to feed a crowd.
Conclusion
This easy holiday charcuterie board has become a staple in my home because it solves a real problem: how to feed a crowd on a budget without looking like you’re cutting corners. It’s the recipe that Mrs. Gable handed me three winters ago, and I’ve been grateful for it ever since.
I hope you’ll try it and make it your own. Swap in your favorite cheeses, use whatever fruit looks good at the store, and don’t stress about making it perfect. The beauty of a charcuterie board is that it’s forgiving—every arrangement is unique, and every board tells a story.
If you make this recipe, I’d love to hear how it turned out. Leave a comment below and let me know what variations you tried. Did you add something unexpected? Did your guests have a favorite part? Share your photos and tag me—I love seeing your creations. And if you’re looking for more easy holiday recipes, check out my creamy holiday spinach dip and no-bake holiday cookies for a complete party spread.
Happy hosting, friends. You’ve got this.
Frequently Asked Questions
How far in advance can I make this charcuterie board?
You can assemble the board up to 2 hours ahead and keep it covered in the fridge. Just take it out 20 minutes before serving. The roasted grapes should be added right before serving for the best texture.
Can I make this board for a smaller crowd?
Absolutely. Just halve the ingredients and use a smaller board or platter. The same principles apply—just scale everything down proportionally.
What’s the best way to keep crackers from getting soft?
Store the crackers separately until just before serving. Add them to the board in the last 10 minutes before guests arrive. If you’re making the board ahead, keep the crackers in a sealed bag and add them at the last minute.
Can I use different fruits?
Yes, feel free to swap based on what’s in season. Sliced pears, fresh figs, strawberries, or even mango work beautifully. Just avoid very watery fruits like watermelon that can make the board soggy.
How do I estimate how much to buy per person?
For a gathering where this is the main appetizer, plan on about 3-4 ounces (85-115g) of cheese and 2-3 ounces (55-85g) of meat per person. For crackers and bread, about 2 ounces (55g) per person is a good starting point. It’s always better to have a little extra than to run out.
Pin This Recipe!
Easy Holiday Charcuterie Board: Best Budget Crowd-Pleaser
This easy holiday charcuterie board is designed to feed a crowd on a budget without looking like you cut corners. It’s the perfect appetizer for Christmas, Hanukkah, New Year’s Eve, or any holiday gathering, featuring roasted grapes, budget-friendly cheeses, and a honey cream cheese spread.
- Prep Time: 20 minutes
- Cook Time: 20 minutes
- Total Time: 40 minutes
- Yield: 8 servings
- Category: Appetizer
- Cuisine: American
Ingredients
- Sharp cheddar cheese, 8 ounces (225g), sliced or cubed
- Cream cheese, 8 ounces (225g), softened
- Gouda or Edam, 6 ounces (170g), sliced
- Salami, 8 ounces (225g), thinly sliced
- Pepperoni, 6 ounces (170g), sliced
- Red seedless grapes, 1 cup (150g)
- Green apples, 2 medium, sliced
- Dried apricots or figs, ½ cup (80g)
- Cherry tomatoes, 1 cup (150g)
- Assorted crackers, 8 ounces (225g)
- Baguette, 1 small, sliced and lightly toasted
- Mixed nuts, 1 cup (140g)
- Olives, ½ cup (75g)
- Honey, 3 tablespoons (60ml)
- Dark chocolate, 3 ounces (85g), broken into pieces
Instructions
- Roast the grapes: Preheat oven to 400°F (200°C). Wash and dry ½ cup of the grapes, spread on a parchment-lined baking sheet. Roast for 15-20 minutes until wrinkled and jammy. Let cool.
- Prepare the cream cheese spread: Take cream cheese out of fridge 20 minutes before starting to soften. Place in a small bowl and drizzle with 2 tablespoons of honey. Sprinkle with flaky salt if desired.
- Slice the cheeses and fruits: Cut cheddar into thin slices or ½-inch cubes. Slice Gouda into thin triangles. Core and slice apples into thin wedges, toss with lemon juice. Halve large dried apricots.
- Arrange the board: Place honey-drizzled cream cheese bowl and olive bowl on board first. Arrange sliced cheeses in small clusters. Fold salami and pepperoni into quarters or roll into cylinders near cheeses. Add roasted grapes, fresh grapes, apple slices, and cherry tomatoes in small groups. Fill gaps with crackers, baguette slices, and nuts. Tuck dark chocolate pieces in a few spots.
- Add final touches: Drizzle extra honey over Gouda if desired. Sprinkle roasted grapes with fresh thyme or rosemary (optional). Check board from all angles and adjust for color and texture balance.
- Serve immediately or chill briefly: Best served at room temperature. If making ahead, cover loosely with plastic wrap and refrigerate up to 2 hours. Remove 20 minutes before serving. Do not refrigerate roasted grapes.
Notes
The roasted grapes are a secret weapon—they look fancy but cost the same as regular grapes. For best results, don’t overthink the arrangement; group items naturally in clusters of color. Use the ‘rule of three’ for each section (odd numbers look more natural). Store crackers separately until just before serving to keep them crisp. The board can be assembled up to 2 hours ahead and refrigerated, but add roasted grapes right before serving.
Nutrition
- Serving Size: 1 serving (approxima
- Calories: 415
- Sugar: 14
- Sodium: 780
- Fat: 27
- Saturated Fat: 12
- Carbohydrates: 31
- Fiber: 5
- Protein: 20
Keywords: holiday charcuterie board, budget charcuterie, easy appetizer, Christmas appetizer, party platter, cheese board, grazing board


