That cool, creamy bite—lightly sweet with a hint of tang—right as the sun starts dipping and fireworks begin their crackling dance overhead. It still takes me back to a particular Fourth of July evening on my childhood porch, where the smell of sizzling burgers mixed with the sharp sweetness of fresh berries. This fresh red white and blue no-bake cheesecake trifle wasn’t just dessert; it was the quiet signal that the night had officially turned festive. The way those layers of fluffy cheesecake, juicy berries, and crumbly crust came together felt like a little celebration in every spoonful. Honestly, there’s something about assembling this trifle that slows time down, letting you soak in the chatter, laughter, and that unmistakable hum of summer nights shared with people you love.
I remember feeling a gentle pride in how simple it was to put together—no oven fuss, just fresh ingredients and a little patience while it set. It became my go-to recipe, the one I brought to every picnic or barbecue, especially when I wanted to impress without stress. The fresh red white and blue no-bake cheesecake trifle stuck around in my kitchen repertoire because it offers more than flavor; it’s a kind of comfort, a sweet reminder that sometimes the best desserts are the ones you can build with your hands, layer by vibrant layer. It’s not flashy, but it’s honest, and honestly, that’s what makes it so trust-worthy.
So, if you’re looking for a dessert that tastes like celebration and feels like home, this no-bake cheesecake trifle quietly promises just that—a little slice of summer, any time you want it.
Why You’ll Love This Fresh Red White and Blue No-Bake Cheesecake Trifle Recipe
Coming from someone who’s tested countless desserts in a kitchen that’s seen its share of wins and (oh, the fails), this no-bake cheesecake trifle is a gem worth holding onto. It’s not just about looking good on the table with those patriotic layers; it’s about how effortlessly it comes together and delivers on flavor every single time.
- Quick & Easy: This recipe comes together in under 30 minutes, perfect for those last-minute summer gatherings or when you just want a fuss-free dessert.
- Simple Ingredients: You likely already have most of the ingredients in your pantry or fridge—cream cheese, whipped topping, fresh berries, and a buttery crust.
- Perfect for Patriotic Occasions: Whether it’s Independence Day, Memorial Day, or just a sunny weekend, this trifle fits the bill with its festive red, white, and blue colors.
- Crowd-Pleaser: Kids and adults alike go crazy for the creamy layers and juicy berries—plus, it’s light enough to enjoy even after a heavy meal.
- Unbelievably Delicious: The smooth cheesecake layer contrasted with the tangy berries and crunchy crust gives this trifle a delightful texture combo that keeps you coming back for more.
This isn’t just any no-bake cheesecake trifle—what sets it apart is the balance. The filling is whipped just right, not too dense, thanks to folding in the whipped topping, and the crust is buttery but not soggy, holding its own beneath the layers. Plus, the fresh berries are the star players, adding natural sweetness that feels like a little burst of sunshine with every bite. Honestly, it’s the kind of dessert that makes you close your eyes and savor the moment, a simple pleasure that feels special.
And if you’re into fuss-free entertaining, this recipe delivers without the stress, making you look like the hostess with the mostest—even if you’re just winging it. It’s dessert that brings people together, without you breaking a sweat.
What Ingredients You Will Need for Fresh Red White and Blue No-Bake Cheesecake Trifle
This recipe uses simple, wholesome ingredients to deliver bold flavor and satisfying texture without the fuss. Most of these are pantry staples or fresh market finds, and substitutions are easy if you want to switch things up.
- For the Cheesecake Layer:
- 8 oz (225g) cream cheese, softened (I like Philadelphia for its smoothness)
- 1 cup (240ml) heavy whipping cream, cold (for that perfect fluffy texture)
- ½ cup (100g) granulated sugar
- 1 tsp pure vanilla extract
- For the Crust Layer:
- 1 ½ cups (150g) graham cracker crumbs (you can swap for digestive biscuits if preferred)
- 5 tbsp (70g) unsalted butter, melted
- 2 tbsp (25g) granulated sugar (adds just a hint of sweetness)
- For the Fruit Layers:
- 1 ½ cups (225g) fresh strawberries, hulled and sliced
- 1 ½ cups (225g) fresh blueberries
- Optional: 1 cup (150g) fresh raspberries for extra tartness and color
- Optional Garnishes:
- Fresh mint leaves
- Extra whole berries
- White chocolate shavings or crushed nuts
Pro tip: Use fresh berries that are firm and ripe but not overly soft to avoid sogginess. If you’re out of fresh, frozen berries can work—just thaw and drain them well first. For a dairy-free version, swap cream cheese and whipping cream with coconut cream and a dairy-free cream cheese alternative. This fresh red white and blue no-bake cheesecake trifle is pretty forgiving that way.
Equipment Needed
- Mixing bowls (one large for whipping cream, one medium for cream cheese mixture)
- Electric mixer or stand mixer (hand-whisking is possible, but takes longer)
- Measuring cups and spoons for accuracy
- Spatula for folding
- 9×13 inch (23×33 cm) glass trifle dish or individual clear dessert cups to show off layers
- Knife and cutting board for slicing berries
If you don’t have a stand mixer, a handheld electric mixer works just as well—just make sure the cream is very cold before whipping. For budget-friendly options, use a sturdy glass bowl and a whisk, but expect a bit more elbow grease. Keeping your cream cheese at room temperature is key, so it blends smoothly without clumps—trust me, I’ve learned that the hard way!
Preparation Method for Fresh Red White and Blue No-Bake Cheesecake Trifle
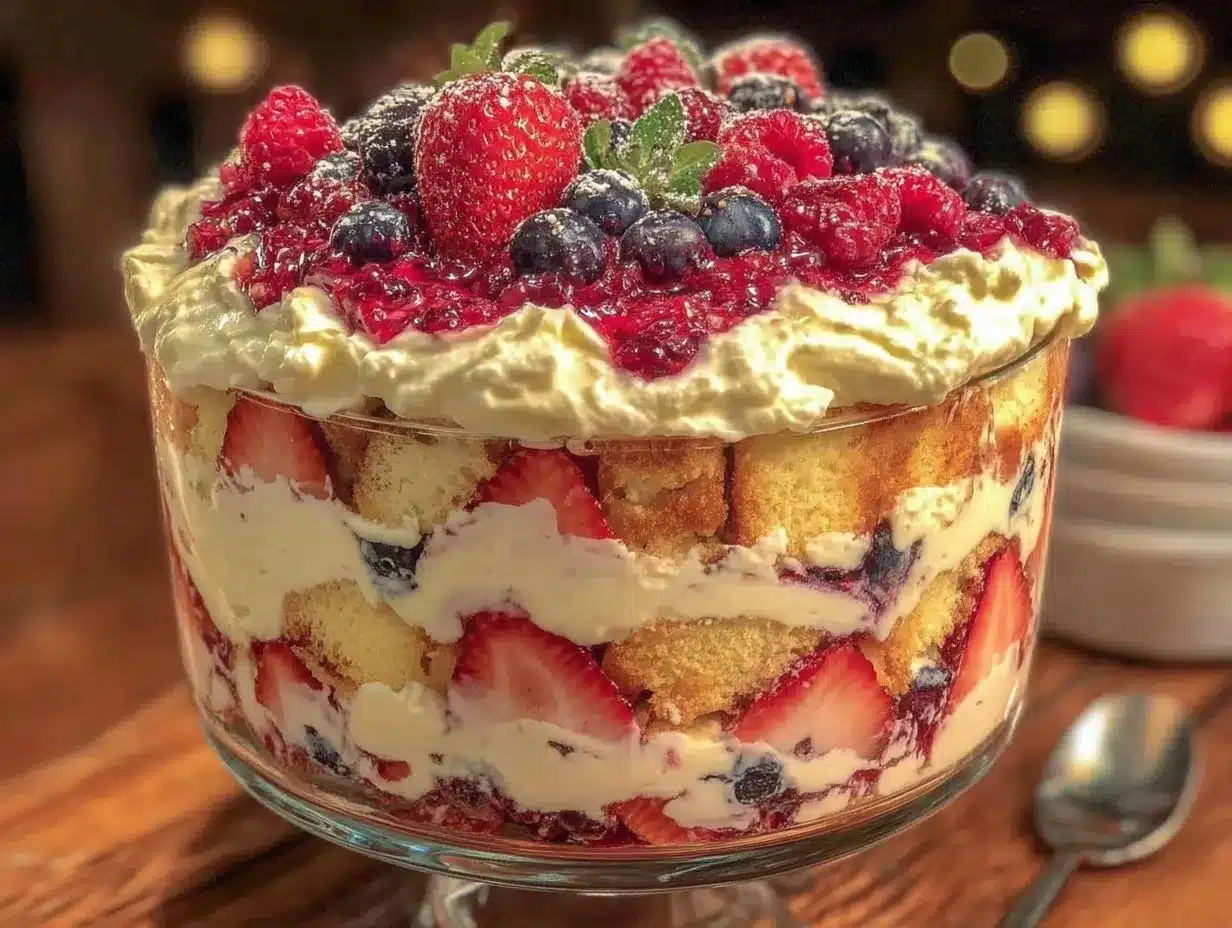
- Prepare the Crust: In a medium bowl, mix graham cracker crumbs, melted butter, and sugar until the mixture resembles wet sand. Press the crumb mixture evenly into the bottom of your trifle dish or divide between dessert cups. Chill in the fridge while you prepare the cheesecake layer. (About 5 minutes prep + chilling)
- Make the Cheesecake Filling: Beat the softened cream cheese with sugar and vanilla extract until smooth and creamy (about 2 minutes on medium speed). In a separate chilled bowl, whip the heavy cream until stiff peaks form. Gently fold the whipped cream into the cream cheese mixture in batches—this keeps the filling light and fluffy. (Approximately 8–10 minutes)
- Assemble the Trifle Layers: Start by spooning a generous layer of the cheesecake filling over the crust. Then add a layer of sliced strawberries, followed by more cheesecake filling. Next, scatter a layer of blueberries. Repeat layering until you reach the top of your dish, finishing with a few berries for garnish. (10–15 minutes)
- Chill: Cover the trifle with plastic wrap and refrigerate for at least 3 hours, preferably overnight. This allows the flavors to meld and the crust to soften slightly without going soggy.
- Serve: Just before serving, add fresh mint leaves or white chocolate shavings on top if desired. Use a large spoon to scoop out portions so you get all the layers in every bite.
Watch out: if your cream cheese isn’t softened enough, lumps will sneak in, so take a moment to let it rest at room temp. Also, folding the whipped cream gently is key—you want to keep all that air in for a light texture. When layering, don’t overload any single layer; balanced portions ensure every bite has that perfect red, white, and blue harmony. This is a great recipe to prep ahead—making it the day before helps the flavors blend beautifully.
Cooking Tips & Techniques
Here’s what I’ve learned after more than a few tries with this no-bake cheesecake trifle. The devil’s in the details, and a few simple tweaks make all the difference.
- Softening Cream Cheese: Let it sit out for about 30 minutes before mixing. Too cold and it clumps; too warm and it gets runny.
- Whipping Cream: Chill your bowl and beaters in the fridge for 15 minutes before whipping. Cold equipment helps the cream whip faster and hold better.
- Folding Technique: Use a rubber spatula to fold whipped cream into the cream cheese gently—fold from the bottom up to keep it airy.
- Preventing Soggy Crust: Press crust firmly and chill it before layering. If you want extra protection, brush a thin layer of melted chocolate or a quick spread of cream cheese over the crust before assembling.
- Berry Prep: Pat berries dry before layering to avoid excess moisture leaking into the trifle.
One time, I rushed the chilling step and ended up with a runny mess—lesson learned! Patience is your friend here. Also, this dessert lets you multitask well: you can prep the crust and filling while the grill is firing up outside, then assemble just before guests arrive. It’s perfect for busy summer days.
Variations & Adaptations
If you want to switch things up or cater to different dietary needs, this fresh red white and blue no-bake cheesecake trifle is a blank canvas ready for customization.
- Gluten-Free Option: Swap graham cracker crumbs with gluten-free graham or almond flour-based crumbs.
- Lower Sugar Version: Use a sugar substitute like erythritol or monk fruit sweetener in the cheesecake filling and crust.
- Seasonal Fruit Swap: In fall, swap berries for pomegranate seeds and apple slices for a festive twist.
- Dairy-Free Version: Use vegan cream cheese and coconut whipped topping. The flavor is slightly different but still delicious.
- Layering Twist: Add a thin layer of lemon curd or strawberry jam between layers for an extra zing.
Personally, I once tried adding a layer of crushed roasted pomegranate seeds from a salad recipe I adore. It added a surprising crunch and tart pop that played nicely with the creamy cheesecake. Feel free to get creative here; this trifle is forgiving and welcoming to improvisation.
Serving & Storage Suggestions
This no-bake cheesecake trifle is best served chilled, straight from the fridge. The cold temperature keeps the cheesecake layer firm but creamy, while the berries stay fresh and vibrant.
For presentation, serve it in a clear trifle bowl or individual glass cups to show off those patriotic layers—trust me, it’s as much a feast for the eyes as the palate. Pair it with a light sparkling drink or iced tea for a refreshing summer vibe. It’s also a great companion to dishes like grilled chicken or even a fresh avocado and smoked salmon crostini, which adds a touch of savory balance to your spread.
Leftovers store well in the refrigerator for up to 3 days. Just cover tightly with plastic wrap to prevent the trifle from absorbing other fridge smells. When reheating, honestly, it’s best enjoyed cold, but you can let it sit at room temperature for 10 minutes before serving to soften the cheesecake layers slightly. Over time, the flavors meld beautifully, making it taste even more homemade the next day.
Nutritional Information & Benefits
This fresh red white and blue no-bake cheesecake trifle is a moderate indulgence, offering a balance of creamy richness and fresh fruit goodness. Per serving (assuming 8 servings), it roughly contains:
| Calories | 320 |
|---|---|
| Fat | 22g |
| Carbohydrates | 28g |
| Protein | 4g |
| Sugar | 18g |
Key ingredients like cream cheese and heavy cream provide calcium and vitamin A, while fresh berries are packed with antioxidants, fiber, and vitamin C. The berries bring a fresh, natural sweetness that helps cut the richness of the cheesecake filling, making each bite feel lighter. For those watching carbs, swapping sugar with a low-carb sweetener can keep the indulgence in check without sacrificing flavor.
Allergy note: This recipe contains dairy and gluten (from the graham crackers), so substitutions are recommended for those with sensitivities.
Conclusion
In the end, this fresh red white and blue no-bake cheesecake trifle is more than just a dessert; it’s a little ritual of summer, a simple joy that’s easy to make and impossible not to love. It’s flexible, forgiving, and always a hit—making it a staple in my recipe box for every patriotic celebration or anytime I want to bring a bit of brightness to the table. Give it a go, tweak it to your liking, and maybe it’ll become your go-to summer dessert too.
From my kitchen to yours, here’s to sweet moments layered with good company and fresh flavors. If you try this recipe, I’d love to hear how you made it your own!
Frequently Asked Questions About Fresh Red White and Blue No-Bake Cheesecake Trifle
- Can I make this trifle ahead of time? Absolutely! It tastes even better after chilling overnight, allowing layers to set and flavors to meld.
- What can I substitute for graham cracker crumbs? Digestive biscuits, gluten-free cracker crumbs, or even crushed pretzels for a salty twist.
- How long should I whip the cream? Whip until stiff peaks form—this usually takes 3-5 minutes with an electric mixer on medium-high speed.
- Can I use frozen berries? Yes, but thaw and drain them well to avoid extra moisture making the trifle soggy.
- Is there a vegan version of this trifle? You can use vegan cream cheese, coconut whipped cream, and a plant-based crust to create a dairy-free alternative.
Pin This Recipe!

Fresh Red White and Blue No-Bake Cheesecake Trifle
A light, creamy no-bake cheesecake trifle layered with fresh strawberries, blueberries, and a buttery graham cracker crust, perfect for patriotic celebrations and easy summer entertaining.
- Prep Time: 20 minutes
- Cook Time: 0 minutes
- Total Time: 3 hours 20 minutes
- Yield: 8 servings 1x
- Category: Dessert
- Cuisine: American
Ingredients
- 8 oz cream cheese, softened
- 1 cup heavy whipping cream, cold
- ½ cup granulated sugar
- 1 tsp pure vanilla extract
- 1 ½ cups graham cracker crumbs
- 5 tbsp unsalted butter, melted
- 2 tbsp granulated sugar
- 1 ½ cups fresh strawberries, hulled and sliced
- 1 ½ cups fresh blueberries
- Optional: 1 cup fresh raspberries
- Optional garnishes: fresh mint leaves, extra whole berries, white chocolate shavings or crushed nuts
Instructions
- Prepare the crust by mixing graham cracker crumbs, melted butter, and sugar until the mixture resembles wet sand. Press evenly into the bottom of a trifle dish or dessert cups. Chill in the fridge.
- Beat softened cream cheese with sugar and vanilla extract until smooth. In a separate chilled bowl, whip heavy cream until stiff peaks form. Gently fold whipped cream into cream cheese mixture to keep it light and fluffy.
- Assemble the trifle by layering cheesecake filling, sliced strawberries, more cheesecake filling, and blueberries. Repeat layers until the dish is filled, finishing with berries on top.
- Cover the trifle with plastic wrap and refrigerate for at least 3 hours or overnight to allow flavors to meld and crust to soften slightly.
- Before serving, garnish with fresh mint leaves or white chocolate shavings if desired. Serve chilled.
Notes
Let cream cheese soften at room temperature for about 30 minutes before mixing to avoid lumps. Chill bowl and beaters before whipping cream for better volume. Fold whipped cream gently into cream cheese mixture to keep it airy. Press crust firmly and chill before layering to prevent sogginess. Pat berries dry before layering to avoid excess moisture. The trifle tastes better after chilling overnight. For dairy-free or gluten-free versions, substitute ingredients accordingly.
Nutrition
- Serving Size: 1 serving (approx. 1
- Calories: 320
- Sugar: 18
- Fat: 22
- Carbohydrates: 28
- Protein: 4
Keywords: no-bake cheesecake, trifle, patriotic dessert, Fourth of July dessert, easy summer dessert, red white and blue dessert


