Standing in my kitchen, a bag of crushed chocolate cookies in one hand and a can of pumpkin puree in the other, I was trying to figure out what to bring to my daughter’s fall classroom party. The sign-up sheet said “dessert for 24 kids” and I had exactly zero time and a rapidly melting stick of butter. That’s when this idea hit me — something that looked like a little potted plant but tasted like a creamy, dreamy pumpkin pie. No oven required, no fancy piping skills needed, just a few ingredients and a whole lot of fun.
These Easy No-Bake Pumpkin Dirt Cups became an instant legend in our house. I mean, who knew that layering spiced pumpkin pudding with crushed chocolate cookies could look this cute and taste this good? The kids at the party went absolutely wild for them, and I had parents asking for the recipe before the last cup was even licked clean. Honestly, I’ve made them three times since that week alone — they’re just that simple and satisfying.
There’s something about eating dessert out of a clear cup that makes it more fun, don’t you think? And when that dessert tastes like a pumpkin cheesecake cloud topped with crunchy chocolate “dirt,” you’ve got a winner on your hands. These little cups are my go-to fall dessert now, and I have a feeling they’re about to become yours too.
Why You’ll Love This Recipe
Let me tell you why these dirt cups are going to be your new favorite fall treat. I’ve tested this recipe at least a dozen times — tweaking the spice levels, trying different pudding bases, even testing it with homemade whipped cream versus store-bought. And every single time, the result is the same: pure, unapologetic deliciousness.
- No Oven Required : This is a true no-bake dessert. Perfect for those warm fall days when you don’t want to heat up the kitchen, or when you’re short on time and need something impressive fast.
- Simple Ingredients : You probably already have most of these in your pantry. Pumpkin puree, cream cheese, whipped topping, and chocolate cookies — that’s basically it. No fancy grocery store runs necessary.
- Perfect for Fall Gatherings : Whether it’s a Halloween party, Thanksgiving dinner, or just a cozy night in, these dirt cups fit right in. They’re kid-friendly, adult-approved, and they look adorable on a dessert table.
- Make-Ahead Magic : You can prep these a day or two in advance. The flavors actually get better as they sit, making them perfect for stress-free entertaining.
- Unbelievably Delicious : The creamy pumpkin filling with that subtle spice, paired with the crunch of chocolate cookie crumbs — it’s a texture and flavor combination that just works. Close-your-eyes-and-savor-it good.
What makes this recipe different from all the other pumpkin desserts out there? It’s the texture. The filling is light and airy, almost mousse-like, thanks to the whipped cream and cream cheese. It’s not dense or heavy like a traditional pumpkin pie. And the chocolate cookie “dirt” on top? It adds this satisfying crunch that makes every bite interesting. This isn’t just another pumpkin recipe — it’s the pumpkin recipe you’ll actually want to make on repeat.
What Ingredients You Will Need
This recipe uses simple, wholesome ingredients to create a dessert that tastes like it took hours of work. Here’s everything you’ll need to make these adorable pumpkin dirt cups.
For the Pumpkin Filling:
- 1 can (15 oz) pumpkin puree (not pumpkin pie filling — make sure it’s 100% pure pumpkin)
- 8 oz cream cheese, softened to room temperature (this is important for a smooth texture)
- 1 cup powdered sugar
- 1 teaspoon vanilla extract
- 1 teaspoon pumpkin pie spice (or make your own with cinnamon, nutmeg, ginger, and cloves)
- 1/2 teaspoon ground cinnamon
- 1/4 teaspoon salt (trust me, it balances the sweetness)
- 1 cup cold heavy whipping cream (or use 2 cups thawed whipped topping like Cool Whip for an even easier version)
For the Dirt Layer:
- 2 cups chocolate sandwich cookies, crushed (like Oreos — about 20 cookies)
- 2 tablespoons melted butter (helps the crumbs stick together a bit)
For Garnish (optional but fun):
- Gummy worms (classic dirt cup move!)
- Small pumpkin candies or candy corn
- Fresh mint leaves (to look like little plant stems)
I recommend using full-fat cream cheese for the creamiest filling. If you use reduced-fat, the texture won’t be as luscious. For the pumpkin puree, Libby’s is my go-to brand — it’s consistently thick and not watery, which makes a big difference in the final texture.
If you’re dairy-free, you can use dairy-free cream cheese and coconut cream whipped topping. The flavor will be slightly different but still delicious. And for a lower-sugar version, use powdered monk fruit sweetener instead of powdered sugar — just keep in mind the texture might be slightly grainier.
Equipment Needed
You don’t need much for this recipe, which is one of the reasons I love it. Here’s what you’ll need:
- Electric mixer (handheld or stand mixer) — you can technically whisk by hand, but your arm will thank you for using a mixer
- Large mixing bowls — one for the filling, one for crushing cookies
- Food processor or zip-top bag and rolling pin — for crushing the cookies into fine crumbs
- Small clear cups or glasses — 8 to 10 cups, depending on size. I use 6-ounce cups for perfect portions. Clear plastic cups let you see the beautiful layers!
- Spatula — for scraping every last bit of that creamy filling
- Measuring cups and spoons
If you don’t have a food processor, no worries at all. Just put the cookies in a zip-top bag and go to town with a rolling pin. It’s actually kind of therapeutic — great stress relief after a long day! And if you don’t have clear cups, small mason jars or even ramekins work beautifully. I’ve used shot glasses for mini versions at parties, and they were a huge hit.
Preparation Method
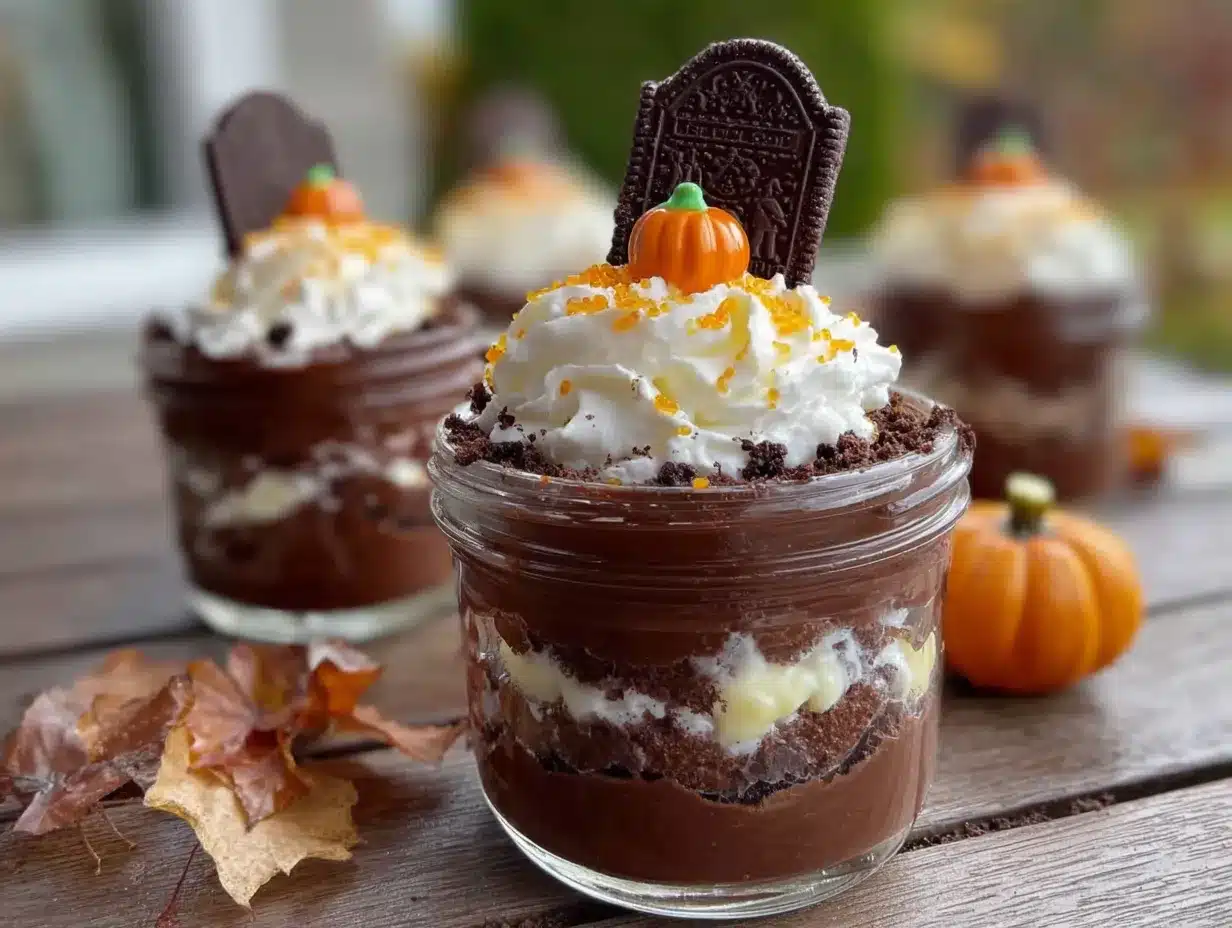
Alright, let’s get to the fun part. Here’s how to make these Easy No-Bake Pumpkin Dirt Cups step by step.
Step 1: Make the Cookie Dirt
Start by crushing your chocolate sandwich cookies. If you’re using a food processor, pulse them until they’re fine crumbs. If you’re using the bag method, put the cookies in a zip-top bag and smash them with a rolling pin until you have a mix of fine crumbs and some slightly bigger pieces (that texture is nice). Transfer the crumbs to a small bowl and stir in the melted butter. Set this aside — it’s your “dirt.”
Step 2: Whip the Cream
In a large mixing bowl, pour in the cold heavy whipping cream. Using your electric mixer, beat the cream on medium-high speed until stiff peaks form. This takes about 3-4 minutes. You’ll know it’s ready when you lift the beaters and the cream holds its shape without drooping. Be careful not to over-whip, or you’ll end up with butter! Set this bowl aside for a moment.
Step 3: Make the Pumpkin Base
In another large bowl, beat the softened cream cheese with your electric mixer until it’s smooth and creamy — about 2 minutes. Scrape down the sides of the bowl with your spatula. Add the powdered sugar, vanilla extract, pumpkin pie spice, cinnamon, and salt. Beat again until everything is well combined and smooth. Now add the pumpkin puree and beat until the mixture is uniform and silky. It should be a beautiful orange color and smell amazing.
Step 4: Fold Everything Together
Here’s where you need to be gentle. Take about a third of your whipped cream and fold it into the pumpkin mixture using your spatula. Fold gently — cut through the center, scoop from the bottom, and turn the bowl. This lightens the mixture. Add the rest of the whipped cream and continue folding until no white streaks remain. The final mixture should be light, airy, and mousse-like. Don’t overmix, or you’ll deflate all that lovely air.
Step 5: Layer the Cups
Now comes the fun part. Grab your clear cups and start layering. Spoon about 2 tablespoons of the cookie crumbs into the bottom of each cup. Press them down lightly with the back of the spoon. Next, add a generous layer of the pumpkin filling — about 1/4 cup per cup. Smooth it out. Add another thin layer of cookie crumbs, then more pumpkin filling. End with a final layer of cookie crumbs on top. This gives you that “dirt” look.
Step 6: Chill and Set
Cover the cups loosely with plastic wrap or their lids and refrigerate for at least 2 hours. This is crucial — the filling needs time to firm up and the flavors need time to meld. If you can wait overnight, even better. The texture becomes almost cheesecake-like after a good chill.
Step 7: Garnish and Serve
Right before serving, add your garnishes. Stick a gummy worm into the “dirt” so it looks like it’s crawling out. Add a tiny pumpkin candy or a mint leaf to make it look like a little plant. Serve cold and watch everyone smile.
Cooking Tips & Techniques
I’ve made these dirt cups more times than I can count, and I’ve learned a few things along the way. Let me share some tips so yours turn out perfect every time.
Room temperature cream cheese is non-negotiable. I learned this the hard way when I tried to rush things with cold cream cheese. It won’t blend smoothly, and you’ll end up with lumpy filling. Leave it on the counter for at least 30 minutes before starting. If you’re in a hurry, cut it into small cubes and let it sit for 15 minutes.
Don’t skip the salt. I know it sounds weird in a sweet dessert, but that tiny pinch of salt balances the sweetness and makes the pumpkin flavor pop. You won’t taste the salt itself — it just makes everything taste more like itself.
For the best texture, use cold heavy cream. If your cream isn’t cold enough, it won’t whip properly. Pop the bowl and beaters in the freezer for 10 minutes before whipping — it makes a big difference.
Crush those cookies the right way. You want a mix of fine crumbs and small chunks. If everything is too fine, it’ll feel like sand. If the pieces are too big, they won’t stick together. Aim for the texture of actual garden soil — varied but mostly fine.
Let them chill long enough. I know it’s tempting to dig in right away, but trust me on this. The filling needs at least 2 hours to set properly. If you eat them too soon, the texture will be more like pudding than mousse. Overnight chilling gives you that perfect, sliceable consistency.
One time I forgot to add the butter to the cookie crumbs, and they just slid right off the filling when I tried to serve them. That butter is important — it helps the crumbs clump together just enough to stay put.
Variations & Adaptations
One of the best things about this recipe is how easy it is to customize. Here are some of my favorite variations.
Vegan Pumpkin Dirt Cups: Use dairy-free cream cheese (like Kite Hill or Tofutti), coconut cream whipped topping (like CocoWhip), and vegan chocolate sandwich cookies. The flavor is slightly different but still creamy and delicious.
Gluten-Free Version: Simply use gluten-free chocolate sandwich cookies. There are several brands available now that taste just like the original. Everything else in the recipe is naturally gluten-free.
Pumpkin Cheesecake Dirt Cups: Add an extra 4 ounces of cream cheese and reduce the whipped cream by 1/2 cup. This gives you a denser, more cheesecake-like filling that’s absolutely decadent.
Spiced-Up Version: Add 1/4 teaspoon of ground ginger and a pinch of cloves to the pumpkin mixture. You can also add a tablespoon of bourbon or dark rum for an adult version — just reduce the heavy cream slightly to compensate.
Mini Dirt Cups for Parties: Use shot glasses or small 2-ounce cups for bite-sized desserts. They’re perfect for Halloween parties or Thanksgiving appetizers. Just reduce the layering amounts and chill time to about 1 hour.
I once made a version with crushed gingersnap cookies instead of chocolate ones, and it was incredible. The spicy ginger paired beautifully with the pumpkin. Give it a try if you’re feeling adventurous!
Serving & Storage Suggestions
These dirt cups are best served cold, straight from the fridge. The contrast between the cool, creamy filling and the crunchy cookie dirt is what makes them so addictive.
For presentation, clear cups are definitely the way to go. The layers look beautiful and guests love seeing the “dirt” on top. If you’re serving these at a party, you can arrange them on a platter with some fake leaves or mini pumpkins around them for a festive look.
These pair wonderfully with a warm drink. A hot cup of coffee, a pumpkin spice latte (try my easy homemade pumpkin spice syrup for the perfect fall latte), or even a glass of cold milk — they all work beautifully. If you’re serving these after a big meal, they’re light enough to not weigh you down but satisfying enough to feel like a real treat.
Storage: Keep the dirt cups covered in the refrigerator for up to 4 days. The texture is best within the first 2 days, but they’ll still be delicious on day 3 or 4. Just note that the cookie crumbs will soften over time, so if you want that crunch, add a fresh layer of crumbs right before serving.
Freezing: You can freeze these for up to 2 months. Make them in freezer-safe cups, cover tightly, and thaw in the refrigerator overnight before serving. The texture will be slightly softer after freezing, but they’re still wonderful.
One thing I love about these is that the flavors actually develop and deepen after a day in the fridge. The spices meld with the cream cheese and pumpkin, and everything becomes more harmonious. So don’t be afraid to make them a day ahead!
Nutritional Information & Benefits
Here’s the estimated nutritional breakdown for one dirt cup (based on 8 servings):
- Calories: 320
- Fat: 22g
- Carbohydrates: 30g
- Protein: 5g
- Fiber: 3g
- Sugar: 20g
Now, I’m not saying these are health food — they’re a dessert, after all. But pumpkin does bring some nice benefits to the table. It’s packed with vitamin A (great for your eyes and immune system), fiber, and antioxidants. The cream cheese adds calcium and protein, and the spices — cinnamon, nutmeg, ginger — are all anti-inflammatory.
For a lighter version, you can use reduced-fat cream cheese and sugar-free pudding mix. The texture won’t be as rich, but it’ll still be tasty. And if you’re watching your sugar intake, this is definitely a treat-you-worthy dessert rather than an everyday thing.
These dirt cups are vegetarian and can easily be made gluten-free or vegan with simple swaps. They do contain dairy and gluten (from the cookies), so keep that in mind if you’re serving to anyone with allergies.
Conclusion
These Easy No-Bake Pumpkin Dirt Cups are everything I want in a fall dessert — they’re simple, gorgeous, and absolutely delicious. No oven required, no complicated techniques, just honest-to-goodness comfort food that makes people smile. I love that I can whip them up in 20 minutes and then forget about them until it’s time to serve. And honestly? Watching someone take their first bite and seeing that surprised look of “wait, this is amazing” never gets old.
I hope you give these a try. Make them for your next Halloween party, your Thanksgiving dinner, or just a random Tuesday when you need a little pumpkin pick-me-up. And if you do, I’d love to hear about it! Leave a comment below and tell me how they turned out. Did you add any fun garnishes? Did the kids go crazy for them? Share your photos and tag me — I love seeing your creations.
And if you’re looking for more easy, no-bake desserts, you might enjoy my easy no-bake strawberry cheesecake icebox cake or these no-bake dark chocolate peanut butter protein balls. Happy fall baking — or should I say, happy fall no-baking!
Frequently Asked Questions
Can I use pumpkin pie filling instead of pumpkin puree?
No, please don’t! Pumpkin pie filling already has sugar and spices added, which will throw off the sweetness and spice balance of this recipe. Stick with 100% pure pumpkin puree for the best results.
How far in advance can I make these dirt cups?
You can make them up to 2 days in advance. The flavors actually get better as they sit! Just wait to add the garnishes until right before serving so they stay fresh and cute.
Can I use Cool Whip instead of whipping cream?
Absolutely! If you want to make this even easier, use 2 cups of thawed whipped topping (like Cool Whip) instead of whipping your own cream. Just fold it into the pumpkin mixture the same way you would with homemade whipped cream.
My filling turned out runny. What went wrong?
This usually happens if the cream cheese wasn’t softened enough or if the pumpkin puree was too watery. Make sure your cream cheese is at room temperature, and if your pumpkin puree looks watery, pat it dry with a paper towel before using it.
Can I make these in a large dish instead of individual cups?
Yes! Layer everything in a 9×9 inch dish or a trifle bowl. Just increase the chilling time to at least 4 hours so it sets properly. Scoop it out like a parfait when serving.
Pin This Recipe!

Easy No-Bake Pumpkin Dirt Cups: The Best Fall Dessert
These Easy No-Bake Pumpkin Dirt Cups are a fun and delicious fall dessert made with a creamy pumpkin mousse and crushed chocolate cookie ‘dirt’. No oven required, perfect for parties and make-ahead entertaining.
- Prep Time: 20 minutes
- Cook Time: 0 minutes
- Total Time: 2 hours 20 minutes (includes chilling)
- Yield: 8 servings 1x
- Category: Dessert
- Cuisine: American
Ingredients
- 1 can (15 oz) pumpkin puree (not pumpkin pie filling)
- 8 oz cream cheese, softened to room temperature
- 1 cup powdered sugar
- 1 teaspoon vanilla extract
- 1 teaspoon pumpkin pie spice
- 1/2 teaspoon ground cinnamon
- 1/4 teaspoon salt
- 1 cup cold heavy whipping cream (or 2 cups thawed whipped topping like Cool Whip)
- 2 cups chocolate sandwich cookies, crushed (about 20 cookies, like Oreos)
- 2 tablespoons melted butter
- Gummy worms (optional, for garnish)
- Small pumpkin candies or candy corn (optional, for garnish)
- Fresh mint leaves (optional, for garnish)
Instructions
- Crush the chocolate sandwich cookies into fine crumbs using a food processor or a zip-top bag and rolling pin. Transfer to a small bowl and stir in the melted butter. Set aside.
- In a large mixing bowl, beat the cold heavy whipping cream with an electric mixer on medium-high speed until stiff peaks form, about 3-4 minutes. Set aside.
- In another large bowl, beat the softened cream cheese until smooth and creamy, about 2 minutes. Add the powdered sugar, vanilla extract, pumpkin pie spice, cinnamon, and salt. Beat until well combined. Add the pumpkin puree and beat until smooth and silky.
- Gently fold about one-third of the whipped cream into the pumpkin mixture using a spatula. Fold gently until combined. Add the remaining whipped cream and continue folding until no white streaks remain. The mixture should be light and airy.
- Layer the cups: Spoon about 2 tablespoons of cookie crumbs into the bottom of each clear cup. Press down lightly. Add about 1/4 cup of the pumpkin filling. Repeat with another thin layer of cookie crumbs, then more pumpkin filling. End with a final layer of cookie crumbs on top.
- Cover the cups loosely with plastic wrap and refrigerate for at least 2 hours, or overnight for best texture.
- Before serving, garnish with gummy worms, pumpkin candies, or mint leaves as desired. Serve cold.
Notes
Room temperature cream cheese is essential for a smooth filling. Don’t skip the salt—it balances the sweetness. For best texture, use cold heavy cream and chill the cups for at least 2 hours. The cookie crumbs will soften over time; add a fresh layer before serving if desired. Can be made up to 2 days in advance. For a vegan version, use dairy-free cream cheese and coconut whipped topping. For gluten-free, use gluten-free chocolate sandwich cookies.
Nutrition
- Serving Size: 1 dirt cup
- Calories: 320
- Sugar: 20
- Sodium: 280
- Fat: 22
- Saturated Fat: 12
- Carbohydrates: 30
- Fiber: 3
- Protein: 5
Keywords: pumpkin dirt cups, no-bake pumpkin dessert, easy fall dessert, pumpkin mousse, Halloween dessert, Thanksgiving dessert, kid-friendly dessert


