The cream cheese was softening on the counter, and I was staring at a pile of jalapeños, wondering why every Halloween appetizer had to be a sweet thing. Don’t get me wrong—I love a good pumpkin cookie or a brown butter pumpkin snickerdoodle as much as the next person, but there was this gap at every party I went to. You know the one. The table is loaded with cupcakes and candy corn, and there’s nothing savory with a little kick to balance it out. I wanted something that looked like it belonged at a Halloween party but tasted like something I’d actually want to eat on a regular Tuesday night.
I had been playing around with stuffed jalapeños for years—my go-to for game days and summer cookouts. But for Halloween, they needed a costume. That’s when the idea hit me. What if the filling wasn’t just inside the pepper, but wrapped around it, too? A little cream cheese mummy wrapping, complete with tiny olive eyes. It was one of those ideas that felt silly until I actually tried it, and then I couldn’t believe I hadn’t thought of it sooner.
The first batch disappeared before I could even set them on the table. My husband, who usually picks around anything spicy, ate four before asking what was in them. That’s when I knew this wasn’t just a cute idea—it was a keeper. These mummy poppers have become my Halloween party signature, and honestly, they’re just as good for game day or any fall gathering where you want something that looks fun and tastes serious.
Why You’ll Love This Recipe
Let me tell you why these little guys have earned a permanent spot in my Halloween rotation. It’s not just because they’re adorable—though that definitely helps.
- Quick & Easy: You can have these assembled and in the oven in under 20 minutes. The actual hands-on time is maybe 15 minutes, which is perfect when you’re juggling party prep or last-minute costume fixes.
- Simple Ingredients: Cream cheese, jalapeños, bacon, and crescent roll dough. That’s it. No weird specialty items or expensive cheeses. You probably have most of this in your fridge right now.
- Perfect for Halloween Parties: These are the appetizer that makes people stop and take pictures before they eat. The mummy wrapping is instantly recognizable, and the olive eyes give them that perfect spooky-but-cute vibe.
- Crowd-Pleaser: I’ve served these at parties with kids and adults, and they disappear fast. The cream cheese tames the heat of the jalapeños, so even people who don’t usually go for spicy food end up grabbing one (or three).
- Unbelievably Delicious: The combination of crispy bacon, creamy cheese, and that slight jalapeño kick wrapped in golden, flaky dough is honestly addicting. It’s the kind of appetizer you keep going back for, telling yourself just one more.
What makes these different from every other stuffed jalapeño recipe out there is the crescent roll wrapping. Instead of just stuffing the pepper and wrapping it in bacon, you get this beautiful golden crust that gives you the mummy effect while adding a buttery, flaky texture. It’s not just another version—it’s the version that looks like you spent way more time on it than you actually did.
These poppers have that perfect balance of fun and flavor. They’re the kind of appetizer that makes people close their eyes after the first bite, then immediately reach for another. Perfect for impressing guests without the stress, or turning a simple Halloween snack into something memorable.
What Ingredients You Will Need
This recipe uses simple, everyday ingredients to create something that looks like it came from a themed bakery. Here’s what you’ll need:
- Fresh jalapeño peppers (12-15 medium-sized): Look for firm, evenly shaped peppers that will sit flat on the baking sheet. The size matters here—you want them big enough to stuff but not so huge that they’re unwieldy. I usually pick through the bin at the store to find ones that are roughly the same size so they cook evenly.
- 8 oz cream cheese, softened: Full-fat cream cheese gives the best texture and flavor. Make sure it’s at room temperature before you start mixing—cold cream cheese will be lumpy and hard to pipe. I leave mine out for about 30 minutes before I start.
- 1/2 cup shredded cheddar cheese: This adds a little sharpness and helps the filling hold its shape. I prefer sharp cheddar, but mild works fine too. Pre-shredded is okay in a pinch, but freshly shredded melts better.
- 1/4 cup cooked and crumbled bacon (about 4 strips): You can use bacon bits from the store, but honestly, freshly cooked bacon gives you better flavor and texture. I usually cook a few extra strips when I’m making breakfast and save them for this.
- 1 can (8 oz) refrigerated crescent roll dough: This is the secret to the mummy wrapping. The dough is already perforated into triangles, which makes cutting the strips easy. I’ve tried using puff pastry, but crescent rolls give you that perfect golden color and flaky texture without being too heavy.
- 1/4 cup melted butter: For brushing on the dough before baking. It gives the poppers that gorgeous golden-brown color and adds a little richness.
- Garlic powder, onion powder, salt, and pepper: Just a pinch of each for seasoning the cream cheese mixture. Don’t go overboard—you want the flavors to complement, not overpower.
- 12-15 black olive slices (for the eyes): You need two small slices per popper for the mummy eyes. I use canned sliced black olives, but you can also slice your own from whole olives for a more custom look.
For the filling, I recommend using Philadelphia cream cheese for the smoothest texture. When it comes to the crescent rolls, Pillsbury is my go-to—they consistently bake up flaky and golden. If you’re looking for a gluten-free option, there are gluten-free crescent roll doughs available, though the texture will be slightly different.
One thing I’ve learned the hard way: don’t skip the step of cooking the bacon until it’s really crispy. Under-cooked bacon will release grease as the poppers bake, making the dough soggy instead of flaky. Trust me on this one.
Equipment Needed
You don’t need any fancy equipment for this recipe, which is part of why I love it. Here’s what you’ll need:
- Baking sheet: A standard half-sheet pan works perfectly. Line it with parchment paper or a silicone baking mat for easy cleanup.
- Small mixing bowl: For combining the cream cheese filling. Any medium-sized bowl will do.
- Hand mixer or spoon: A hand mixer makes the cream cheese filling silky smooth in about 30 seconds, but a sturdy spoon and some elbow grease work just fine.
- Sharp knife or kitchen shears: For cutting the crescent roll dough into strips. I prefer kitchen shears because they give you cleaner cuts without dragging through the dough.
- Pastry brush: For brushing the melted butter onto the dough strips. If you don’t have one, you can use a paper towel or even your fingers—just wash your hands first.
- Small piping bag or zip-top bag: For filling the jalapeños. A zip-top bag with the corner snipped off works perfectly and saves you from having to buy a piping bag.
- Cutting board: For prepping the jalapeños. Use one that’s easy to clean—jalapeño oils can linger.
- Kitchen gloves (optional but recommended): Handling jalapeños can leave your hands burning for hours. Gloves save you from that misery. I learned this the hard way after rubbing my eye mid-recipe.
If you don’t have a piping bag, don’t stress. A zip-top bag with a tiny corner snipped off works like a charm. Just don’t cut too big of an opening, or the filling will come out too fast and make a mess.
Preparation Method
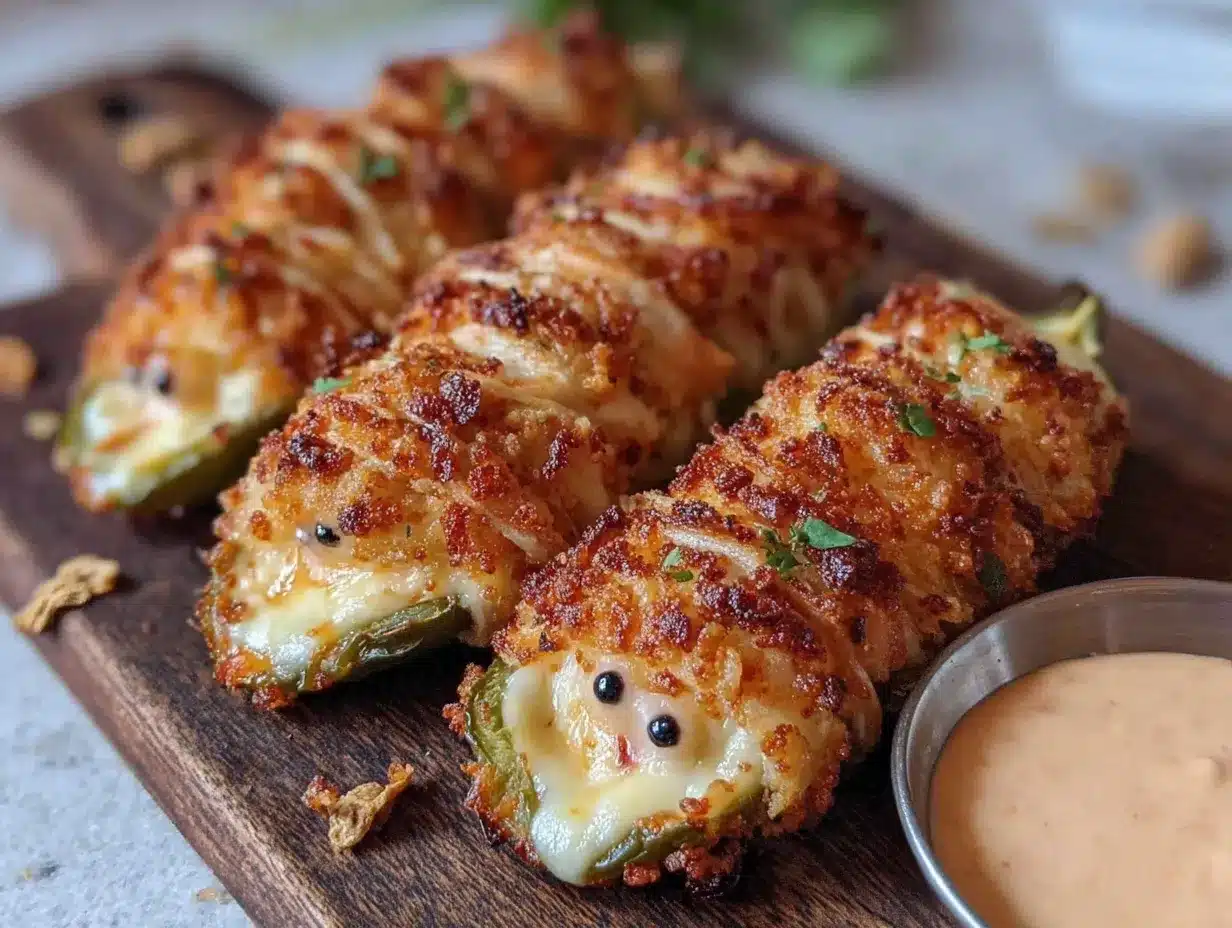
Alright, let’s get into the actual making of these little mummies. I’ve broken it down step by step so you don’t miss anything.
- Preheat your oven to 375°F (190°C). Line a baking sheet with parchment paper or a silicone mat. Getting the oven hot before you start is key—you want that dough to start baking immediately when it hits the pan.
- Prep the jalapeños. Put on your gloves (seriously, do this). Cut each jalapeño in half lengthwise, from the stem to the tip. Use a small spoon to scrape out the seeds and white membranes. If you like things spicy, leave a few seeds in. For milder poppers, get every bit of that membrane out—that’s where most of the heat lives. You should end up with 24-30 halves, depending on how many peppers you use.
- Make the filling. In your mixing bowl, combine the softened cream cheese, shredded cheddar, crumbled bacon, and a pinch each of garlic powder, onion powder, salt, and pepper. Mix until everything is well combined and smooth. If you’re using a hand mixer, about 30 seconds on medium speed is perfect. Taste the filling—it should be creamy, cheesy, and just slightly salty from the bacon.
- Fill the jalapeños. Transfer the cream cheese mixture to your piping bag or zip-top bag. Snip off a small corner—about 1/4 inch wide. Pipe the filling into each jalapeño half, mounding it slightly above the edge. You want enough filling that it looks generous, but not so much that it spills out when you wrap the dough. Set the filled peppers aside.
- Prepare the mummy wrappings. Open the can of crescent roll dough and unroll it onto a clean cutting board. Don’t separate the triangles along the perforations—you want the whole sheet. Using your knife or kitchen shears, cut the dough into thin strips about 1/4 to 1/2 inch wide. You’ll get about 12-15 strips from each can. The strips don’t have to be perfectly even—in fact, slightly uneven strips look more like authentic mummy wrappings.
- Wrap the mummies. Take one strip of dough and wrap it around a filled jalapeño half, starting at one end and working your way to the other. Leave a small gap near the top where the eyes will go. The dough should overlap slightly as you wrap, but don’t pull it too tight—the dough will puff up as it bakes. Press the ends gently to seal. Repeat with the remaining peppers and dough strips.
- Add the eyes. Place two olive slices in the gap you left near the top of each popper. Press them gently into the cream cheese filling so they stay put. This is where the mummy face really comes together, so take a moment to position them so they look like eyes peeking out from the wrappings.
- Brush with butter. Melt your 1/4 cup of butter in a small microwave-safe bowl (about 20 seconds on high). Using your pastry brush, gently brush the melted butter over each dough-wrapped popper. This is what gives them that beautiful golden color and helps the dough crisp up nicely.
- Bake. Arrange the mummy poppers on your prepared baking sheet, leaving about an inch of space between each one. Bake for 12-15 minutes, or until the dough is golden brown and the filling is hot and bubbly. The kitchen will start smelling incredible about halfway through.
- Cool and serve. Let the poppers cool on the baking sheet for about 5 minutes before transferring them to a serving platter. The filling will be extremely hot right out of the oven, so this resting time is important. Serve warm, and watch them disappear.
One thing I always do: as the poppers bake, the cream cheese might bubble out slightly around the edges. That’s totally fine—it adds to the messy, mummy-like look. If you want them neater, you can trim any overflow after they’ve cooled for a minute.
Cooking Tips & Techniques
After making these poppers more times than I can count, I’ve picked up a few tricks that make a real difference. Here’s what I’ve learned:
The jalapeño selection matters more than you think. Look for peppers that are relatively straight and have a flat side. They’ll sit better on the baking sheet and the dough will wrap more evenly. Curved peppers are harder to work with and tend to wobble.
Don’t overfill the peppers. I know it’s tempting to pack in as much cream cheese as possible, but too much filling will spill out during baking and make the dough soggy. You want the filling to be level with or just slightly above the edge of the pepper.
Work quickly with the crescent dough. Crescent roll dough gets sticky and hard to handle if it warms up too much. If you find the dough becoming difficult to work with, pop it in the fridge for 5 minutes to firm up. I learned this one the hard way after a particularly warm summer day left me with a sticky mess.
Space them out on the baking sheet. These poppers need room to breathe. If they’re too close together, the dough won’t crisp up properly and you’ll end up with soft, pale spots instead of golden-brown wrappings.
Make ahead option: You can assemble these poppers up to 24 hours in advance. Just arrange them on the baking sheet, cover tightly with plastic wrap, and refrigerate. Add the butter wash right before baking. If you’re baking them straight from the fridge, add about 2-3 minutes to the baking time.
One mistake I made early on was using too much butter. You don’t need to drench the dough—just a light brushing is enough to get that golden color. Too much butter can make the dough greasy instead of flaky.
Variations & Adaptations
This recipe is surprisingly flexible. Here are some variations I’ve tried and loved:
- Spicy Mummy Poppers: Add 1/4 teaspoon of cayenne pepper or a finely minced fresh serrano pepper to the cream cheese mixture. This gives the poppers a serious kick that spice lovers will appreciate. I made these for a Halloween party where everyone was doing hot sauce challenges, and they were a hit.
- Vegetarian Version: Skip the bacon and add 1/4 cup of finely chopped roasted red peppers or sun-dried tomatoes to the filling. You can also add a handful of fresh corn kernels or black beans for texture. The roasted red peppers give a nice sweetness that balances the jalapeño heat.
- Cheese Swap: Replace the cheddar with pepper jack for extra heat, or use Monterey Jack for a milder, creamier filling. I’ve also used crumbled feta for a tangier version that works surprisingly well with the jalapeño.
- Gluten-Free Adaptation: Use gluten-free crescent roll dough or substitute with thin slices of prosciutto or ham for the wrappings. The prosciutto version is actually amazing—it crisps up beautifully and adds a salty, savory element. Just note that the mummy look will be different without the dough.
- Air Fryer Method: Cook the poppers in an air fryer at 350°F (175°C) for 8-10 minutes, flipping halfway through. The air fryer gives you an extra-crispy exterior and cuts the cooking time in half. Just make sure not to overcrowd the basket.
I once made a batch with cream cheese mixed with leftover buffalo chicken dip filling, and honestly, it was incredible. The tangy buffalo flavor paired perfectly with the jalapeño and the creamy cheese. If you have leftover dip from game day, this is a great way to use it up.
Serving & Storage Suggestions
These poppers are best served warm, right out of the oven, when the dough is still flaky and the filling is hot and creamy. I like to arrange them on a platter with the mummy eyes facing up so everyone can see the faces. A sprinkle of fresh chopped chives or parsley on top adds a nice pop of color, though it’s totally optional.
For dipping, ranch dressing is the classic choice—the cool, creamy dressing balances the heat perfectly. Blue cheese dressing is another great option if you’re serving these alongside crispy buffalo cauliflower bites. I’ve also served them with a side of sour cream mixed with a little lime juice, which adds a bright, tangy element.
Storage: If you have leftovers (unlikely, but possible), store them in an airtight container in the refrigerator for up to 3 days. The dough will soften as they sit, so they won’t be as crispy as fresh-baked, but the flavor is still great.
Reheating: The best way to reheat these is in the oven or air fryer. Pop them in a 350°F (175°C) oven for 5-7 minutes, or in the air fryer at 350°F for 3-4 minutes. The microwave will make the dough soggy, so avoid it if you can. I’ve found that reheating in the air fryer gives you the closest texture to fresh-baked.
Freezing: You can freeze the assembled, unbaked poppers for up to 2 months. Arrange them on a baking sheet and freeze until solid, then transfer to a freezer bag. When you’re ready to bake, add the butter wash and bake from frozen, adding about 5 minutes to the baking time. This is a lifesaver for last-minute party prep.
The flavors actually develop nicely overnight. If you make these a day ahead and reheat them, the jalapeño heat mellows out a bit and the cream cheese filling gets even creamier. They’re not quite as pretty the second day, but they’re still delicious.
Nutritional Information & Benefits
Here’s the approximate nutritional breakdown for one mummy popper (based on 24 servings):
- Calories: 120-140 per popper
- Protein: 4-5 grams
- Fat: 9-10 grams
- Carbohydrates: 6-8 grams
- Fiber: 0.5 grams
- Sugar: 1-2 grams
- Sodium: 200-250 mg
While these are definitely a treat, they’re not without some redeeming qualities. Jalapeños are a good source of vitamin C and capsaicin, which has been linked to metabolism-boosting and anti-inflammatory effects. The cream cheese provides calcium and protein, and the bacon adds a little protein too. Plus, the crescent roll dough gives you quick energy—perfect for powering through a Halloween party.
If you’re watching your carb intake, you can use low-carb tortillas cut into strips instead of crescent roll dough. The texture will be different, but the mummy effect works just as well. For a dairy-free version, use vegan cream cheese and skip the cheddar—just add a little nutritional yeast for that cheesy flavor.
These poppers pair beautifully with a spiced apple cider margarita for a grown-up Halloween gathering. The sweetness of the margarita balances the heat from the jalapeños perfectly.
Conclusion
These Spooky Mummy-Stuffed Jalapeño Poppers are the Halloween appetizer you didn’t know you needed. They’re fun enough to make kids smile, tasty enough to satisfy adults, and easy enough that you can actually enjoy your own party instead of being stuck in the kitchen.
The best part? You can customize them however you want. Spicier, cheesier, wrapped in prosciutto instead of dough—they’re forgiving and flexible. I’ve made these for Halloween parties, game day gatherings, and even just a fun weeknight snack when I wanted something that felt special without a ton of effort.
I’d love to hear how yours turn out. Did you add extra spice? Try a different cheese? Wrap them in something unexpected? Drop a comment below and let me know—I’m always looking for new variations to try. And if you make these for your Halloween party, tag me in your photos. There’s nothing better than seeing a platter of little mummy faces staring up from a party table.
Go ahead, give these a try. Your taste buds—and your party guests—will thank you.
Frequently Asked Questions
Can I make these poppers less spicy?
Absolutely. The heat in jalapeños comes mostly from the seeds and white membranes. If you scrape those out thoroughly, you’ll remove most of the spice. You can also use mini sweet peppers instead of jalapeños for a completely mild version—they’re just as cute and work perfectly for kids.
Can I use pre-cooked bacon or bacon bits?
You can, but freshly cooked bacon gives you better flavor and texture. Pre-cooked bacon tends to be chewier and less crispy, which can make the filling a little greasy. If you’re short on time, though, it works in a pinch. Just make sure to crumble it finely.
How do I keep the dough from getting soggy?
The key is not to overfill the peppers and to make sure your bacon is crispy before mixing it into the filling. Also, don’t skip the step of brushing the dough with butter—it helps create a barrier that keeps the dough crisp. Baking on parchment paper instead of a bare pan also helps.
Can I make these in advance for a party?
Yes! You can assemble the poppers up to 24 hours ahead and keep them covered in the refrigerator. Add the butter wash right before baking. If you’re baking from cold, add 2-3 minutes to the baking time. You can also freeze the unbaked poppers for up to 2 months.
What can I serve with these poppers?
These pair well with almost any party food. I love serving them alongside loaded nacho dip or a crockpot buffalo chicken sliders for a full game day spread. For a Halloween party, they’re great with pumpkin-themed desserts and spooky cocktails.
Pin This Recipe!

Spooky Mummy-Stuffed Jalapeño Poppers: Easy Halloween Appetizer

These spooky mummy-stuffed jalapeño poppers are a savory Halloween appetizer that combines creamy cheese, crispy bacon, and a golden crescent roll wrapping. Perfect for parties, they’re quick to make and disappear fast.
- Prep Time: 15 minutes
- Cook Time: 15 minutes
- Total Time: 30 minutes
- Yield: 24-30 poppers 1x
- Category: Appetizer
- Cuisine: American
Ingredients
- 12–15 fresh jalapeño peppers, medium-sized
- 8 oz cream cheese, softened
- 1/2 cup shredded cheddar cheese
- 1/4 cup cooked and crumbled bacon (about 4 strips)
- 1 can (8 oz) refrigerated crescent roll dough
- 1/4 cup melted butter
- Garlic powder, onion powder, salt, and pepper (a pinch each)
- 12–15 black olive slices (for the eyes)
Instructions
- Preheat your oven to 375°F (190°C). Line a baking sheet with parchment paper or a silicone mat.
- Put on gloves. Cut each jalapeño in half lengthwise. Use a small spoon to scrape out the seeds and white membranes.
- In a mixing bowl, combine the softened cream cheese, shredded cheddar, crumbled bacon, and a pinch each of garlic powder, onion powder, salt, and pepper. Mix until smooth.
- Transfer the cream cheese mixture to a piping bag or zip-top bag. Snip off a small corner. Pipe the filling into each jalapeño half, mounding it slightly above the edge.
- Open the can of crescent roll dough and unroll it onto a clean cutting board. Cut the dough into thin strips about 1/4 to 1/2 inch wide.
- Take one strip of dough and wrap it around a filled jalapeño half, starting at one end and working to the other. Leave a small gap near the top for the eyes. Press the ends gently to seal. Repeat with remaining peppers and dough strips.
- Place two olive slices in the gap near the top of each popper for the eyes. Press them gently into the cream cheese filling.
- Melt the butter. Using a pastry brush, gently brush the melted butter over each dough-wrapped popper.
- Arrange the mummy poppers on the prepared baking sheet, leaving about an inch of space between each one. Bake for 12-15 minutes, or until the dough is golden brown and the filling is hot and bubbly.
- Let the poppers cool on the baking sheet for about 5 minutes before transferring to a serving platter. Serve warm.
Notes
For milder poppers, remove all seeds and membranes. For extra spice, leave some seeds in. You can assemble the poppers up to 24 hours in advance and refrigerate; add the butter wash right before baking. If baking from cold, add 2-3 minutes to the baking time. To freeze, assemble unbaked poppers, freeze on a baking sheet, then transfer to a freezer bag for up to 2 months. Bake from frozen, adding about 5 minutes to the baking time.
Nutrition
- Serving Size: 1 popper
- Calories: 130
- Sugar: 1.5
- Sodium: 225
- Fat: 9.5
- Saturated Fat: 5
- Carbohydrates: 7
- Fiber: 0.5
- Protein: 4.5
Keywords: Halloween appetizer, stuffed jalapeño poppers, mummy poppers, cream cheese jalapeños, easy party snack, savory Halloween recipe


