The company potluck was in six hours and I’d completely forgotten. Not just forgotten—I’d actively ignored the email, convinced it was next week. Everyone else would be bringing their grandmother’s famous casseroles or those fancy layered dips that take all day. I had a pack of chicken thighs in the fridge, some garlic that was starting to sprout, and a half-empty bag of Parmesan that I’d bought for a pasta night two months ago. Honestly, I stood in front of my open fridge for a solid minute, hoping something would magically transform into a dish worthy of a potluck table.
I’m not supposed to play favorites with recipes, but this one—well, let me tell you, it’s the underdog that won the whole show. I threw those thighs in a skillet, prayed to the kitchen gods, and crossed my fingers that the crispy garlic Parmesan crust would hold together. The sizzle when they hit the pan was the first good sign. The smell of garlic and butter filling my tiny apartment was the second. By the time I walked into that potluck with my foil-covered dish, I was still half-convinced I’d be taking home leftovers.
Spoiler alert: I didn’t. A coworker named Diane actually asked for the recipe before I’d even set the dish down. Three people came back for seconds. One guy—I still don’t know his name—stood by the table eating straight from the pan. And the best part? I almost didn’t make them. Maybe you’ve been there, staring at your pantry, convinced you have nothing worth cooking. This recipe is proof that sometimes the best things come from a moment of panic and a whole lot of garlic.
Why You’ll Love This Recipe
Let me break down exactly why these crispy garlic Parmesan chicken thighs have become my go-to dinner, my potluck hero, and the meal I make when I need comfort on a plate. This isn’t just another chicken recipe—it’s the one that makes you close your eyes after the first bite.
- Quick & Easy: From fridge to table in under 30 minutes. No marinating, no complicated steps. Just simple cooking that delivers big flavor when you need it most.
- Simple Ingredients: You probably have everything in your kitchen right now. Chicken thighs, garlic, Parmesan, butter, and a few pantry staples. No fancy grocery trips required.
- Perfect for Busy Weeknights: When you’ve had a long day and just want something that feels special without the effort, this is your answer. It’s comfort food that doesn’t ask for much.
- Crowd-Pleaser: I’ve served these to picky kids, skeptical in-laws, and foodie friends. Every single time, the plate comes back empty. The crispy crust and juicy meat are universally loved.
- Unbelievably Delicious: The combination of browned butter, crispy garlic, and salty Parmesan creates a crust that’s next-level. It’s the kind of dinner that makes you forget you’re eating chicken—again.
What makes this recipe different from all the other garlic chicken recipes out there? It’s the technique. Most recipes tell you to just sprinkle Parmesan on top and call it a day. I take it further—building a proper crust that stays crispy even after the chicken rests. The secret is in the order: garlic hits the pan first, infusing the butter, then the Parmesan melts and crisps up around the edges. It’s not just another version—it’s my best version, tested through more than a dozen attempts to get that perfect crunch.
This recipe isnt just good—it is the kind that makes you feel like you’ve accomplished something, even on a Tuesday night. It’s comfort food reimagined: faster, simpler, but with the same soul-soothing satisfaction. Perfect for impressing unexpected guests without stress, or turning a simple dinner into something memorable.
What Ingredients You Will Need
This recipe uses simple, wholesome ingredients to deliver bold flavor and satisfying texture without the fuss. Most of these are pantry staples, which is exactly what you want when dinner needs to happen fast.
For the Chicken
- 4 bone-in, skin-on chicken thighs (about 1.5 lbs total) – The skin gets incredibly crispy, and the bone keeps the meat juicy. You can use boneless thighs, but reduce cooking time by about 5 minutes.
- 1 teaspoon salt – I prefer kosher salt for even seasoning. Diamond Crystal is my go-to brand for its clean taste.
- ½ teaspoon black pepper – Freshly ground is best, but pre-ground works in a pinch.
- ½ teaspoon garlic powder – Adds an extra layer of garlic flavor that complements the fresh garlic.
- ½ teaspoon paprika – Smoked paprika adds a subtle warmth, but sweet paprika works too. (adds color and depth)
For the Crispy Garlic Parmesan Coating
- 4 tablespoons unsalted butter – Butter is essential for flavor and browning. Salted butter works if you reduce the added salt slightly.
- 6 cloves garlic, minced – Fresh garlic is non-negotiable here. Pre-minced jarred garlic won’t give you the same flavor. Look for firm, plump cloves.
- ½ cup grated Parmesan cheese – Use the real stuff, not the green can. Freshly grated Parmesan melts better and creates a crispier crust. I recommend Parmigiano-Reggiano for best texture.
- 2 tablespoons olive oil – Helps the butter resist burning and adds fruity notes. Extra virgin is fine, but regular olive oil works too.
- 2 tablespoons fresh parsley, chopped – For garnish and a fresh finish. Dried parsley can be used in a pinch, but fresh is brighter. (use 1 teaspoon dried if needed)
- Optional: red pepper flakes – A pinch adds gentle heat if you like a little kick.
Ingredient Tips & Substitutions
For the chicken, look for thighs that are roughly the same size so they cook evenly. If you’re using frozen thighs, thaw them completely and pat them very dry—wet skin won’t crisp up. For a dairy-free option, use vegan butter and a plant-based Parmesan alternative, though the texture will be slightly different. Swap the parsley with chives or basil for a different herb note. In summer, I sometimes add a squeeze of lemon juice at the end for brightness.
Equipment Needed
You don’t need a fancy kitchen to make these crispy garlic Parmesan chicken thighs. Here’s what you’ll actually use:
- A large cast-iron skillet or heavy-bottomed oven-safe pan – Cast iron retains heat beautifully and gives you that perfect golden crust. If you don’t have one, any heavy stainless steel pan works. I’ve used my trusty 12-inch Lodge skillet for years, and it’s never let me down.
- Tongs – For flipping the chicken without piercing the skin. Silicone-tipped tongs are gentle on non-stick pans.
- A sharp knife and cutting board – For mincing garlic and chopping parsley. A microplane also works for garlic if you want it extra fine.
- Paper towels – Absolutely essential for patting the chicken dry. This step makes or breaks the crispiness.
- An instant-read thermometer – Not strictly necessary, but it guarantees perfectly cooked chicken every time. I use a Thermapen and it’s worth every penny.
Budget-friendly tip: If you don’t have a cast-iron skillet, a regular non-stick pan works fine for stovetop cooking. Just be careful not to use metal utensils that could scratch the surface. For the thermometer, a basic $10 one from the grocery store does the job—just make sure it’s accurate.
Preparation Method
Let me walk you through this step by step. Trust me, the first time I made these, I was rushing and almost burned the garlic. Learn from my mistakes!
- Prep the chicken (5 minutes): Pat the chicken thighs completely dry with paper towels. This is the most important step—wet skin won’t crisp. Season both sides evenly with salt, pepper, garlic powder, and paprika. Let them sit at room temperature for 10 minutes while you prep everything else. This helps the seasoning stick and the chicken cook more evenly.
- Heat the pan (2 minutes): Place your skillet over medium-high heat. Add the olive oil and 2 tablespoons of the butter. Swirl the pan until the butter melts and starts to foam. The oil helps prevent the butter from burning. You want the pan hot but not smoking—if it smokes, lower the heat slightly.
- Sear the chicken (8-10 minutes): Place the chicken thighs skin-side down in the hot pan. Don’t crowd them—leave space between each piece. Press down gently with a spatula for 30 seconds to ensure even contact. Cook undisturbed for 5-6 minutes until the skin is deep golden brown and crispy. The skin should release easily from the pan; if it sticks, it needs more time. Flip and cook the other side for 3-4 minutes. Remove chicken to a plate and set aside.
- Make the garlic butter (2 minutes): Reduce heat to medium-low. Add the remaining 2 tablespoons of butter to the pan. Once melted, add the minced garlic. Cook for 30-45 seconds, stirring constantly, until fragrant. Do not let the garlic turn brown—it will become bitter. You want it soft and golden. I once got distracted and burnt the garlic; the whole batch tasted awful. Learn from me.
- Add the Parmesan (1 minute): Sprinkle the grated Parmesan directly into the garlic butter. Stir quickly to combine. The cheese will melt and start to bubble. Let it cook for about 30 seconds until it forms a lacy, golden crust around the edges of the pan.
- Return the chicken (5-7 minutes): Place the chicken thighs back into the pan, skin-side up. Spoon some of the garlic Parmesan mixture over the tops. If your pan is oven-safe, transfer it to a preheated 400°F (200°C) oven for 5-7 minutes to finish cooking. If not, cover the pan and cook on low heat for 5-7 minutes until the chicken reaches an internal temperature of 165°F (74°C) at the thickest part.
- Rest and garnish (3 minutes): Remove from heat. Let the chicken rest in the pan for 3 minutes. This allows the juices to redistribute. Sprinkle with fresh parsley and optional red pepper flakes before serving.
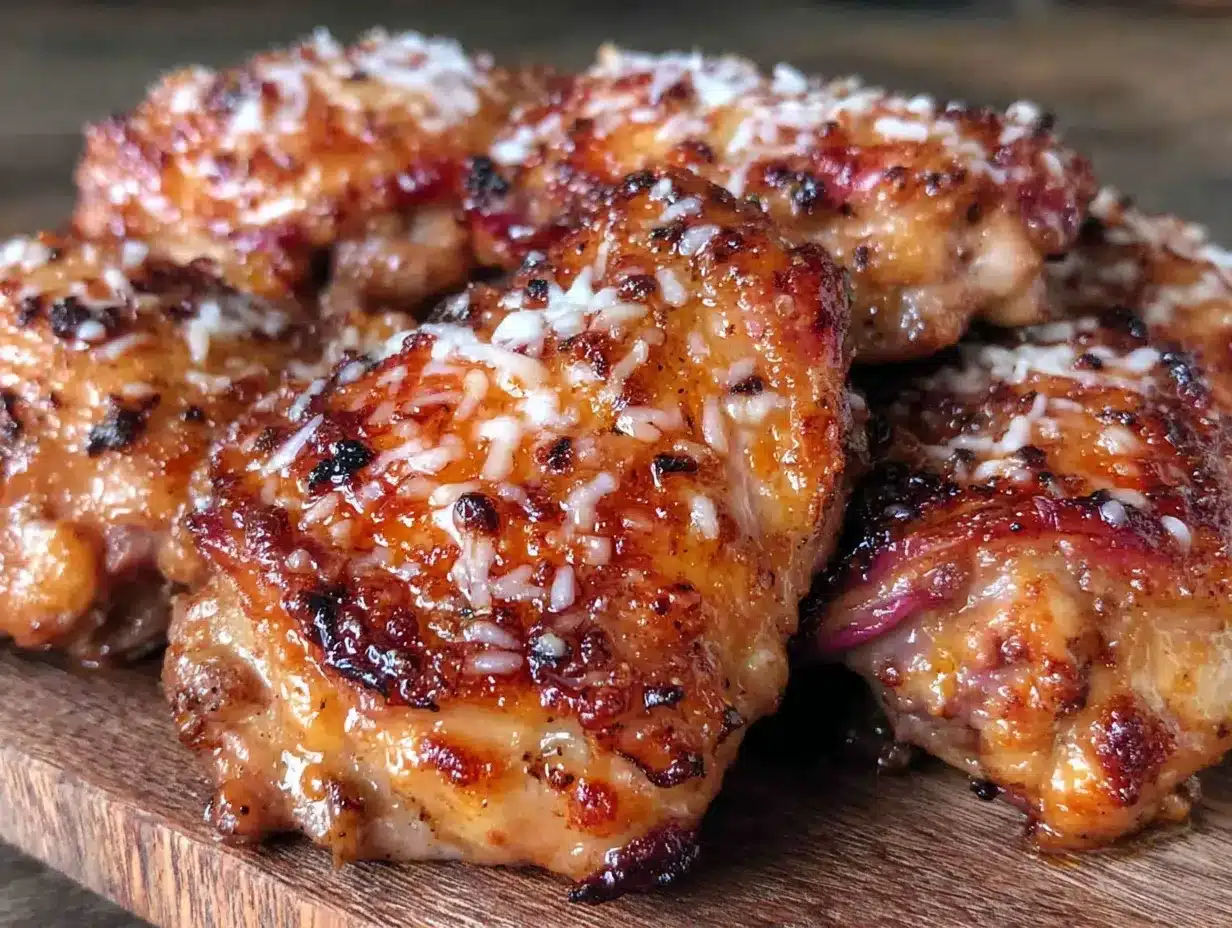
The chicken should look glossy with a golden-brown crust. The garlic should be soft and fragrant, not burnt. The Parmesan should form crispy, lacy edges around each thigh—those crispy bits are the best part, honestly. When you cut into the chicken, the juices should run clear, and the meat should be tender enough to pull apart with a fork.
Cooking Tips & Techniques
After making these chicken thighs more times than I can count, I’ve learned a few things the hard way. Let me save you some trouble.
The biggest mistake people make is not drying the chicken enough. I’m serious—pat those thighs until they feel almost tacky. Any moisture on the skin will steam instead of sear, and you’ll end up with soggy skin. I learned this after a particularly disappointing batch that looked pale and sad. Now I use three paper towels per thigh and don’t feel bad about it.
Don’t move the chicken too early. When you first place the thighs in the hot pan, they will stick. That’s normal. Let them cook undisturbed for a full 5-6 minutes. The skin will naturally release from the pan once it’s properly seared. If you try to flip too early, you’ll tear the skin and lose all that crispy potential. Patience is the secret ingredient here.
Watch your garlic like a hawk. Garlic goes from fragrant to burnt in about 15 seconds. Once you add it to the butter, keep stirring and don’t walk away. If you see it turning brown, immediately remove the pan from heat. Burnt garlic will ruin the entire dish with a bitter, acrid taste. I keep a small bowl of cold water nearby, just in case I need to stop the cooking quickly.
For consistent results, use an instant-read thermometer. Chicken thighs are forgiving, but they’re best at 165°F (74°C). Overcooking makes them dry; undercooking is unsafe. The thermometer takes the guesswork out. Plus, it makes you look like a pro when you confidently announce the temperature.
Multitasking tip: While the chicken rests, use the same pan to quickly sauté some spinach or green beans. The leftover garlic butter in the pan adds incredible flavor. Just toss the veggies in for 2-3 minutes, and you’ve got a complete meal with zero extra cleanup.
Variations & Adaptations
One of the best things about this recipe is how flexible it is. Here are some ways I’ve adapted it over the years:
Dietary Variations: For a gluten-free version, this recipe is naturally gluten-free as written—just double-check your Parmesan doesn’t contain anti-caking agents with gluten. For dairy-free, substitute the butter with vegan butter and use a nutritional yeast-based Parmesan alternative. The texture won’t be quite as crispy, but the flavor is still fantastic.
Flavor Twists: Try adding 1 teaspoon of lemon zest along with the garlic for a bright, citrusy note. Or swap the parsley for fresh basil and add a pinch of dried oregano for an Italian-inspired version. I once made a spicy version by adding ½ teaspoon of cayenne pepper to the seasoning mix—it was a hit at a game day party.
Cooking Method Variations: If you don’t have a stovetop, you can bake these entirely in the oven. Sear the chicken under the broiler for 5-6 minutes per side, then proceed with the garlic butter and Parmesan step. Or try an air fryer: cook the seasoned chicken at 375°F (190°C) for 12 minutes, then add the garlic butter mixture and cook for another 3-4 minutes until crispy.
Customization for Different Tastes: My family loves extra garlic, so I sometimes use 8-10 cloves. My neighbor prefers a milder version and uses only 3 cloves plus a pinch of garlic powder. For a cheesier crust, add an extra ¼ cup of Parmesan. The beauty of this recipe is that it adapts to whatever you have and whatever you love.
Serving & Storage Suggestions
These chicken thighs are best served hot, straight from the pan. The crispy crust is at its peak right after cooking, so don’t let them sit too long. I like to serve them on a warm platter with the garlic butter spooned over the top.
What to serve with them: The garlic butter in the pan is liquid gold. Serve with crusty bread to soak it up, or spoon it over mashed potatoes. A simple side salad with lemon vinaigrette cuts through the richness beautifully. Roasted asparagus or green beans are also perfect companions. For a complete meal, try serving alongside a garlic butter rice pilaf—the flavors complement each other perfectly.
Storage instructions: Store leftover chicken in an airtight container in the refrigerator for up to 3 days. The crispy crust will soften, but the flavor remains excellent. To reheat, place the chicken in a 350°F (175°C) oven for 10-12 minutes, or until heated through. Avoid the microwave—it will make the skin rubbery. For a quick reheat, use an air fryer at 350°F for 5-6 minutes.
Freezer tips: These chicken thighs freeze well for up to 2 months. Cool completely, then wrap individually in plastic wrap and place in a freezer bag. Thaw overnight in the refrigerator before reheating. The texture won’t be as crispy as fresh, but the flavor holds up beautifully. I often double the batch and freeze half for busy weeks.
One thing I love about this dish: the flavors actually deepen overnight. The garlic and Parmesan meld together, making leftovers almost better than the original. If you have any leftover garlic butter sauce, save it—it’s amazing tossed with pasta or drizzled over roasted vegetables.
Nutritional Information & Benefits
Here’s the estimated nutritional breakdown per serving (one chicken thigh with sauce):
| Nutrient | Amount |
|---|---|
| Calories | 385 |
| Protein | 28g |
| Fat | 28g |
| Saturated Fat | 12g |
| Carbohydrates | 3g |
| Fiber | 0g |
| Sugar | 0g |
| Sodium | 620mg |
Chicken thighs are a fantastic source of high-quality protein, iron, and B vitamins, which support energy metabolism and immune function. Garlic is known for its anti-inflammatory and heart-health benefits, while Parmesan cheese provides calcium and protein. This dish is naturally low in carbohydrates, making it suitable for keto and low-carb diets. It contains dairy and is not suitable for vegan or dairy-free diets without substitutions. The moderate fat content from the butter and olive oil provides satiety and helps absorb fat-soluble vitamins.
From a wellness perspective, I love that this recipe feels indulgent but is actually quite balanced. The protein keeps you full, the healthy fats from olive oil support heart health, and the garlic adds a punch of flavor without extra sodium. It’s comfort food that doesn’t leave you feeling heavy—just satisfied.
Conclusion
Honestly, I never expected a recipe born from a potluck panic to become one of my most-requested dishes. But here we are, and I’m not complaining. These crispy garlic Parmesan chicken thighs have saved me on busy weeknights, impressed dinner guests, and even won over my garlic-skeptic mother-in-law. They’re proof that you don’t need fancy ingredients or hours in the kitchen to create something truly memorable.
I hope you give these a try—and I hope you make them your own. Add extra garlic if you’re bold, swap the herbs if you’re feeling creative, or double the batch because one pan is never enough. That’s the beauty of a simple recipe: it leaves room for your personal touch. When you make them, I’d love to hear how they turned out. Drop a comment below, share your tweaks, or tag me in your photos. This recipe is meant to be shared, just like that potluck table where it all started.
So go ahead—preheat that pan, grab some garlic, and make dinner feel special tonight. You’ve got this.
Frequently Asked Questions
Can I use chicken breasts instead of thighs?
Yes, but adjust cooking time. Boneless, skinless chicken breasts will cook faster—about 4-5 minutes per side. Use a meat thermometer to ensure they reach 165°F (74°C). Keep in mind that breasts are leaner and may not be as juicy as thighs.
Why is my chicken skin not getting crispy?
Most likely, the chicken wasn’t dried thoroughly before cooking. Pat the skin very dry with paper towels. Also, make sure your pan is hot enough before adding the chicken. If the pan isn’t hot, the skin will steam instead of sear.
Can I make this recipe ahead of time?
You can prep the seasoning and mince the garlic up to 2 days in advance. Cook the chicken just before serving for the best crispy texture. Leftovers reheat well in the oven or air fryer.
Is this recipe spicy?
Not at all! The red pepper flakes are optional. Without them, the dish is mild and family-friendly. The garlic and Parmesan provide savory flavor without heat.
What if I don’t have an oven-safe skillet?
No problem. Cook the chicken entirely on the stovetop. After adding the garlic Parmesan mixture, cover the pan and cook on low heat for 5-7 minutes until the chicken is cooked through. The crust won’t be quite as crispy, but it will still be delicious.
Pin This Recipe!

Crispy Garlic Parmesan Chicken Thighs: Easy 30-Minute Recipe

Crispy, juicy chicken thighs with a golden garlic Parmesan crust, ready in under 30 minutes. Perfect for busy weeknights or potlucks, this simple recipe uses pantry staples to deliver big flavor.
- Prep Time: 10 minutes
- Cook Time: 20 minutes
- Total Time: 30 minutes
- Yield: 4 servings 1x
- Category: Main Course
- Cuisine: American
Ingredients
- 4 bone-in, skin-on chicken thighs (about 1.5 lbs total)
- 1 teaspoon salt
- ½ teaspoon black pepper
- ½ teaspoon garlic powder
- ½ teaspoon paprika
- 4 tablespoons unsalted butter
- 6 cloves garlic, minced
- ½ cup grated Parmesan cheese
- 2 tablespoons olive oil
- 2 tablespoons fresh parsley, chopped
- Optional: red pepper flakes
Instructions
- Prep the chicken (5 minutes): Pat the chicken thighs completely dry with paper towels. Season both sides evenly with salt, pepper, garlic powder, and paprika. Let them sit at room temperature for 10 minutes.
- Heat the pan (2 minutes): Place your skillet over medium-high heat. Add the olive oil and 2 tablespoons of the butter. Swirl the pan until the butter melts and starts to foam.
- Sear the chicken (8-10 minutes): Place the chicken thighs skin-side down in the hot pan. Cook undisturbed for 5-6 minutes until the skin is deep golden brown and crispy. Flip and cook the other side for 3-4 minutes. Remove chicken to a plate and set aside.
- Make the garlic butter (2 minutes): Reduce heat to medium-low. Add the remaining 2 tablespoons of butter to the pan. Once melted, add the minced garlic. Cook for 30-45 seconds, stirring constantly, until fragrant.
- Add the Parmesan (1 minute): Sprinkle the grated Parmesan directly into the garlic butter. Stir quickly to combine. Let it cook for about 30 seconds until it forms a lacy, golden crust around the edges of the pan.
- Return the chicken (5-7 minutes): Place the chicken thighs back into the pan, skin-side up. Spoon some of the garlic Parmesan mixture over the tops. Transfer to a preheated 400°F (200°C) oven for 5-7 minutes to finish cooking, or cover and cook on low heat for 5-7 minutes until the chicken reaches an internal temperature of 165°F (74°C).
- Rest and garnish (3 minutes): Remove from heat. Let the chicken rest in the pan for 3 minutes. Sprinkle with fresh parsley and optional red pepper flakes before serving.
Notes
Pat chicken very dry for crispy skin. Don’t move chicken too early; let it sear undisturbed. Watch garlic carefully to avoid burning. For best results, use an instant-read thermometer to ensure chicken reaches 165°F. Leftovers can be stored in the refrigerator for up to 3 days and reheated in the oven or air fryer.
Nutrition
- Serving Size: 1 chicken thigh with
- Calories: 385
- Sodium: 620
- Fat: 28
- Saturated Fat: 12
- Carbohydrates: 3
- Protein: 28
Keywords: crispy garlic parmesan chicken thighs, easy chicken recipe, 30-minute dinner, weeknight dinner, potluck recipe, garlic chicken, parmesan chicken


