My sister wasn’t trying to throw a party. I’d stopped by to borrow a slow cooker—mine had finally given up the ghost mid-chili—and the smell hit me before I even got past her mudroom. It wasn’t chili. It was sweet, fruity, and strangely… nostalgic? Like a candy store had a baby with a witch’s cauldron. I found her in the kitchen, sleeves rolled up, tiny plastic cauldrons lined up on a baking sheet like little soldiers. She was piping a green-tinted cream into one of them, completely nonchalant, while her cat wound around her ankles.
“Oh, those?” she said when I asked, barely looking up. “Just something for the neighborhood kids.” She shrugged like it was nothing. But let me tell you—it was not nothing. It was the most adorable, festive, and genuinely cozy Halloween treat I had ever seen. And honestly, it tasted even better than it looked. I stood there, slow cooker forgotten, watching her work. She explained it in about thirty seconds, like it was the most obvious thing in the world. Gelatin, some juice, a little vodka (for the adults, obviously), and a few clever tricks to make them look like tiny bubbling cauldrons.
I mean, I’ve made a lot of Halloween desserts in my time. Spooky cookies, ghost-shaped brownies, the obligatory pumpkin-shaped Rice Krispie treats. But these cozy Halloween jello shot cauldrons? They’re different. They’re fun without being fussy. They’re impressive without requiring a pastry degree. And they’ve got that perfect balance of nostalgic Halloween fun and grown-up flavor. Maybe you’ve been there—wanting to bring something to a Halloween gathering that feels special but doesn’t have you sweating in the kitchen for hours. That’s these. They’re the kind of thing that makes people stop, smile, and say, “Wait, you made these?”
I’ve been making them every year since that day in my sister’s kitchen, and they never fail to be the first thing to disappear from the dessert table. So let me show you how to make your own batch of these cozy, spooky, utterly charming little cauldrons.
Why You’ll Love This Recipe
I’ve tested this recipe more times than I care to count—different juices, different cream toppings, different ways to get that perfect “bubbling” effect. Here’s why this version is the one you’ll come back to year after year.
- Quick & Easy: These come together in about 20 minutes of active time. The rest is just waiting for the gelatin to set. Perfect for busy Halloween week when you’ve got costumes to wrangle and pumpkins to carve.
- Simple Ingredients: You probably already have most of what you need in your pantry. No weird specialty items that you’ll never use again.
- Perfect for Halloween Gatherings: Whether it’s a grown-up costume party, a spooky movie night, or just a fun treat for the neighbors, these fit the bill perfectly.
- Crowd-Pleaser: I’ve served these at parties where people were skeptical about “jello shots” and watched them go back for thirds. The creamy topping and fruity base are just plain delicious.
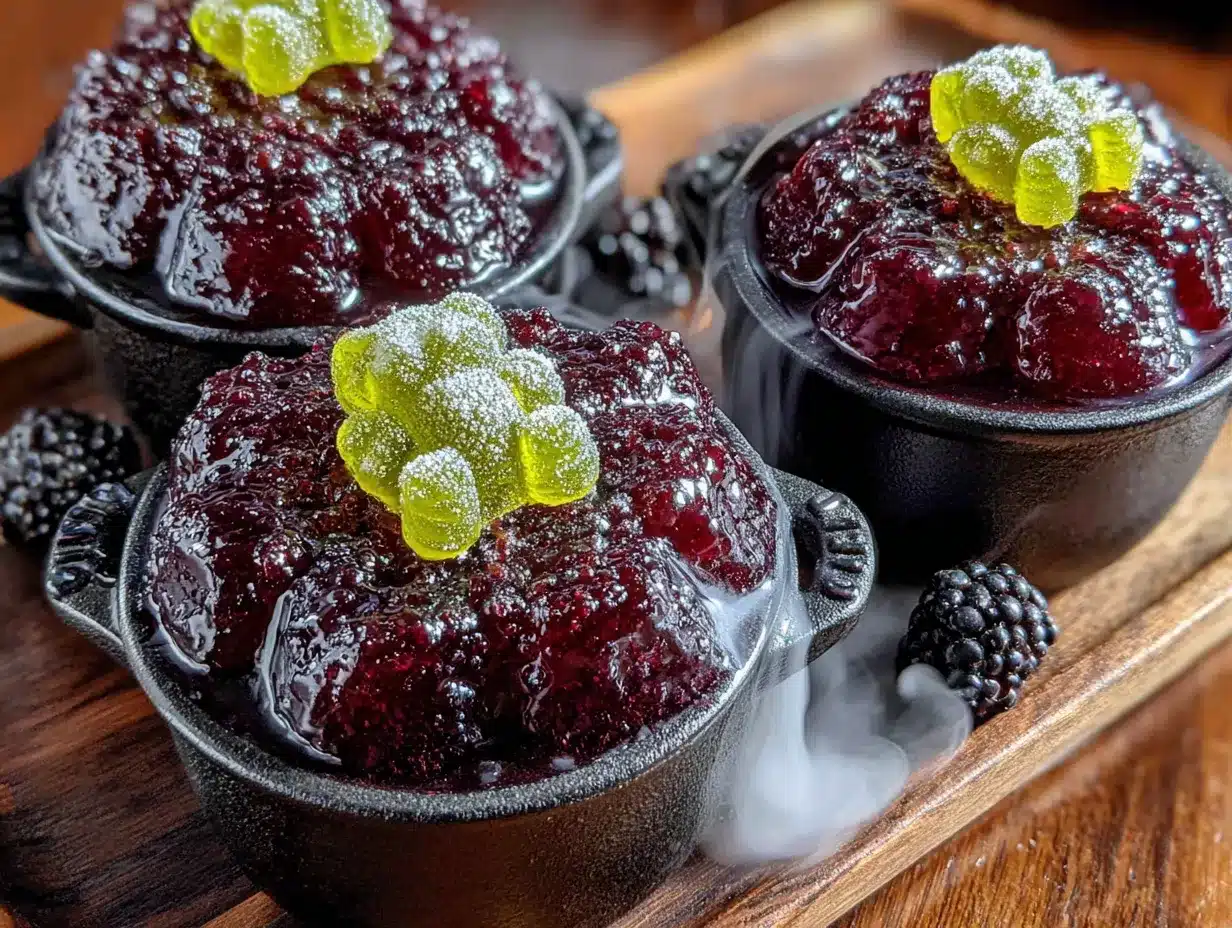
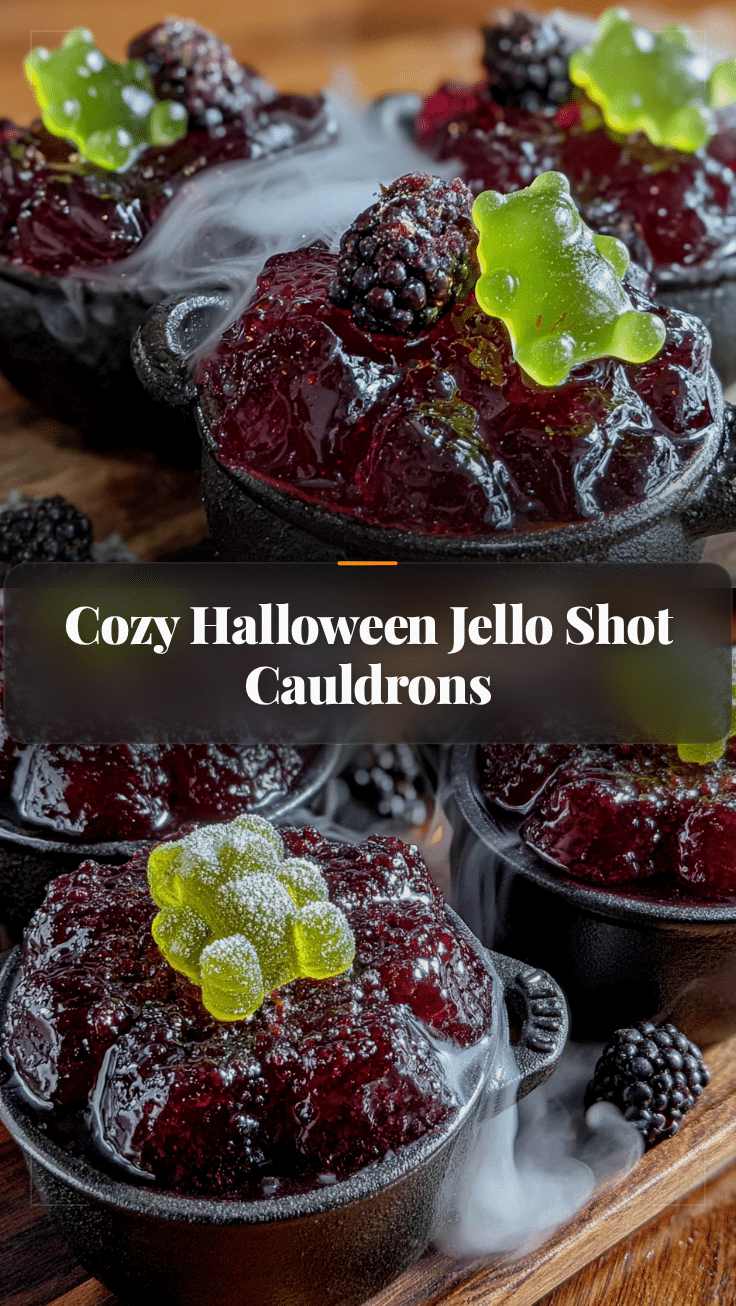
- Unbelievably Adorable: Let’s be honest—half the fun is how they look. The mini cauldrons, the green “bubbling” cream, the little gummy worm or spider on top. They’re Instagram gold, but they taste even better than they photograph.
What makes this recipe different from all the other Halloween jello shots out there? It’s the texture. Most jello shots are either too firm or too jiggly. This one hits that sweet spot—firm enough to hold its shape in the little cauldrons, but soft enough to melt on your tongue. And the cream topping? It’s not just for looks. It adds a rich, creamy counterpoint to the bright, fruity gelatin. It’s comfort food in a tiny cup, honestly.
This recipe isn’t just good—it’s the kind that makes you close your eyes after the first bite. It’s Halloween fun reimagined: cozier, cuter, and with the same soul-soothing satisfaction as a warm blanket on a chilly October evening. Perfect for impressing your friends without stress, or turning a simple Halloween night into something memorable.
What Ingredients You Will Need
This recipe uses simple, everyday ingredients to create something that feels surprisingly special. The magic is in the combination—bright, fruity gelatin, a touch of something boozy (if you want it), and a creamy, dreamy topping that makes these cauldrons look like they’re bubbling with witch’s brew.
For the Jello Base
- 1 box (3 oz) lime or green gelatin dessert mix – This is your color base. I prefer lime for that classic “witch’s brew” green, but you can use any green flavor you like. Jell-O brand works great, but store brands are fine too.
- 1 box (3 oz) berry blue or grape gelatin dessert mix – This deepens the color and adds complexity. The combination of lime and berry blue gives you that perfect murky cauldron green. If you can’t find berry blue, grape works beautifully.
- 2 cups boiling water – To dissolve the gelatin completely.
- 1 cup cold water – To cool the mixture down.
- 1 cup vodka or citrus-flavored spirits – For the adults! You can use unflavored vodka, or try a citrus vodka for extra zing. For a non-alcoholic version, simply substitute with cold water or white grape juice. I personally love using a good quality citrus vodka—it brightens the whole thing up.
- 1/2 cup cold water (if omitting alcohol, use 1 1/2 cups total cold water) – For adjusting the liquid ratio.
For the Cream Topping (The “Bubbling Brew”)
- 1 package (8 oz) cream cheese, softened – Full fat gives the best texture and flavor. Let it sit out for at least 30 minutes before you start. I’ve tried this with Neufchâtel (the lower-fat version) and it works, but it’s not as luscious.
- 1/2 cup powdered sugar – Adds sweetness without grittiness.
- 1 teaspoon vanilla extract – Pure vanilla is best, but imitation works in a pinch.
- 2-3 tablespoons milk or heavy cream – To thin the topping to a pipeable consistency. Start with 2 tablespoons and add more if needed.
- Green or neon green gel food coloring – This is key for that “witch’s brew” look. Liquid food coloring won’t give you the same vibrant color without thinning the mixture too much. I recommend the gel kind from Wilton or Americolor.
For Decoration (Optional But Highly Recommended)
- Gummy worms or gummy spiders – For that creepy-crawly touch. I get the big sour gummy worms and cut them in half.
- Black sanding sugar or edible glitter – For a little sparkle. Because even cauldrons deserve to be glamorous.
- Mini plastic cauldrons – You can find these at party supply stores or online. They usually come in packs of 12 or 24. The 2-ounce size is perfect for jello shots.
Ingredient Selection Tips: For the best texture, look for gelatin that isn’t close to its expiration date. Old gelatin can lose its setting power. I also recommend using a cream cheese brand you trust—I’m partial to Philadelphia for its consistent creaminess. If you’re making these for a crowd with dietary restrictions, you can use dairy-free cream cheese and a plant-based milk for the topping, but note that the texture will be slightly different—still good, just not as rich.
Equipment Needed
You don’t need a lot of fancy equipment for these cozy Halloween jello shot cauldrons, which is part of why I love them. Here’s what you’ll want on hand:
- Medium mixing bowl – For dissolving the gelatin. A glass or ceramic bowl works best.
- Whisk – To make sure the gelatin is fully dissolved and smooth.
- Liquid measuring cup – For measuring your boiling water and spirits accurately. Trust me, eyeballing it leads to sad, runny jello.
- Small saucepan or kettle – To boil water. A kettle is faster, but a saucepan works just fine.
- Mini plastic cauldrons – The star of the show! I’ve found them at Party City, Walmart, and Amazon. They’re usually sold in packs of 12 or 24.
- Baking sheet or tray – To hold the cauldrons while they set. This makes them easy to move in and out of the fridge.
- Hand mixer or stand mixer – For the cream topping. You can do it by hand with a whisk, but your arm will thank you for using a mixer.
- Piping bag or zip-top bag – For piping the cream topping. A zip-top bag with the corner snipped off works perfectly and saves you from having to buy piping bags.
- Small offset spatula or butter knife – For smoothing the cream topping if needed.
Budget-Friendly Tip: Don’t want to buy plastic cauldrons? You can use small clear plastic shot cups (the 2-ounce size) and just decorate them with Halloween stickers or washi tape. It’s not quite as cute, but it still works! And honestly, the cream topping hides a multitude of sins.
Preparation Method
Alright, let’s get to the fun part. Here’s how to make these cozy Halloween jello shot cauldrons step by step. I’ve included all the little tips and tricks I’ve learned from making these more times than I can count.
Step 1: Dissolve the Gelatin
In your medium mixing bowl, combine both boxes of gelatin dessert mix. Pour in 2 cups (480 ml) of boiling water and whisk vigorously for at least 2 minutes, until the gelatin is completely dissolved. You shouldn’t see any granules at the bottom of the bowl. This is important—undissolved gelatin will give you a grainy texture and uneven setting. I once rushed this step and ended up with some cauldrons that were perfectly set and some that were a weird, lumpy mess. Don’t be like me. Take the extra minute.
Step 2: Add the Cold Liquid
Stir in 1 cup (240 ml) of cold water and 1 cup (240 ml) of vodka (or your chosen spirit). If you’re making the non-alcoholic version, add 2 cups (480 ml) of cold water total. Stir gently until everything is combined. You’ll notice the mixture starts to cool down a bit—that’s good. You want it to be warm but not hot before you pour it into the cauldrons.
Pro tip: If you’re using a citrus-flavored vodka, the flavor really shines here. I’ve made these with plain vodka and with lemon vodka, and the lemon version is noticeably brighter and more refreshing. Just something to think about!
Step 3: Fill the Cauldrons
Place your mini cauldrons on a baking sheet or tray. This makes them much easier to move in and out of the fridge without spilling. Carefully pour the gelatin mixture into each cauldron, filling them about 3/4 full. You want to leave room for the cream topping. I use a liquid measuring cup with a spout for this, but you can also use a small ladle or even a turkey baster if you’re feeling fancy.
You should get about 20-24 cauldrons, depending on their exact size. If you have extra gelatin mixture, you can pour it into a small dish and have a little “chef’s snack” later.
Step 4: Let Them Set
Carefully transfer the baking sheet to the refrigerator. Let the cauldrons set for at least 4 hours, but overnight is even better. I know, I know—waiting is the hardest part. But trust me, a full overnight set gives you the perfect firm-but-tender texture. If you’re in a rush, 4 hours will work, but they’ll be a bit softer.
Warning: Don’t try to speed this up by putting them in the freezer. I tried that once, and the gelatin got icy and weird on top while the bottom was still liquid. Just be patient. Your fridge is your friend here.
Step 5: Make the Cream Topping
While the cauldrons are setting, you can prepare the cream topping. In a mixing bowl, beat the softened cream cheese with an electric mixer until it’s smooth and creamy. Add the powdered sugar and vanilla extract, and beat until well combined. The mixture will be thick at this point—that’s normal.
Add the milk or heavy cream, one tablespoon at a time, beating after each addition, until the mixture is smooth and pipeable. You’re looking for a consistency similar to thick frosting—not runny, but soft enough to pipe easily.
Add a few drops of green gel food coloring and beat until the color is evenly distributed. Start with a small amount—you can always add more. You want a fun, vibrant green, not something that looks radioactive (unless that’s your vibe, in which case, go wild).
Step 6: Pipe the “Bubbling Brew”
Once the cauldrons are fully set (they should feel firm to the touch), it’s time to add the topping. Transfer the green cream cheese mixture to a piping bag or a zip-top bag with the corner snipped off. Pipe a small swirl on top of each cauldron, covering the gelatin completely. You can make it as neat or as messy as you like—the “bubbling” effect actually looks better if it’s a little uneven.
If you want a really dramatic “bubbling” look, use a small offset spatula or the back of a spoon to create peaks and swirls in the cream. This gives it that witch’s cauldron texture.
Step 7: Decorate and Serve
This is where you can really have fun. While the cream topping is still soft, place a gummy worm or gummy spider on top of each cauldron. You can also sprinkle a little black sanding sugar or edible glitter over the top for some sparkle. If you’re feeling extra festive, you can even add a tiny plastic spider ring or a bat-shaped sprinkle.
Refrigerate the decorated cauldrons for at least 30 minutes before serving to let the cream topping firm up slightly. They’re best served cold, straight from the fridge.
Cooking Tips & Techniques
Over the years, I’ve made a few mistakes with these cozy Halloween jello shot cauldrons so you don’t have to. Here are my best tips for success.
Get the Gelatin-to-Liquid Ratio Right
This is the most important thing. Too much liquid and your jello shots will be runny and sad. Too little and they’ll be rubbery. The recipe I’ve given you is perfectly balanced for 2 ounces of gelatin (two boxes) and 4 cups of total liquid (including the alcohol). Stick to it, and you’ll be fine.
Don’t Skimp on the Setting Time
I know I said this already, but it’s worth repeating. Four hours is the absolute minimum. Overnight is ideal. If you try to rush it, you’ll end up with jello shots that are too soft to hold their shape when you add the cream topping. And nobody wants a jello shot that collapses into a puddle.
Soften Your Cream Cheese
This is a small thing that makes a big difference. If your cream cheese is too cold, it won’t blend smoothly with the other ingredients, and you’ll end up with lumpy topping. Let it sit on the counter for at least 30 minutes before you start. In a pinch, you can microwave it for 10-15 seconds, but be careful—you don’t want it to melt.
Use Gel Food Coloring
Liquid food coloring will thin out your cream topping and make it runny. Gel coloring gives you vibrant color without changing the consistency. I learned this the hard way when I tried to make green cream cheese frosting with liquid coloring and ended up with a watery mess. Gel is the way to go.
Make Ahead for Stress-Free Hosting
These are perfect for making ahead of time. You can prepare the jello base and let it set up to 2 days in advance. Just keep them covered in the fridge. Add the cream topping and decorations no more than a few hours before serving for the best presentation. This makes them ideal for Halloween parties when you’ve got a million other things to do.
Variations & Adaptations
One of the best things about this recipe is how easy it is to customize. Here are some of my favorite variations.
Non-Alcoholic Version
Simply replace the vodka with an equal amount of cold water or white grape juice. The grape juice adds a nice sweetness and a slightly deeper color. Kids and designated drivers will love these just as much as the boozy version.
Different Flavor Combinations
Experiment with different gelatin flavors! Try orange gelatin with a vanilla cream topping for a creamsicle vibe. Or use berry blue gelatin with a lemon cream topping for a tart and sweet combo. My personal favorite non-green version is raspberry gelatin with a chocolate cream topping—it tastes like a chocolate-covered raspberry.
Dairy-Free Version
Use dairy-free cream cheese (I like the brand Kite Hill) and a plant-based milk like oat or almond milk for the topping. The texture will be slightly less rich, but it’s still delicious. Just make sure your dairy-free cream cheese is softened before you try to whip it.
Extra Boozy Version
For a stronger kick, you can replace some of the cold water with additional vodka. But be careful—too much alcohol can prevent the gelatin from setting properly. I wouldn’t go beyond 1 1/2 cups of alcohol total.
Spooky Spider Web Topping
Instead of piping a simple swirl, try this: Pipe a spiral of green cream on top of each cauldron, then use a toothpick to drag lines from the center outward, creating a spider web pattern. It takes a little practice, but the effect is stunning.
Serving & Storage Suggestions
These cozy Halloween jello shot cauldrons are best served cold, straight from the fridge. Arrange them on a platter or serving tray—the little cauldrons are sturdy enough to stack if you’re careful, but I prefer to lay them out in a single layer so everyone can see the decorations.
What to Serve With Them: These pair beautifully with other Halloween treats like pumpkin-shaped cookies, ghost-shaped brownies, or a warm mug of apple cider. For a grown-up party, they’re great alongside a charcuterie board with spooky-themed cheeses and crackers.
Storage: Leftover cauldrons can be stored in the refrigerator, covered, for up to 3 days. The cream topping may start to weep slightly after a day or two, so they’re best eaten within 24 hours of adding the topping. If you’re making them ahead, keep the jello base and the cream topping separate until you’re ready to serve.
Freezing: I don’t recommend freezing these. The gelatin will become watery and the texture will be ruined when it thaws. These are strictly a refrigerator treat.
Flavor Development: The flavors actually meld and deepen after a day in the fridge. The alcohol becomes less pronounced, and the fruit flavors become more rounded. So if you can wait a day before serving, you’ll be rewarded with an even better jello shot.
Nutritional Information & Benefits
Let’s be real—these are a treat, not a health food. But here’s the nutritional breakdown for one cauldron (based on the recipe making 24 servings, using vodka and full-fat cream cheese).
| Nutrient | Amount Per Serving |
|---|---|
| Calories | 85 |
| Total Fat | 4g |
| Saturated Fat | 2.5g |
| Carbohydrates | 8g |
| Sugar | 7g |
| Protein | 1g |
| Sodium | 45mg |
Health Benefits: Gelatin itself is a good source of collagen, which is great for skin, hair, and joint health. The cream cheese provides a small amount of calcium and protein. And honestly? The biggest benefit is the joy and connection these bring to a Halloween gathering. Sometimes food is about more than just nutrients—it’s about creating memories and sharing a smile.
Dietary Considerations: This recipe contains dairy and gelatin. It can be made gluten-free (most gelatin and vodka are naturally gluten-free, but always check labels). For a dairy-free version, see the variations section above.
Frequently Asked Questions
Can I make these without alcohol?
Absolutely! Just replace the vodka with an equal amount of cold water or white grape juice. They’ll still be delicious and fun—perfect for parties where kids or designated drivers will be enjoying them too.
How far in advance can I make these?
You can make the jello base up to 2 days in advance and keep it covered in the fridge. Add the cream topping and decorations no more than a few hours before serving for the best presentation and texture.
My jello shots didn’t set properly. What went wrong?
This usually happens for one of three reasons: too much liquid, old gelatin, or not enough setting time. Double-check your measurements, make sure your gelatin isn’t expired, and give them a full 4-6 hours (or overnight) to set. If you used too much alcohol, that can also prevent the gelatin from setting properly.
Can I use sugar-free gelatin?
Yes, you can! Sugar-free gelatin works just fine in this recipe. The texture will be slightly different—a bit less firm—but still good. Just be aware that the cream topping will add sugar, so these won’t be sugar-free overall unless you use a sugar substitute in the topping as well.
How do I get the cream topping to look like bubbling brew?
The key is piping the cream in an uneven, swirly pattern. Don’t try to make it perfectly smooth. Use a piping bag with a small round tip, and pipe in a circular motion, lifting the bag up and down to create peaks and valleys. You can also use a toothpick to create a few small “bubbles” by poking the cream gently.
Conclusion
These cozy Halloween jello shot cauldrons are everything I love about fall entertaining. They’re fun, they’re festive, and they’re surprisingly simple to make. Whether you’re hosting a grown-up Halloween party, bringing a treat to a neighborhood gathering, or just want to make something special for a spooky movie night, these little cauldrons deliver every time.
I love that they’re customizable—you can make them as boozy or as family-friendly as you like, swap in different flavors, and go wild with the decorations. They’re the kind of recipe that invites creativity and makes you feel like a kitchen witch (in the best possible way).
So go ahead—grab some plastic cauldrons, a box of green gelatin, and your favorite vodka. Make a batch of these cozy Halloween jello shot cauldrons, and watch them disappear. And when your friends ask for the recipe (they will), send them my way. I’d love to hear about your own spooky creations—leave a comment below and tell me what flavor combinations you tried. Happy Halloween, friends! 🎃
Pin This Recipe!
Cozy Halloween Jello Shot Cauldrons: Easy & Spooky Party Treat
These adorable mini cauldrons feature a fruity, boozy (or non-alcoholic) green gelatin base topped with a creamy, bubbling witch’s brew frosting. Perfect for Halloween parties, they’re quick to make and guaranteed to be the first thing to disappear from the dessert table.
- Prep Time: 20 minutes
- Cook Time: 0 minutes
- Total Time: 4 hours 20 minutes (includes setting time)
- Yield: 20-24 servings 1x
- Category: Dessert
- Cuisine: American
Ingredients
- 1 box (3 oz) lime or green gelatin dessert mix
- 1 box (3 oz) berry blue or grape gelatin dessert mix
- 2 cups boiling water
- 1 cup cold water
- 1 cup vodka or citrus-flavored spirits (or substitute with cold water or white grape juice for non-alcoholic)
- 1/2 cup cold water (if omitting alcohol, use 1 1/2 cups total cold water)
- 1 package (8 oz) cream cheese, softened
- 1/2 cup powdered sugar
- 1 teaspoon vanilla extract
- 2–3 tablespoons milk or heavy cream
- Green or neon green gel food coloring
- Gummy worms or gummy spiders (for decoration)
- Black sanding sugar or edible glitter (optional, for decoration)
- Mini plastic cauldrons (2-ounce size)
Instructions
- In a medium mixing bowl, combine both boxes of gelatin dessert mix. Pour in 2 cups of boiling water and whisk vigorously for at least 2 minutes until the gelatin is completely dissolved.
- Stir in 1 cup of cold water and 1 cup of vodka (or substitute). If making non-alcoholic version, add 2 cups of cold water total. Stir gently until combined.
- Place mini cauldrons on a baking sheet. Carefully pour the gelatin mixture into each cauldron, filling them about 3/4 full. You should get about 20-24 cauldrons.
- Refrigerate the cauldrons for at least 4 hours, preferably overnight, until the gelatin is fully set.
- In a mixing bowl, beat the softened cream cheese with an electric mixer until smooth. Add powdered sugar and vanilla extract, and beat until well combined.
- Add milk or heavy cream, one tablespoon at a time, beating after each addition, until the mixture is smooth and pipeable (consistency of thick frosting).
- Add a few drops of green gel food coloring and beat until evenly distributed.
- Transfer the cream cheese mixture to a piping bag or a zip-top bag with the corner snipped off. Pipe a small swirl on top of each set cauldron, covering the gelatin completely. Create peaks and swirls for a bubbling effect.
- While the cream topping is still soft, decorate with gummy worms or spiders and sprinkle with black sanding sugar or edible glitter if desired.
- Refrigerate the decorated cauldrons for at least 30 minutes before serving. Serve cold.
Notes
For best texture, use fresh gelatin and allow full overnight set. Soften cream cheese before making topping. Use gel food coloring for vibrant color without thinning. Can be made up to 2 days ahead (add topping just before serving).
Nutrition
- Serving Size: 1 cauldron
- Calories: 85
- Sugar: 7
- Sodium: 45
- Fat: 4
- Saturated Fat: 2.5
- Carbohydrates: 8
- Protein: 1
Keywords: Halloween, jello shots, cauldrons, party treat, spooky, gelatin, vodka, cream cheese, festive


