I was supposed to be making a traditional pumpkin pie for a Friendsgiving gathering last November. The plan was simple enough — bake the crust, mix the filling, pour it in, and let the oven do the work. Except my oven had other ideas. It was an old rental apartment model that ran about 25 degrees hotter than whatever you set it to, and I knew this, but I was rushing. I had three different dishes going at once, the sink was piled with bowls, and someone was knocking at the door early. I grabbed the wrong baking pan — a metal one instead of glass — and I was already feeling that tight-chested panic when you realize you’ve forgotten to set a timer.
The crust burned on the edges within 12 minutes. Not just a little brown, but properly, almost-smoke-alarm burned. I stood there staring at it, spatula in hand, and honestly, I almost cried over a pie crust. That’s when I noticed the block of cream cheese sitting on the counter, softening. I had bought it for a cheesecake I planned to make later that week, but in that moment, something clicked. Maybe you’ve been there — that split-second pivot where you decide to scrap the whole plan and try something completely different.
I grabbed the cream cheese, some pumpkin puree I had leftover from another recipe, and a box of graham crackers I kept for emergencies. No oven required. I just started mixing, layering, and praying it would work. What came out of the fridge a few hours later was nothing like the pie I had planned — and honestly, so much better. These no-bake pumpkin cheesecake bars became the star of that dinner, and I haven’t made a traditional pumpkin pie since. Sometimes the best recipes come from your worst kitchen disasters, and this one is proof.
Why You’ll Love This Recipe
These no-bake pumpkin cheesecake bars are the kind of dessert that makes you look like a hero without breaking a sweat. I’ve brought them to four different gatherings this fall alone, and every single time, someone asks for the recipe before they even finish their first bite.
- No Oven Required: Perfect for when your oven is occupied with the main dish, or when you just don’t want to deal with the heat. I made these during an unseasonably warm October and didn’t miss the oven one bit.
- Simple Ingredients: Cream cheese, pumpkin puree, graham crackers, butter, and a few pantry spices. Nothing weird, nothing you have to hunt down at a specialty store.
- Perfect for Hosting: These bars are ideal for dinner parties, potlucks, or holiday gatherings. You can make them a full day ahead, which means one less thing to worry about when guests arrive.
- Crowd-Pleaser: I’ve watched people who “don’t like pumpkin desserts” go back for seconds. The creamy texture and balanced spice level win everyone over.
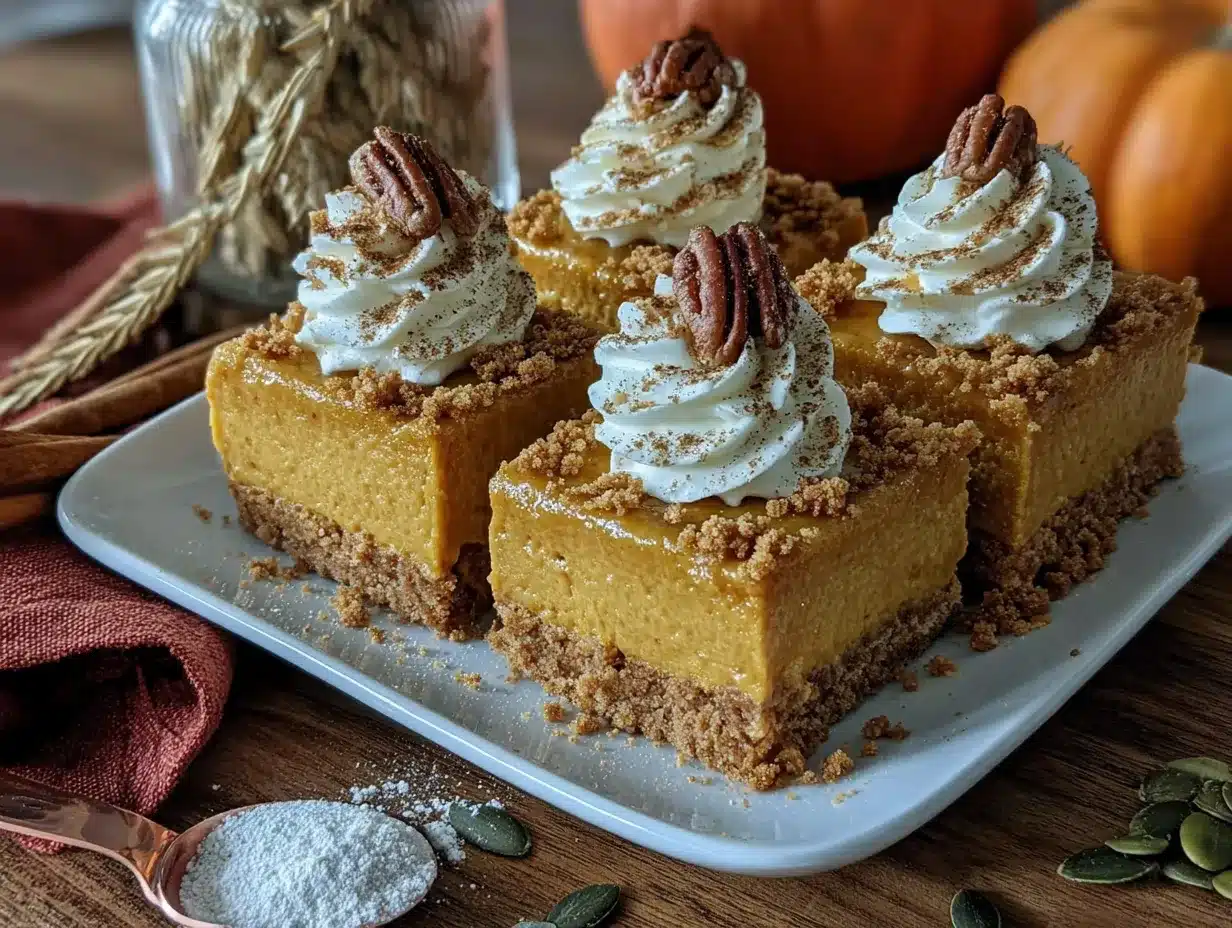
- Unbelievably Delicious: The combination of the buttery graham cracker crust, the velvety pumpkin cheesecake layer, and the light whipped topping is pure comfort. It’s the kind of dessert that makes you close your eyes after the first bite.
What sets these bars apart is the texture. Because there’s no baking, the cheesecake layer stays incredibly smooth and almost mousse-like. It’s lighter than a traditional baked cheesecake but just as satisfying. The spice blend is also dialed in perfectly — warm cinnamon and ginger with just a hint of nutmeg, nothing overpowering.
This recipe isn’t just good — it’s the kind that makes you feel proud to share it. It’s comfort food reimagined, and it’s perfect for impressing guests without any stress.
What Ingredients You Will Need
This recipe uses simple, wholesome ingredients to deliver that rich, creamy pumpkin flavor without the fuss of baking. Most of these are pantry staples for fall baking, so you probably have them on hand already.
For the Crust
- 2 cups graham cracker crumbs (about 16 full sheets, crushed finely)
- 1/2 cup unsalted butter, melted (I prefer using salted butter in a pinch and just omitting the added salt)
- 1/4 cup granulated sugar
- 1/4 teaspoon salt (skip this if using salted butter)
For the Pumpkin Cheesecake Layer
- 16 ounces cream cheese, softened to room temperature (full-fat works best for texture, but Neufchâtel is fine too)
- 1 cup pumpkin puree (not pumpkin pie filling — make sure it’s 100% pure pumpkin)
- 1/2 cup granulated sugar
- 1/4 cup packed light brown sugar
- 1 teaspoon vanilla extract
- 1 1/2 teaspoons ground cinnamon
- 1/2 teaspoon ground ginger
- 1/4 teaspoon ground nutmeg
- 1/8 teaspoon ground cloves (optional, but I love the warmth it adds)
- 1 cup heavy cream, cold (or 1 1/2 cups Cool Whip for a shortcut)
For the Topping (Optional but Recommended)
- 1 cup heavy cream, cold
- 2 tablespoons powdered sugar
- 1/2 teaspoon vanilla extract
- Caramel sauce for drizzling (store-bought is fine, I use the one from Trader Joe’s)
- Crushed pecans or cinnamon dusting for garnish
A quick note on the pumpkin puree: I recommend Libby’s for its consistent texture and deep color. If you’re using a fresh pumpkin, make sure to strain the puree through cheesecloth to remove excess water — otherwise, your cheesecake layer might be too loose to set properly.
Equipment Needed
You don’t need anything fancy for this recipe, which is part of its charm. Here’s what you’ll need:
- 9×9-inch baking pan (an 8×8 works too, the bars will just be slightly thicker)
- Parchment paper (for easy lifting and clean slicing)
- Mixing bowls — at least two medium-sized ones
- Electric hand mixer or stand mixer (a whisk and some elbow grease works, but your arm will thank you for the mixer)
- Food processor or zip-top bag and rolling pin (for crushing graham crackers)
- Spatula for spreading layers evenly
- Plastic wrap for covering while chilling
If you don’t have a food processor, don’t worry. I’ve crushed graham crackers with a rolling pin in a zip-top bag more times than I can count, and it works perfectly. Just make sure the crumbs are fine and even, or the crust might be crumbly.
Preparation Method
Take your time with each step, and you’ll have perfect bars every time. I’ve included all the little details I wish someone had told me the first time I made these.
Step 1: Prepare the Pan
Line your 9×9-inch baking pan with parchment paper, leaving a 2-inch overhang on two opposite sides. This creates handles for lifting the bars out later. Lightly spray the parchment with non-stick spray for extra insurance.
Step 2: Make the Crust
In a medium bowl, combine the graham cracker crumbs, sugar, and salt. Pour the melted butter over the mixture and stir with a fork until every crumb is moistened and the texture looks like wet sand. Press this mixture firmly into the bottom of your prepared pan. I use the bottom of a measuring cup to really pack it down — a loose crust will fall apart when you slice the bars. Place the pan in the refrigerator while you make the filling, at least 15 minutes.
Step 3: Whip the Cream
In a large mixing bowl, pour the cold heavy cream. Using your electric mixer on medium-high speed, whip the cream until stiff peaks form. This takes about 3-4 minutes. Be careful not to over-whip, or you’ll end up with butter. Set the whipped cream aside in the refrigerator if your filling isn’t ready yet.
Step 4: Make the Cheesecake Filling
In another large bowl, beat the softened cream cheese with the electric mixer on medium speed until smooth and creamy, about 2 minutes. Scrape down the sides of the bowl with a spatula. Add both sugars, the vanilla, and all the spices, and beat for another minute until everything is well combined and fluffy.
Add the pumpkin puree and beat on low speed just until incorporated. Do not over-mix here — you want the filling to stay light and airy. The mixture should be a beautiful orange color and smell like fall in a bowl.
Step 5: Fold in the Whipped Cream
This is the most important step. Take your chilled whipped cream and add about one-third of it to the pumpkin mixture. Gently fold it in with a spatula using a cutting motion — down through the middle, scrape along the bottom, and fold over the top. Add the remaining whipped cream in two more additions, folding gently each time until no white streaks remain. The mixture should be light, mousse-like, and pillowy.
Step 6: Assemble and Chill
Remove the crust from the refrigerator. Spoon the pumpkin cheesecake filling onto the crust and spread it evenly with your spatula. Give the pan a few gentle taps on the counter to release any air bubbles. Cover the pan tightly with plastic wrap and refrigerate for at least 6 hours, but overnight is better. I know it’s tempting to rush this, but the bars need that time to set properly. Cutting them too early will give you a mess.
Step 7: Add Toppings and Serve
Once the bars are fully chilled and firm, lift them out of the pan using the parchment handles. Place them on a cutting board. If you’re adding the whipped cream topping, now’s the time. Whip the cream with powdered sugar and vanilla until soft peaks form, then spread or pipe it over the top. Drizzle with caramel sauce and sprinkle with crushed pecans or a dusting of cinnamon. Use a sharp knife to slice into 9 or 16 squares, wiping the knife clean between cuts for neat edges.
Cooking Tips & Techniques
I’ve made these bars at least a dozen times now, and I’ve learned a few things the hard way so you don’t have to.
Make sure your cream cheese is truly softened. Cold cream cheese will leave you with lumpy filling, and nobody wants that. Leave it on the counter for at least an hour, or microwave it in 10-second bursts if you’re in a hurry. It should feel like soft butter when you press it.
Don’t skip the chilling time. I once tried to cut these after only four hours because guests were arriving early, and the bars were a sloppy, delicious disaster. They tasted great, but they looked like a crime scene. Give them the full overnight chill, and you’ll get clean, beautiful slices.
Use a hot knife for clean cuts. Run your knife under hot water, dry it off, and slice. Wipe the blade clean between each cut. This makes a huge difference in presentation, especially if you’re serving these at a dinner party.
Watch your pumpkin puree. If your pumpkin puree looks watery at all, blot it with a paper towel before adding it to the filling. Too much moisture will prevent the bars from setting properly, and you’ll end up with a softer, almost pudding-like texture.
Taste as you go. I always taste the filling before folding in the whipped cream to check the spice level. Sometimes I add an extra pinch of cinnamon or a dash more ginger. Trust your palate — you know what you like.
Variations & Adaptations
One of the best things about this recipe is how flexible it is. Here are some variations I’ve tried and loved:
Gluten-Free Version: Use gluten-free graham crackers or crushed gluten-free cookies for the crust. I’ve used Schär’s graham-style crackers with great results. The filling is naturally gluten-free, so this is an easy swap.
Dairy-Free Version: Substitute the cream cheese with a high-quality dairy-free alternative like Kite Hill or Miyoko’s. Use coconut cream (the solid part from a can of full-fat coconut milk) instead of heavy cream. The texture will be slightly different — a bit softer — but the flavor is still fantastic.
Bourbon Maple Twist: Add 2 tablespoons of bourbon and 1/4 cup of maple syrup (reduce the granulated sugar by 2 tablespoons) to the cheesecake filling. This is my personal favorite for adult gatherings. The bourbon adds a warm, smoky depth that pairs beautifully with the pumpkin.
Chocolate Pumpkin Swirl: Melt 1/2 cup of semi-sweet chocolate chips and swirl it into the filling before chilling. Use a knife to create gentle figure-eight patterns through the batter. The chocolate and pumpkin combo is surprisingly good, and it looks stunning when sliced.
Pecan Praline Topping: Instead of whipped cream, top the bars with a quick pecan praline. Toast 1 cup of pecans, then simmer 1/2 cup brown sugar, 1/4 cup heavy cream, and 2 tablespoons butter for 3 minutes. Pour over the bars and chill until set. This adds a wonderful crunch and caramel flavor.
Serving & Storage Suggestions
These bars are best served cold, straight from the refrigerator. The texture is firm but creamy, almost like a frozen mousse. I like to let them sit at room temperature for about 10 minutes before serving — it takes the chill off and lets the flavors open up.
For presentation, I arrange the bars on a large platter with a drizzle of caramel sauce and a sprinkle of flaky sea salt. It looks fancy but takes 30 seconds. A few fresh cranberries or small rosemary sprigs add a beautiful festive touch for holiday gatherings.
These pair beautifully with a cup of hot apple cider, a spiced chai latte, or even a dark stout beer. For a full dessert spread, serve them alongside pecan pie bars or a simple apple crisp.
Storage: Keep the bars in an airtight container in the refrigerator for up to 5 days. The flavor actually improves after the first day as the spices meld together. I’ve never had any last longer than 3 days in my house, though.
Freezing: These freeze beautifully. Wrap individual bars tightly in plastic wrap, then place them in a freezer-safe bag. They’ll keep for up to 3 months. Thaw in the refrigerator overnight before serving. I keep a stash in the freezer for unexpected guests or late-night cravings.
Nutritional Information & Benefits
Here’s the approximate nutritional breakdown for one bar (based on 9 servings):
- Calories: 380
- Fat: 28g
- Carbohydrates: 30g
- Protein: 5g
- Fiber: 2g
- Sugar: 22g
These numbers will vary depending on your specific ingredients and portion sizes. If you use the dairy-free version, the fat content will be similar but the sugar may be slightly lower.
Pumpkin is packed with vitamin A, which supports eye health and immune function. The cream cheese provides calcium and protein, while the cinnamon and ginger offer anti-inflammatory benefits. This isn’t a health food by any means, but it’s a dessert that offers a little more than empty calories.
For a lighter version, you can reduce the sugar in the filling by 1/4 cup and use low-fat cream cheese. The texture will be slightly less creamy, but the flavor will still be great.
Conclusion
These no-bake pumpkin cheesecake bars have become my signature fall dessert, and I don’t see that changing anytime soon. They’re the recipe that taught me to trust my instincts in the kitchen and to embrace the happy accidents that happen along the way. Every time I make them, I remember that burnt pie crust and the panic that turned into something wonderful.
I hope you give these a try, whether you’re hosting a Friendsgiving, bringing dessert to a potluck, or just treating yourself on a cozy autumn evening. Don’t be afraid to play with the spices or try one of the variations I mentioned — the best recipes are the ones you make your own.
If you make these bars, I’d love to hear about it. Drop a comment below and let me know how they turned out, or share your own twist on the recipe. And if you’re looking for another crowd-pleasing dessert, check out my easy pumpkin dump cake — it’s just as simple and always disappears fast. Happy baking, friends!
Frequently Asked Questions
Can I use pumpkin pie filling instead of pumpkin puree?
No, I wouldn’t recommend it. Pumpkin pie filling already has sugar and spices added, which will throw off the balance of this recipe. Stick with 100% pure pumpkin puree for the best results.
How far in advance can I make these bars?
You can make them up to 2 days ahead of time. Just keep them covered in the refrigerator. I actually think they taste better on day two after the flavors have had time to meld together.
Can I use a different crust?
Absolutely. Ginger snaps make an amazing crust for these bars — the spicy flavor pairs perfectly with the pumpkin. You can also use vanilla wafers, shortbread cookies, or even crushed pretzels for a sweet-salty twist.
Why are my bars too soft and not setting?
This usually happens for one of three reasons: the cream cheese wasn’t fully softened, the pumpkin puree was too watery, or you didn’t chill them long enough. Make sure to blot your pumpkin puree if it looks wet, and give the bars at least 6 hours in the fridge.
Can I double this recipe for a 9×13 pan?
Yes, you can double all the ingredients and use a 9×13-inch pan. The bars will be slightly thinner, so reduce the chilling time by about an hour. You’ll get about 24 servings from the larger pan, which is perfect for big gatherings.
PrintNo-Bake Pumpkin Cheesecake Bars: Best Easy Fall Dessert
These no-bake pumpkin cheesecake bars are the perfect fall dessert with a buttery graham cracker crust, a velvety pumpkin cheesecake layer, and a light whipped topping. No oven required, simple ingredients, and a crowd-pleaser for any gathering.
- Prep Time: 20 minutes
- Cook Time: 0 minutes
- Total Time: 6 hours 20 minutes (includes chilling)
- Yield: 9 servings 1x
- Category: Dessert
- Cuisine: American
Ingredients
- 2 cups graham cracker crumbs (about 16 full sheets, crushed finely)
- 1/2 cup unsalted butter, melted
- 1/4 cup granulated sugar
- 1/4 teaspoon salt (skip if using salted butter)
- 16 ounces cream cheese, softened to room temperature
- 1 cup pumpkin puree (not pumpkin pie filling)
- 1/2 cup granulated sugar
- 1/4 cup packed light brown sugar
- 1 teaspoon vanilla extract
- 1 1/2 teaspoons ground cinnamon
- 1/2 teaspoon ground ginger
- 1/4 teaspoon ground nutmeg
- 1/8 teaspoon ground cloves (optional)
- 1 cup heavy cream, cold (or 1 1/2 cups Cool Whip for a shortcut)
- 1 cup heavy cream, cold (for topping)
- 2 tablespoons powdered sugar (for topping)
- 1/2 teaspoon vanilla extract (for topping)
- Caramel sauce for drizzling
- Crushed pecans or cinnamon dusting for garnish
Instructions
- Line a 9×9-inch baking pan with parchment paper, leaving a 2-inch overhang on two opposite sides. Lightly spray with non-stick spray.
- In a medium bowl, combine graham cracker crumbs, 1/4 cup sugar, and salt. Pour melted butter over the mixture and stir with a fork until every crumb is moistened. Press firmly into the bottom of the prepared pan using the bottom of a measuring cup. Refrigerate for at least 15 minutes.
- In a large mixing bowl, pour 1 cup cold heavy cream. Using an electric mixer on medium-high speed, whip until stiff peaks form, about 3-4 minutes. Set aside in the refrigerator.
- In another large bowl, beat softened cream cheese on medium speed until smooth and creamy, about 2 minutes. Scrape down the sides. Add 1/2 cup granulated sugar, brown sugar, vanilla, cinnamon, ginger, nutmeg, and cloves. Beat for another minute until well combined and fluffy.
- Add pumpkin puree and beat on low speed just until incorporated. Do not over-mix.
- Fold in the whipped cream in three additions, using a spatula with a cutting motion until no white streaks remain. The mixture should be light and mousse-like.
- Remove crust from refrigerator. Spoon the pumpkin cheesecake filling onto the crust and spread evenly. Tap the pan gently on the counter to release air bubbles. Cover tightly with plastic wrap and refrigerate for at least 6 hours, preferably overnight.
- Once fully chilled and firm, lift the bars out using the parchment handles. For the topping, whip 1 cup heavy cream with powdered sugar and vanilla until soft peaks form. Spread or pipe over the top. Drizzle with caramel sauce and sprinkle with crushed pecans or cinnamon. Slice into 9 or 16 squares using a sharp knife, wiping clean between cuts.
Notes
Make sure cream cheese is truly softened to avoid lumps. Do not skip the chilling time; overnight is best for clean slices. Use a hot knife for clean cuts. If pumpkin puree looks watery, blot with a paper towel before adding. Taste the filling before folding in whipped cream to adjust spices.
Nutrition
- Serving Size: 1 bar
- Calories: 380
- Sugar: 22
- Fat: 28
- Carbohydrates: 30
- Fiber: 2
- Protein: 5
Keywords: no-bake pumpkin cheesecake bars, easy fall dessert, pumpkin cheesecake, no-bake dessert, pumpkin bars, fall baking, Thanksgiving dessert


