I was standing in the checkout line at the hardware store last October when a kid walked past holding one of those cheap plastic pumpkin buckets—the kind that always smells faintly of vinyl and anticipation. And I don’t know if it was the rustle of his costume or the way the fluorescent lights hit that orange plastic, but suddenly I was seven years old, sitting cross-legged on my Aunt Jo’s linoleum kitchen floor. She was pulling a baking sheet from the oven, and the whole room filled with the smell of butter and vanilla and something else—something that felt like a secret. She turned around with oven mitts that had little roosters on them and said, “These are for the ghosts.” I had no idea what she meant. But then I saw them: sugar cookies cut into perfect little rounded shapes, iced white, with two dark eyes staring back at me. Not scary. Friendly. Like they knew something I didn’t.
I haven’t thought about Aunt Jo in years. She passed when I was twelve, and honestly, her ghost cookies became one of those memories I just assumed was gone forever. But standing there in the hardware aisle—holding a bag of mulch, of all things—it came rushing back. The way she’d let me press the chocolate chips in for the eyes. The way she’d hum along to the radio, off-key but completely unbothered. I mean, I almost started crying over landscaping supplies. You know that feeling when a memory hits you so hard you can’t tell if it’s sad or happy? It’s both. It’s always both.
So I went home and I made these. Not her exact recipe—I’ve had to reconstruct it from taste-memory and a lot of trial and error. But these Spooky Season Ghost Sugar Cookies are close. Like, close enough that I caught myself humming that same off-key song while I rolled out the dough. They’re soft, they’re buttery, and they’ve got that perfect little puff when they bake. And honestly? They’re the reason I keep making cookies in October, even when I tell myself I’m too busy. Some recipes just stay with you. This one stayed with me for twenty-three years before I finally wrote it down.
Why You’ll Love This Recipe
Let me tell you—I’ve tested a lot of sugar cookie recipes over the years. Some are too dry. Some spread into unrecognizable blobs in the oven. Some taste like nothing but sweet. These Spooky Season Ghost Sugar Cookies are none of those things. They’re the result of about six batches of trial and error, one very patient husband who ate all the mistakes, and a deep, stubborn need to get it right.
- Perfectly Soft, Not Cakey : These cookies bake up with a tender, melt-in-your-mouth texture that holds its shape. No spreading, no puffing into weird dome shapes. Just a clean little ghost silhouette every time.
- Simple Pantry Ingredients : Butter, sugar, flour, eggs, vanilla—you probably have everything already. No weird extracts, no specialty flours. Just honest, basic baking ingredients.
- No Chill Time Required : I know, I know—most cut-out cookie recipes make you chill the dough for hours. Not this one. You can go from mixing bowl to oven in about 20 minutes. Perfect for when the Halloween mood strikes suddenly.
- Kid-Friendly Activity : My niece helped me decorate the last batch, and let me tell you, her ghosts had three eyes and lopsided smiles. It was adorable. This is the kind of recipe you make with little hands helping.
- Customizable for Any Spooky Occasion : Change the icing color, add sprinkles, or leave them plain white. They work for Halloween parties, school treats, or just a cozy October afternoon.
What makes these different from every other ghost cookie recipe out there? It’s the texture. I use a combination of butter and a tiny bit of cream cheese in the dough. I know—it sounds weird for sugar cookies. But the cream cheese gives them this subtle tang that balances the sweetness, and it keeps the cookies soft for days. Plus, they don’t spread. I’ve tested them with different flours, different fats, different chilling times. This version is the one that made me stop testing. It’s the one that tastes like Aunt Jo’s kitchen.
What Ingredients You Will Need
This recipe uses simple, everyday ingredients to create something that feels a little bit magical. The key is using good-quality basics and paying attention to temperature. Here’s what you’ll need:
For the Cookie Dough:
- 1 cup (226g) unsalted butter, softened to room temperature (I use Kerrygold for the best flavor, but any good unsalted butter works)
- 4 ounces (113g) cream cheese, softened (full-fat is best here—low-fat changes the texture)
- 1 cup (200g) granulated sugar
- 1 large egg, room temperature
- 1 teaspoon vanilla extract (use real vanilla, not imitation—it makes a difference)
- ½ teaspoon almond extract (optional, but it adds that classic bakery flavor)
- 2 ½ cups (312g) all-purpose flour, spooned and leveled
- ½ teaspoon baking powder
- ¼ teaspoon salt
For the Royal Icing:
- 2 cups (240g) powdered sugar, sifted
- 2 tablespoons meringue powder (I like Wilton brand for consistency)
- 3-4 tablespoons water, plus more as needed
- ¼ teaspoon vanilla extract
- Black food coloring gel (for the eyes and mouth—I use Americolor Super Black)
Ingredient Tips:
For the butter and cream cheese, make sure they’re truly at room temperature. Not microwaved, not partially softened—just left on the counter for about an hour. Cold ingredients won’t cream together properly, and you’ll end up with dense, flat cookies. I learned this the hard way after a batch that looked like sad pancakes.
For the flour, spoon it into your measuring cup and level it off with a knife. Scooping directly from the bag packs the flour down and gives you too much, which makes dry cookies. Trust me on this one—I’ve made that mistake more times than I want to admit.
The almond extract is optional, but it gives these cookies that “bakery” taste that makes people ask for the recipe. If you’re allergic to nuts or just don’t like almond flavor, leave it out and add an extra ½ teaspoon of vanilla instead.
Equipment Needed
You don’t need a ton of fancy equipment for these Spooky Season Ghost Sugar Cookies, but a few specific tools will make your life easier:
- Electric stand mixer or hand mixer : You can cream the butter and sugar by hand, but your arm will get tired. I use my KitchenAid stand mixer for this.
- Large mixing bowls : One for the wet ingredients, one for the dry.
- Ghost-shaped cookie cutter : I got mine on Amazon for about six dollars. Wilton makes a good one, or you can find them at craft stores in the baking section.
- Rolling pin : I prefer a French-style tapered rolling pin, but any rolling pin works. If you don’t have one, a clean wine bottle works in a pinch—I’ve done it.
- Parchment paper or silicone baking mats : These prevent sticking and make cleanup so much easier.
- Baking sheets : Light-colored aluminum sheets work best. Dark sheets can cause the bottoms to brown too quickly.
- Cooling rack : Essential for letting the cookies cool completely before icing.
- Piping bags or squeeze bottles : For the royal icing. I use disposable piping bags with a #2 round tip, but squeeze bottles work great for flooding.
- Small offset spatula : Helpful for transferring cut cookies to the baking sheet.
If you don’t have a ghost cookie cutter, you can make a template from cardboard and cut around it with a sharp knife. It’s more work, but it works. I did that for my first batch because I couldn’t find a ghost cutter anywhere in October—every store was sold out.
Preparation Method
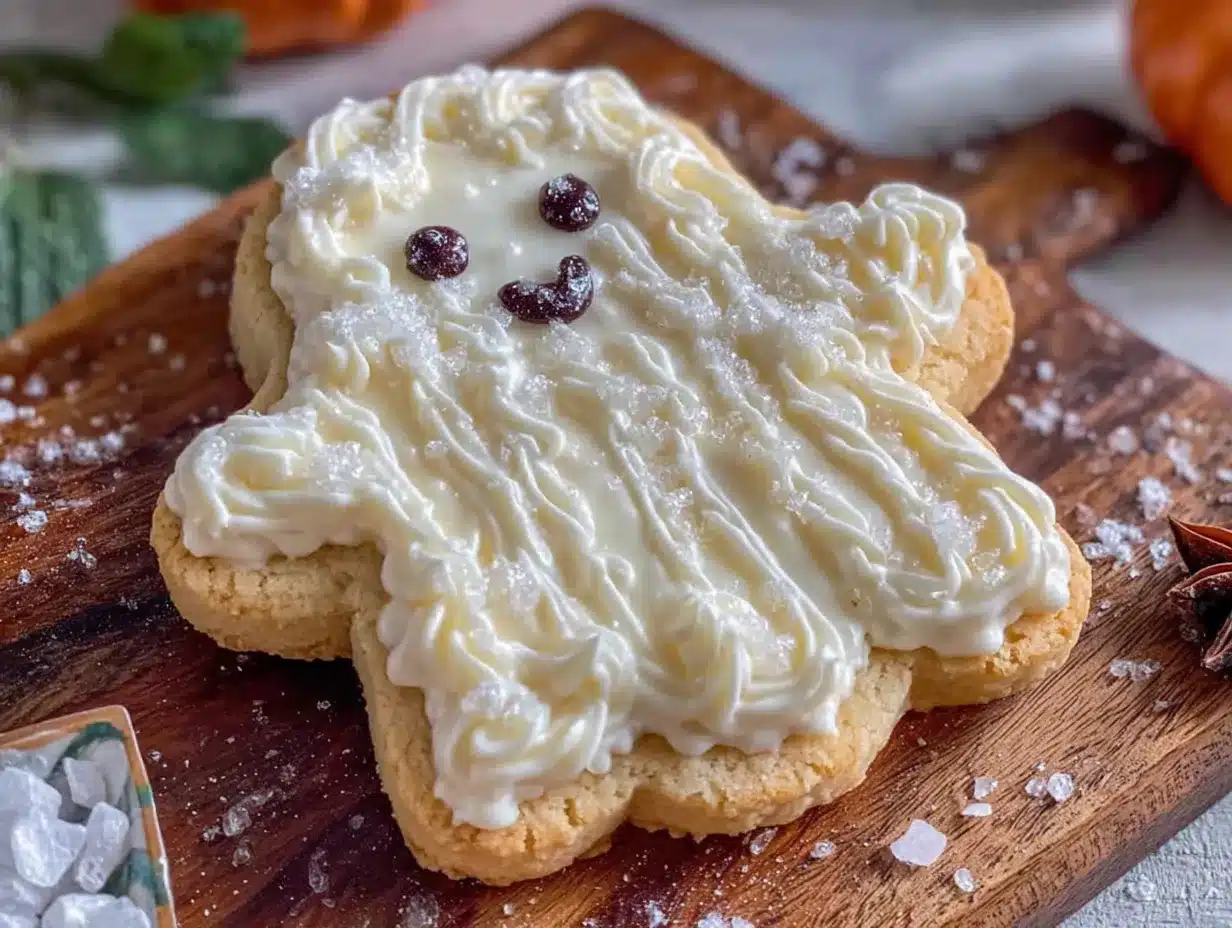
Alright, let’s make some ghosts. This process is straightforward, but there are a few key moments where paying attention makes all the difference.
Step 1: Cream the Butter and Cream Cheese
In a large mixing bowl, beat the softened butter and cream cheese together on medium speed until smooth and well combined—about 2 minutes. You want it light and fluffy, with no lumps. Scrape down the sides of the bowl with a spatula halfway through. If you see little white specks of cream cheese, keep beating until they disappear.
Step 2: Add Sugar and Extracts
Add the granulated sugar and beat on medium-high speed for another 2-3 minutes, until the mixture is pale and fluffy. This is where you’re incorporating air into the dough, which helps the cookies stay tender. Add the egg, vanilla extract, and almond extract (if using). Beat until just combined—don’t overmix here, or the egg can make the dough tough.
Step 3: Combine Dry Ingredients
In a separate bowl, whisk together the flour, baking powder, and salt. This ensures the baking powder is evenly distributed—nobody wants a bite of cookie that tastes like baking powder. Trust me, I’ve been there.
Step 4: Mix Dough
Gradually add the dry ingredients to the wet ingredients, mixing on low speed. Add about a third at a time, mixing just until the flour disappears before adding more. The dough will be soft but not sticky. If it feels too sticky to handle, add another tablespoon of flour. If it feels dry and crumbly, add a teaspoon of milk. Dough consistency varies with humidity, flour brands, and even the temperature of your kitchen.
Step 5: Roll and Cut
Lightly flour your work surface and rolling pin. Roll the dough out to about ¼-inch thickness. I like to roll between two sheets of parchment paper—no mess, no extra flour, and the dough doesn’t stick. Cut out ghost shapes and transfer them to a parchment-lined baking sheet, spacing them about 2 inches apart. They don’t spread much, but they need a little breathing room.
Step 6: Bake
Preheat your oven to 350°F (175°C). Bake the cookies for 8-10 minutes, or until the edges are just barely golden. The centers should look set but not browned. They’ll continue to cook slightly on the hot baking sheet after you take them out. Let them cool on the baking sheet for 5 minutes, then transfer to a cooling rack to cool completely. Do not ice warm cookies—the icing will melt and slide right off. I learned this the messy way.
Step 7: Make the Royal Icing
In a medium bowl, combine the sifted powdered sugar, meringue powder, and 3 tablespoons of water. Beat on low speed until combined, then increase to medium-high and beat for 4-5 minutes, until the icing is thick and glossy. It should hold a ribbon trail when you lift the beater. Add more water, one teaspoon at a time, until the icing reaches a “15-second” consistency—when you drizzle a ribbon of icing back into the bowl, it should take about 15 seconds to disappear. This is the perfect consistency for flooding cookies.
Step 8: Decorate
Divide the icing into two portions. Leave one portion white. Add black food coloring gel to the other portion until it’s a deep, dark black. Transfer the white icing to a piping bag fitted with a #2 round tip. Outline each ghost cookie, then flood the center with more icing. Use a toothpick to spread the icing into the corners. While the white icing is still wet, pipe on two black dots for eyes and a small oval for the mouth. The black icing will sink into the white slightly, creating a smooth surface. Let the cookies dry completely—this takes about 4-6 hours at room temperature, or overnight.
Cooking Tips & Techniques
I’ve made a lot of mistakes with these Spooky Season Ghost Sugar Cookies so you don’t have to. Here are the things I wish someone had told me:
Don’t overbake. This is the number one mistake people make with sugar cookies. They look underdone when you pull them out, but they set up perfectly as they cool. If you wait until the edges are brown, the cookies will be hard and crunchy instead of soft and tender. Pull them when they look just barely set in the center.
Use a light-colored baking sheet. Dark sheets absorb more heat and can cause the bottoms of your cookies to brown before the tops are done. If all you have is dark sheets, reduce your oven temperature by 25 degrees and keep a close eye on them.
Keep the dough cool. If your kitchen is warm and the dough starts getting sticky, pop it in the fridge for 10-15 minutes. You don’t need to chill it before baking, but if it’s too soft to handle, a quick chill helps. I once tried to roll dough in a 90-degree kitchen without air conditioning—total disaster. The cookies spread into ghost-shaped blobs that looked more like ghosts that had melted in the sun.
Royal icing consistency is everything. If the icing is too thick, it won’t spread smoothly. If it’s too thin, it will run right off the cookie and pool on your baking sheet. The 15-second test is your friend. And if you mess up? Just scrape it off and start over. The cookies are sturdy enough to handle a little re-icing.
Plan for drying time. These cookies need several hours to dry completely. If you’re making them for a party, do the baking one day and the decorating the next. Or start early in the morning and let them dry while you do other things. Stacking or storing them before the icing is fully set will ruin all your hard work.
Variations & Adaptations
One of the best things about this recipe is how easy it is to adapt. Here are some of my favorite variations:
Gluten-Free Ghosts: Substitute the all-purpose flour with a 1:1 gluten-free baking flour blend. I’ve used Bob’s Red Mill and King Arthur Measure for Measure with great results. The texture is slightly more delicate, so handle the dough gently. Everything else stays the same.
Vegan Version: Use vegan butter sticks (not the spreadable kind in a tub) and vegan cream cheese. Replace the egg with a flax egg (1 tablespoon ground flaxseed mixed with 3 tablespoons water, let sit for 5 minutes). For the royal icing, use aquafaba (the liquid from a can of chickpeas) instead of meringue powder—3 tablespoons of aquafaba whipped to stiff peaks replaces the meringue powder and water.
Chocolate Ghosts: Replace ¼ cup of the flour with ¼ cup of unsweetened cocoa powder. The ghosts will be chocolate-colored, which is a fun twist. You can still decorate them with white icing for a spooky contrast.
Spiced Ghosts: Add 1 teaspoon of pumpkin pie spice or cinnamon to the dry ingredients. This gives the cookies a warm, fall flavor that pairs beautifully with the vanilla. I made these for a Halloween potluck and they disappeared first.
Different Shapes: Obviously, ghost shapes are perfect for October. But this dough works with any cookie cutter. Pumpkins, bats, cats, skeletons—whatever you have. The recipe makes about 24-30 cookies, depending on the size of your cutter.
No-Icing Option: If you don’t want to mess with royal icing, just bake the cookies and dust them with powdered sugar. Or press chocolate chips into the dough before baking for simple ghost eyes. It’s not as fancy, but it’s still delicious and way less work.
Serving & Storage Suggestions
These Spooky Season Ghost Sugar Cookies are best served at room temperature, with the royal icing fully set and firm. They make a fantastic addition to any Halloween party spread—arrange them on a platter with some fake spiderwebs and plastic spiders for a creepy-cool presentation. I like to stack them in a clear glass jar tied with a black ribbon for a simple, festive look.
They pair beautifully with a cup of hot apple cider, a pumpkin spice latte, or a cold glass of milk. For a grown-up twist, serve them alongside a dark hot chocolate with a splash of peppermint schnapps. The sweetness of the cookie balances the bitterness of the dark chocolate perfectly.
Storage Instructions:
Store undecorated cookies in an airtight container at room temperature for up to 5 days. They stay soft and tender the whole time—no stale, hard cookies here. If you’ve already decorated them with royal icing, store them in a single layer in an airtight container, with parchment paper between layers if you need to stack them. The icing needs to stay dry, so keep them away from humidity.
Freezing Instructions:
You can freeze the unbaked cookie dough for up to 3 months. Roll it out, cut the shapes, and place them on a parchment-lined baking sheet. Freeze until solid, then transfer the frozen cookie cutouts to a freezer bag. When you’re ready to bake, place them frozen on a baking sheet and add 1-2 minutes to the baking time. You can also freeze baked, undecorated cookies for up to 2 months. Thaw at room temperature before decorating.
Flavor Development:
These cookies actually taste better the day after baking. The flavors meld together, and the texture becomes even softer. If you’re making them for a party, bake them a day ahead and decorate the morning of. Your future self will thank you.
Nutritional Information & Benefits
Let’s be real—these are sugar cookies. They’re a treat, not a health food. But here’s the estimated nutritional information per cookie (based on 24 cookies):
| Nutrient | Amount Per Cookie |
|---|---|
| Calories | 185 |
| Total Fat | 9g |
| Saturated Fat | 5g |
| Cholesterol | 30mg |
| Sodium | 75mg |
| Total Carbohydrates | 25g |
| Sugars | 15g |
| Protein | 2g |
These cookies contain dairy, gluten, and eggs. If you’re using the almond extract, they also contain tree nuts. The royal icing contains egg whites from the meringue powder, so it’s not suitable for raw egg consumption if you’re pregnant or immunocompromised—though the meringue powder is pasteurized and generally considered safe.
On the positive side, these cookies are made with real butter and cream cheese, which means they have a small amount of calcium and vitamin A. The cream cheese also adds a tiny bit of protein. Look, I’m not saying these are good for you. I’m saying they’re good for your soul. And sometimes that’s exactly what you need.
Conclusion
These Spooky Season Ghost Sugar Cookies are more than just a Halloween treat. They’re a way to slow down, to make something with your hands, to create a little bit of magic in your own kitchen. Whether you’re making them for a party, for your kids, or just for yourself on a quiet October evening, they deliver that perfect combination of buttery, sweet, and soft that keeps people coming back for more.
I’ve made these cookies every October for the past five years now. They’ve become my little ritual—my way of honoring Aunt Jo’s memory and passing along a tradition that means more to me than I can put into words. And every time I pipe those little black eyes onto a ghost-shaped cookie, I smile. It’s silly, I know. But it feels like she’s still there, humming off-key in the kitchen with me.
I’d love to see your versions of these cookies! Tag me in your photos, leave a comment below telling me about your own Halloween traditions, or share your own twists on the recipe. Did you add sprinkles? Make them gluten-free? Turn them into Frankenstein monsters instead of ghosts? I want to hear all about it. Happy baking, and happy spooky season!
Frequently Asked Questions
Can I use shortening instead of butter?
You can, but the flavor and texture will be different. Butter gives these cookies their rich taste and soft texture. Shortening makes cookies more tender but also more greasy and less flavorful. If you need a dairy-free option, use vegan butter sticks instead of shortening.
Why did my cookies spread in the oven?
Most likely, your dough was too warm. If your kitchen is hot or the dough has been sitting out for a while, the butter can soften too much and cause spreading. Pop the cut-out cookies in the fridge for 10-15 minutes before baking. Also, make sure your butter and cream cheese were softened but not melted when you started.
Can I make the dough ahead of time?
Absolutely. You can make the dough, wrap it tightly in plastic wrap, and refrigerate it for up to 3 days. Let it sit at room temperature for about 10 minutes before rolling—it will be too firm to roll straight from the fridge. You can also freeze the dough for up to 3 months.
How do I get the royal icing perfectly smooth?
The key is the right consistency. The icing should be thin enough to spread on its own but thick enough to hold its shape. Use the 15-second test: drizzle a ribbon of icing back into the bowl and count how long it takes to disappear. If it’s gone in 15 seconds, you’re golden. Use a toothpick to help spread the icing into corners and pop any air bubbles.
Can I use a different icing instead of royal icing?
Sure! A simple glaze made from powdered sugar and milk works in a pinch. It won’t be as smooth or as hard, but it will still look cute. You can also use store-bought cookie icing in a tube for quick decorating. Just know that it won’t dry as hard, so stacking the cookies will be tricky.
PrintEasy Spooky Ghost Sugar Cookies – Best Halloween Treat
These soft, buttery ghost sugar cookies are the perfect Halloween treat. Made with a secret cream cheese addition for a tender texture and subtle tang, they’re easy to decorate and require no chill time.
- Prep Time: 20 minutes
- Cook Time: 10 minutes
- Total Time: 30 minutes
- Yield: 24 cookies 1x
- Category: Dessert
- Cuisine: American
Ingredients
- 1 cup (226g) unsalted butter, softened
- 4 ounces (113g) cream cheese, softened
- 1 cup (200g) granulated sugar
- 1 large egg, room temperature
- 1 teaspoon vanilla extract
- ½ teaspoon almond extract (optional)
- 2 ½ cups (312g) all-purpose flour, spooned and leveled
- ½ teaspoon baking powder
- ¼ teaspoon salt
- 2 cups (240g) powdered sugar, sifted
- 2 tablespoons meringue powder
- 3–4 tablespoons water
- ¼ teaspoon vanilla extract
- Black food coloring gel
Instructions
- Cream the butter and cream cheese together on medium speed until smooth and fluffy, about 2 minutes.
- Add sugar and beat on medium-high for 2-3 minutes until pale and fluffy. Add egg, vanilla, and almond extract (if using); beat until just combined.
- In a separate bowl, whisk together flour, baking powder, and salt.
- Gradually add dry ingredients to wet ingredients, mixing on low until just combined. Dough should be soft but not sticky.
- On a lightly floured surface, roll dough to ¼-inch thickness. Cut into ghost shapes and place on parchment-lined baking sheets, spacing 2 inches apart.
- Bake at 350°F (175°C) for 8-10 minutes, until edges are just barely golden. Cool on baking sheet for 5 minutes, then transfer to a wire rack to cool completely.
- For royal icing: beat powdered sugar, meringue powder, 3 tablespoons water, and vanilla until thick and glossy. Add water 1 teaspoon at a time until it reaches 15-second consistency.
- Divide icing; tint one portion black. Pipe white icing to outline and flood each cookie. While wet, pipe black eyes and mouth. Let dry 4-6 hours or overnight.
Notes
Don’t overbake; cookies should look just set in the center. Use light-colored baking sheets. Keep dough cool if sticky. Royal icing consistency is key—use the 15-second test. Plan for 4-6 hours drying time for icing.
Nutrition
- Serving Size: 1 cookie
- Calories: 185
- Sugar: 15
- Sodium: 75
- Fat: 9
- Saturated Fat: 5
- Carbohydrates: 25
- Protein: 2
Keywords: ghost cookies, sugar cookies, Halloween cookies, spooky cookies, ghost sugar cookies, Halloween treat, easy sugar cookies


