It was 11:47 PM on a random Tuesday in October, and I had a very specific craving for something chocolatey, crunchy, and a little bit ridiculous. I didn’t have the energy for a full baking project, but I had a half-eaten bag of Oreos staring at me from the pantry and a block of cream cheese that needed using up. That’s when the idea hit me—what if I made truffles but turned them into little black cats for Halloween? I mean, honestly, the thought arrived fully formed, like a weird little gift from my sleep-deprived brain. I grabbed the Oreos, crushed them with a rolling pin (loudly, at midnight, sorry neighbors), and started mixing. The kitchen was a mess, I got cream cheese on my favorite sweater, and I definitely ate more of the filling than I should have. But the result? These tiny, fudgy, adorable black cat truffles that somehow looked like they belonged on a party platter. I’ve been making them every Halloween since, and let me tell you—they steal the show every single time.
If you’ve ever wanted a dessert that looks impressive but takes almost zero actual skill, this is it. These Black Cat Oreo Truffles are the kind of thing people assume you spent hours on, when really, you just crushed some cookies and dipped them in chocolate. They’re perfect for Halloween parties, potlucks, or just because you want to eat something spooky and delicious. Plus, they’re totally no-bake, which means no fighting with a hot oven while you’re trying to get your costume on. You know that feeling when you need a dessert that’s cute, crowd-pleasing, and secretly easy? Yeah, this is it.
Why You’ll Love This Recipe
I’ve tested this recipe more times than I care to admit, mostly because I kept eating the test batches. But through all those trials, I learned exactly what makes these truffles work. They’re not just another Oreo ball recipe—they’re a showstopper that anyone can pull off.
- Quick & Easy: These come together in about 30 minutes of active time, plus some chilling. Perfect for last-minute Halloween prep when you realize you forgot to plan a dessert.
- Simple Ingredients: Oreos, cream cheese, chocolate—that’s it. No weird specialty items or trips to three different stores.
- Perfect for Halloween Parties: They look like little black cats, which means they fit the theme without being over-the-top. Guests will actually smile when they see them.
- Crowd-Pleaser: I’ve brought these to potlucks, family dinners, and even a work party. They disappear faster than anything else on the table. Kids love them, adults love them, everyone loves them.
- Unbelievably Delicious: The combo of crushed Oreos, creamy filling, and rich chocolate coating is next-level. It’s like a truffle and a cookie had a baby, and that baby is perfect.
What makes this recipe different from the dozens of other Oreo truffle recipes out there? It’s the attention to detail. I learned the hard way that not all chocolate melts the same, and that the shape of your truffles matters if you want them to actually look like cats. This isn’t just another version—it’s the one I keep coming back to because it works every single time.
Honestly, this recipe is the kind that makes you close your eyes after the first bite. It’s comfort food reimagined for a spooky season—rich, creamy, and just the right amount of silly. Perfect for impressing guests without stressing yourself out.
What Ingredients You Will Need
This recipe uses simple, pantry-friendly ingredients that come together to create something truly special. You probably already have most of these on hand, which is exactly what you want when Halloween sneaks up on you.
- Oreo cookies (1 standard 14.3-ounce package): You’ll use the whole cookie—filling and all. I recommend using regular Oreos, not Double Stuf, because the filling-to-cookie ratio is perfect for these truffles. If you’re feeling fancy, you can use the chocolate creme ones, but classic works best.
- Cream cheese (8 ounces, softened): Full-fat cream cheese is key here. Low-fat or Neufchâtel will work in a pinch, but the truffles won’t be as rich or hold their shape as well. Let it sit out for about 30 minutes before you start so it’s easy to mix.
- Black candy melts or dark chocolate (12 ounces): For that sleek black cat look, I prefer Wilton black candy melts. They melt smoothly and set with a nice shine. If you use dark chocolate, add a tiny bit of black gel food coloring to get the right color—just be careful not to add too much or it’ll seize.
- Candy eyes (small, about 24 pieces): You can find these at any craft store or online. They’re what make the cats look like cats, so don’t skip them.
- Black licorice strings or black decorating gel: For the whiskers. I like using black decorating gel because it’s easier to control, but thin licorice strings cut into small pieces work great too.
- Pretzel sticks (about 12, broken in half): These become the ears. You’ll need about 24 half-sticks. They add a nice salty crunch that balances the sweetness.
- Optional: Coconut oil (1 teaspoon): If you’re using dark chocolate, a little coconut oil helps it melt more smoothly and gives a glossier finish.
For the best results, I recommend using name-brand Oreos. The generic versions sometimes have a different texture that doesn’t crush as evenly. And for the cream cheese, Philadelphia is my go-to—it’s consistently creamy and blends beautifully.
Equipment Needed
You don’t need a fancy kitchen to make these truffles, which is part of why I love them. Here’s what you’ll need:
- Food processor or zip-top bag and rolling pin: A food processor makes quick work of crushing the Oreos into fine crumbs. If you don’t have one, a zip-top bag and a rolling pin work just fine—just expect a little arm workout.
- Mixing bowl: Any medium-sized bowl will do. I use a glass one because it’s easy to see when everything is combined.
- Baking sheet lined with parchment paper: For chilling the truffles. Parchment paper is non-negotiable here—wax paper will stick.
- Microwave-safe bowl or double boiler: For melting the chocolate. I use the microwave because it’s faster, but a double boiler gives you more control if you’re nervous about burning the chocolate.
- Fork or dipping tool: For coating the truffles in chocolate. A regular fork works, but a dipping tool with a loop makes it easier to get an even coating.
- Toothpicks: For adding the eyes and whiskers while the chocolate is still wet.
- Small piping bag or zip-top bag with a tiny corner cut off: For applying the black decorating gel for whiskers.
If you don’t have a food processor, honestly, the bag-and-rolling-pin method is almost therapeutic. Just make sure the bag is well-sealed—I learned that one the hard way when Oreo dust exploded all over my kitchen.
Preparation Method
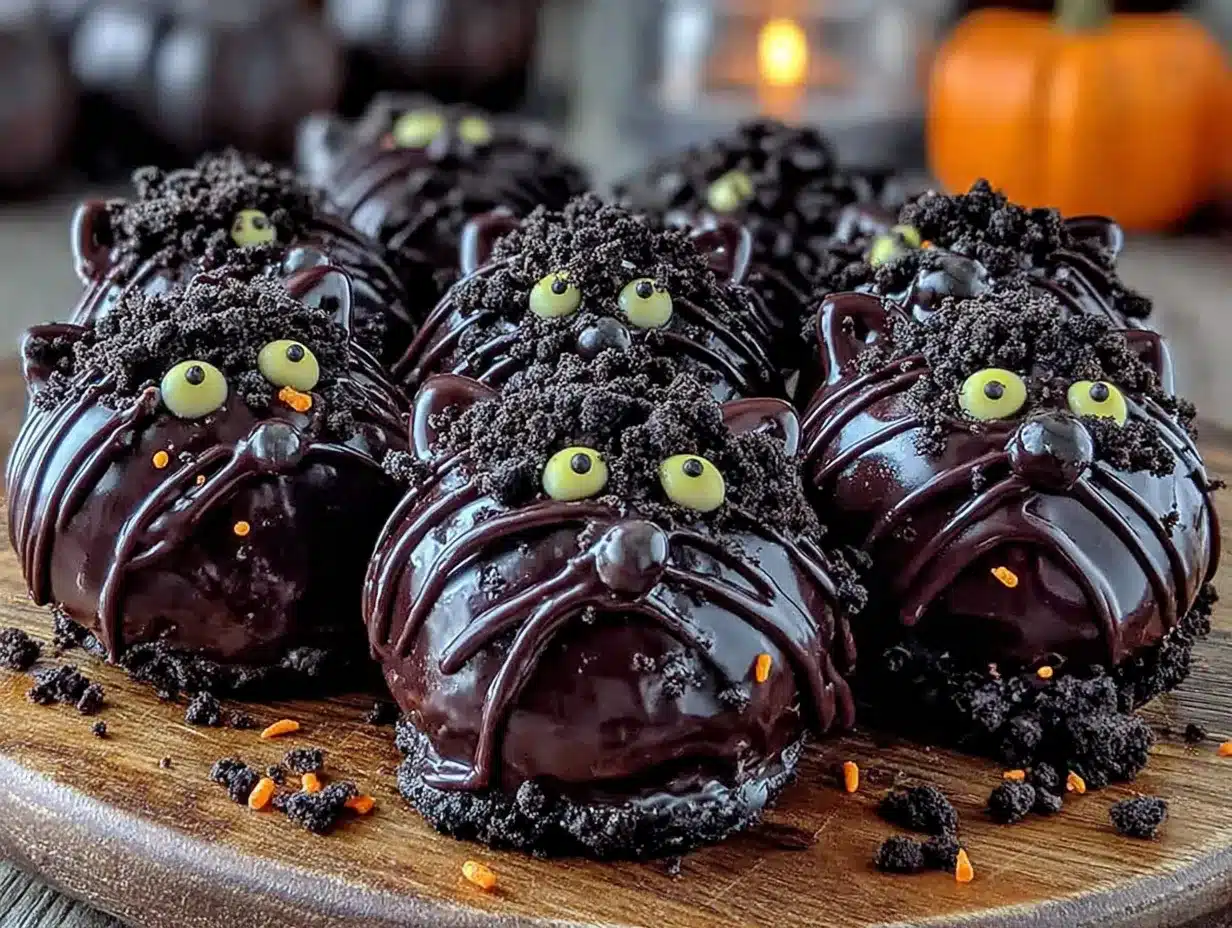
- Crush the Oreos: Place the entire package of Oreos (filling and all) into your food processor. Pulse until you have fine, sand-like crumbs. If you’re using the bag method, put the cookies in a zip-top bag, seal it, and crush them with a rolling pin until no large pieces remain. You should have about 2 cups of crumbs.
- Mix with cream cheese: In a medium bowl, combine the Oreo crumbs with the softened cream cheese. Use a spatula or your hands (I prefer my hands—it’s faster) to mix until everything is fully incorporated. The mixture should look like a dark, fudgy dough. If it’s too dry, add a teaspoon of milk. If it’s too wet, add a few more crushed Oreos.
- Shape the truffles: Scoop out about 1 tablespoon of the mixture and roll it into a ball. Then, gently shape it into an oval that’s slightly pointed at one end—this will be the cat’s head. Place each shaped truffle on the parchment-lined baking sheet. You should get about 24 truffles.
- Add the ears: Take a pretzel stick half and gently press it into the top of each truffle at a slight angle. Repeat with another half on the other side, so they look like cat ears. Press them in just enough so they stay put—don’t push all the way through.
- Chill the truffles: Place the baking sheet in the refrigerator for at least 30 minutes, or up to an hour. This step is crucial—if the truffles aren’t cold, the chocolate coating won’t set properly and the ears will fall off.
- Melt the chocolate: About 5 minutes before you’re ready to dip, melt your black candy melts or dark chocolate. If using the microwave, heat in 30-second intervals, stirring between each, until smooth. If the chocolate is too thick, stir in a teaspoon of coconut oil.
- Dip the truffles: Remove the chilled truffles from the fridge. Using a fork, gently lower one truffle into the melted chocolate. Spoon chocolate over the top to coat it completely. Lift it out and tap the fork gently on the edge of the bowl to remove excess chocolate. Place the coated truffle back on the parchment paper.
- Add the face: While the chocolate is still wet, press two candy eyes into the front of each truffle. Then, using a toothpick or the decorating gel, add a tiny pink or black nose and three whiskers on each side. Work quickly—the chocolate sets fast.
- Let them set: Allow the truffles to sit at room temperature until the chocolate is firm, about 15-20 minutes. If you’re in a hurry, you can pop them back in the fridge for 10 minutes.
- Serve or store: Once set, transfer the truffles to a serving platter or store them in an airtight container in the refrigerator for up to a week.
A few things I’ve learned along the way: if the Oreo mixture sticks to your hands while shaping, lightly dampen your palms with water. And if the chocolate starts to thicken while you’re dipping, just reheat it for 15 seconds—don’t try to work with clumpy chocolate, it’s a disaster.
Cooking Tips & Techniques
I’ve made these truffles enough times to have a few tricks up my sleeve. Here’s what I wish someone had told me the first time.
Don’t overmix the Oreo and cream cheese. I know it’s tempting to keep stirring until it’s perfectly smooth, but overmixing can make the mixture greasy. Stop as soon as everything comes together.
Chill the truffles thoroughly. This is the number one mistake people make. If the truffles are even slightly warm, the chocolate will slide right off, and the pretzel ears will fall out. I’ve had it happen, and it’s frustrating. Give them a full 30 minutes in the fridge, minimum.
Work in small batches. Only take 3-4 truffles out of the fridge at a time to dip. If you take them all out at once, they’ll warm up and start sweating, which makes the chocolate coating look streaky.
Use a deep bowl for dipping. A shallow bowl means you’ll have to tilt it to get the truffles fully coated, which can cause the chocolate to spill everywhere. A deep, narrow bowl lets you submerge the truffles easily.
Tap off excess chocolate gently. When you lift the truffle out of the chocolate, tap the fork against the bowl’s edge a few times. This helps the excess chocolate drip off and prevents a thick, lumpy coating.
One of my biggest failures was the time I tried to use white chocolate with black food coloring instead of black candy melts. It seized up completely, and I ended up with a grainy, ugly mess. Stick with black candy melts—they’re designed for this.
Variations & Adaptations
These truffles are surprisingly flexible. Here are a few ways to switch things up.
Gluten-Free Version: Use gluten-free chocolate sandwich cookies (like Glutino or Kinnikinnick) in place of Oreos. The texture will be slightly different, but they still taste amazing.
Vegan Option: Swap the cream cheese for a vegan cream cheese alternative (I like Kite Hill), and use dairy-free chocolate. The truffles will be a bit softer, so make sure to chill them well before dipping.
Peanut Butter Twist: Add 2 tablespoons of creamy peanut butter to the Oreo mixture before shaping. It gives the truffles a subtle peanut butter flavor that pairs beautifully with the chocolate.
Different Shapes: Instead of cats, you can shape the truffles into pumpkins (orange candy melts, green pretzel stem) or ghosts (white chocolate, black eyes). The base recipe is the same—just change the decorations.
Spicy Kick: Add a pinch of cayenne pepper or cinnamon to the Oreo mixture for a subtle heat that contrasts with the sweet chocolate. It’s unexpected and really good.
I once tried a version with mint Oreos and white chocolate—it was like a thin mint truffle, and it disappeared in minutes. Feel free to experiment!
Serving & Storage Suggestions
These truffles are best served chilled, straight from the fridge. The cold temperature keeps the chocolate snappy and the interior fudgy. Arrange them on a black or orange platter for maximum Halloween vibes. You can even add some edible glitter or sprinkles for extra sparkle.
For a Halloween party, I like to serve them alongside other spooky treats like ghost-shaped brownies or pumpkin cheesecake bites. They also pair beautifully with a hot apple cider or a pumpkin spice latte—the chocolate and spice combo is perfection.
To store, place the truffles in an airtight container, separated by layers of parchment paper. They’ll keep in the refrigerator for up to a week. You can also freeze them for up to 3 months—just thaw them in the fridge overnight before serving.
One thing I’ve noticed: the flavors actually get better after a day or two. The Oreo and cream cheese meld together, and the chocolate sets into a perfect shell. So if you’re making these for a party, make them a day ahead—your future self will thank you.
Nutritional Information & Benefits
Let’s be real—these are a treat, not a health food. But here’s the estimated breakdown per truffle (based on 24 servings):
- Calories: 180
- Fat: 11g
- Carbohydrates: 20g
- Protein: 2g
- Sugar: 14g
That said, there are a few redeeming qualities. The cream cheese provides a small amount of calcium and protein, and the dark chocolate (if you use it) contains antioxidants. Plus, the pretzels add a tiny bit of fiber and iron.
For those with dietary restrictions, this recipe can be adapted to be gluten-free or vegan as noted above. It contains dairy, soy (from the chocolate), and wheat (from the Oreos), so keep that in mind if you’re serving guests with allergies.
Honestly, I don’t make these for the nutritional value—I make them because they make people happy. And sometimes, that’s the most important ingredient.
Conclusion
These Black Cat Oreo Truffles are the kind of recipe that makes you look like a Halloween hero without breaking a sweat. They’re cute, delicious, and surprisingly easy to put together. Whether you’re hosting a party, bringing a dish to a potluck, or just want to surprise your family with something fun, these little cats deliver every time.
I love that I can customize them—add different flavors, change the shape, or just keep them classic. And honestly, the look on people’s faces when they realize the truffles are shaped like cats? Priceless. It’s the little details that make a gathering special, and these truffles bring that extra touch of whimsy.
So go ahead, give them a try. Play around with the decorations, make them your own, and don’t forget to save a few for yourself. When you do, come back and let me know how they turned out—I’d love to hear about your Halloween creations!
Frequently Asked Questions
Can I make these truffles ahead of time?
Absolutely! In fact, they taste even better after a day in the fridge. You can make them up to 3 days in advance and store them in an airtight container.
Why did my chocolate coating crack?
This usually happens if the truffles are too cold when you dip them. Let them sit at room temperature for 5 minutes before dipping. Also, make sure your chocolate isn’t too thick—add a little coconut oil if needed.
Can I use white chocolate instead of black candy melts?
You can, but you’ll need to add black gel food coloring to achieve the right color. Be careful not to add too much, as it can cause the chocolate to seize. Black candy melts are much easier and give a better result.
How do I keep the pretzel ears from falling off?
The key is to chill the truffles thoroughly before dipping. The cold mixture helps the pretzels stay in place. Also, press the pretzels in firmly but gently—don’t wiggle them around once they’re inserted.
Can I freeze these truffles?
Yes! Place them in a freezer-safe container with parchment paper between layers. They’ll keep for up to 3 months. Thaw in the refrigerator overnight before serving.
PrintBest Black Cat Oreo Truffles Easy Halloween Recipe

These Black Cat Oreo Truffles are a no-bake Halloween treat that looks impressive but takes almost zero skill. Made with crushed Oreos, cream cheese, and chocolate, they’re cute, crowd-pleasing, and secretly easy to make.
- Prep Time: 30 minutes
- Cook Time: 0 minutes
- Total Time: 1 hour 30 minutes (includes chilling time)
- Yield: 24 truffles 1x
- Category: Dessert
- Cuisine: American
Ingredients
- 1 standard 14.3-ounce package Oreo cookies
- 8 ounces cream cheese, softened
- 12 ounces black candy melts or dark chocolate
- 24 small candy eyes
- Black licorice strings or black decorating gel for whiskers
- 12 pretzel sticks, broken in half (for ears)
- 1 teaspoon coconut oil (optional, for dark chocolate)
Instructions
- Crush the Oreos: Place the entire package of Oreos (filling and all) into your food processor. Pulse until you have fine, sand-like crumbs. If using the bag method, put the cookies in a zip-top bag, seal it, and crush them with a rolling pin until no large pieces remain. You should have about 2 cups of crumbs.
- Mix with cream cheese: In a medium bowl, combine the Oreo crumbs with the softened cream cheese. Use a spatula or your hands to mix until everything is fully incorporated. The mixture should look like a dark, fudgy dough. If it’s too dry, add a teaspoon of milk. If it’s too wet, add a few more crushed Oreos.
- Shape the truffles: Scoop out about 1 tablespoon of the mixture and roll it into a ball. Then, gently shape it into an oval that’s slightly pointed at one end—this will be the cat’s head. Place each shaped truffle on a parchment-lined baking sheet. You should get about 24 truffles.
- Add the ears: Take a pretzel stick half and gently press it into the top of each truffle at a slight angle. Repeat with another half on the other side, so they look like cat ears. Press them in just enough so they stay put—don’t push all the way through.
- Chill the truffles: Place the baking sheet in the refrigerator for at least 30 minutes, or up to an hour. This step is crucial—if the truffles aren’t cold, the chocolate coating won’t set properly and the ears will fall off.
- Melt the chocolate: About 5 minutes before you’re ready to dip, melt your black candy melts or dark chocolate. If using the microwave, heat in 30-second intervals, stirring between each, until smooth. If the chocolate is too thick, stir in a teaspoon of coconut oil.
- Dip the truffles: Remove the chilled truffles from the fridge. Using a fork, gently lower one truffle into the melted chocolate. Spoon chocolate over the top to coat it completely. Lift it out and tap the fork gently on the edge of the bowl to remove excess chocolate. Place the coated truffle back on the parchment paper.
- Add the face: While the chocolate is still wet, press two candy eyes into the front of each truffle. Then, using a toothpick or the decorating gel, add a tiny pink or black nose and three whiskers on each side. Work quickly—the chocolate sets fast.
- Let them set: Allow the truffles to sit at room temperature until the chocolate is firm, about 15-20 minutes. If you’re in a hurry, you can pop them back in the fridge for 10 minutes.
- Serve or store: Once set, transfer the truffles to a serving platter or store them in an airtight container in the refrigerator for up to a week.
Notes
For best results, use full-fat cream cheese and name-brand Oreos. Chill truffles thoroughly before dipping to prevent chocolate from sliding off. Work in small batches to keep truffles cold. If chocolate thickens while dipping, reheat for 15 seconds. Truffles taste even better after a day in the fridge.
Nutrition
- Serving Size: 1 truffle
- Calories: 180
- Sugar: 14
- Sodium: 120
- Fat: 11
- Saturated Fat: 6
- Carbohydrates: 20
- Fiber: 1
- Protein: 2
Keywords: Halloween truffles, Oreo truffles, black cat truffles, no-bake dessert, easy Halloween recipe, chocolate truffles, Oreo balls


