My neighbor Karen wasn’t trying to impress anyone that Tuesday afternoon. I’d stopped by to borrow a bundt pan—mine had mysteriously vanished after a bake sale—and the smell of cinnamon and pumpkin hit me before I even got to her screen door. It wasn’t a cake, and it wasn’t pie. It was this weird, glorious layered mess in little plastic cups she was packing for her kid’s class party. “Oh, it’s just dirt cake,” she said, waving her hand like she’d thrown it together in two seconds. But I saw the careful layers of crushed cookies and creamy filling, and I knew better. That nonchalant, “it’s nothing” attitude is exactly why this recipe stuck with me. It’s the kind of dessert that feels like a secret weapon—easy enough to make on a whim but impressive enough to get you asked for the recipe every single time.
Why You’ll Love This Recipe
Let’s be honest—sometimes you just need a dessert that feels like a hug in a cup. These Pumpkin Patch Dirt Pudding Cups are exactly that. They’ve been tested on my picky nieces, my skeptical brother-in-law, and a whole group of moms who swore they “weren’t pumpkin people.” Spoiler: they all asked for seconds.
- No-Bake & Quick: Ready in under 20 minutes of active time, then just chill. Perfect for those days when you need a treat fast.
- Simple Ingredients: No fancy grocery store runs. You probably have most of this in your pantry already—pumpkin puree, cream cheese, vanilla pudding mix.
- Perfect for Fall Gatherings: Great for Halloween parties, Thanksgiving dinners, or just a cozy night in with a scary movie.
- Crowd-Pleaser: Kids love the “dirt” texture with the gummy worms, and adults love the rich, spiced pumpkin flavor.
- Unbelievably Delicious: The combo of creamy pumpkin cheesecake filling and crunchy cookie crumb is next-level comfort food. You’ll close your eyes after the first bite, I promise.
This isn’t just another pudding cup. The trick is blending the cream cheese with the pumpkin puree until it’s silky smooth—no lumps allowed. It makes the texture feel almost like a cheesecake mousse, but way easier. Honestly, it’s the kind of dessert that makes you look like a hero with almost zero effort.
What Ingredients You Will Need
This recipe uses simple, wholesome ingredients to deliver that cozy fall flavor without any fuss. Most of these are pantry staples, especially if you love baking during pumpkin season.
- For the Pumpkin Cheesecake Layer:
- 1 package (8 oz) cream cheese, softened (adds richness and tang; I prefer Philadelphia for the smoothest texture)
- 1 cup canned pumpkin puree (not pumpkin pie filling—make sure it’s 100% pure pumpkin)
- 1/2 cup granulated sugar
- 1 teaspoon vanilla extract
- 1 teaspoon pumpkin pie spice (or a mix of cinnamon, nutmeg, and ginger)
- 1/2 cup cold milk (whole milk works best for creaminess, but 2% is fine too)
- 1 package (3.4 oz) instant vanilla pudding mix (do not use cook-and-serve; it won’t set properly)
- For the “Dirt” Layer:
- 1 1/2 cups crushed chocolate sandwich cookies (like Oreos, with the cream filling removed—just the wafers)
- 2 tablespoons melted butter (helps the crumbs clump a little, like real dirt)
- For the Topping & Decorations:
- 1 cup whipped topping (like Cool Whip, thawed—or homemade whipped cream if you’re feeling fancy)
- Gummy worms (the classic dirt cake touch—orange and green ones are perfect for fall)
- Optional: small pumpkin-shaped candies or candy corn for extra decoration
Substitution Tips: For a lighter version, use reduced-fat cream cheese and sugar-free pudding mix. To make it dairy-free, swap the cream cheese with a plant-based version and use almond milk. Just note the texture might be slightly less firm. Also, if you can’t find pumpkin pie spice, mix 1/2 teaspoon cinnamon, 1/4 teaspoon nutmeg, and a pinch of ground ginger—works like a charm.
Equipment Needed
You don’t need a fancy kitchen for these. Here’s what you’ll need:
- Mixing bowls (one large, one medium)
- Electric hand mixer or stand mixer (a whisk works too, but your arm will get a workout)
- Spatula for scraping the bowl clean
- Small cups or clear plastic cups (I use 8-ounce cups so you can see the layers)
- Rolling pin or food processor for crushing the cookies (I’ve used a zip-top bag and a heavy skillet in a pinch—works great)
- Measuring cups and spoons
- Refrigerator space to chill the cups for at least 2 hours
I’ve made these with both a food processor and a good old-fashioned zip-top bag. Honestly, the bag method is kind of therapeutic—smashing those cookies is a great stress reliever. Just make sure you crush them finely, like sand, not big chunks.
Preparation Method
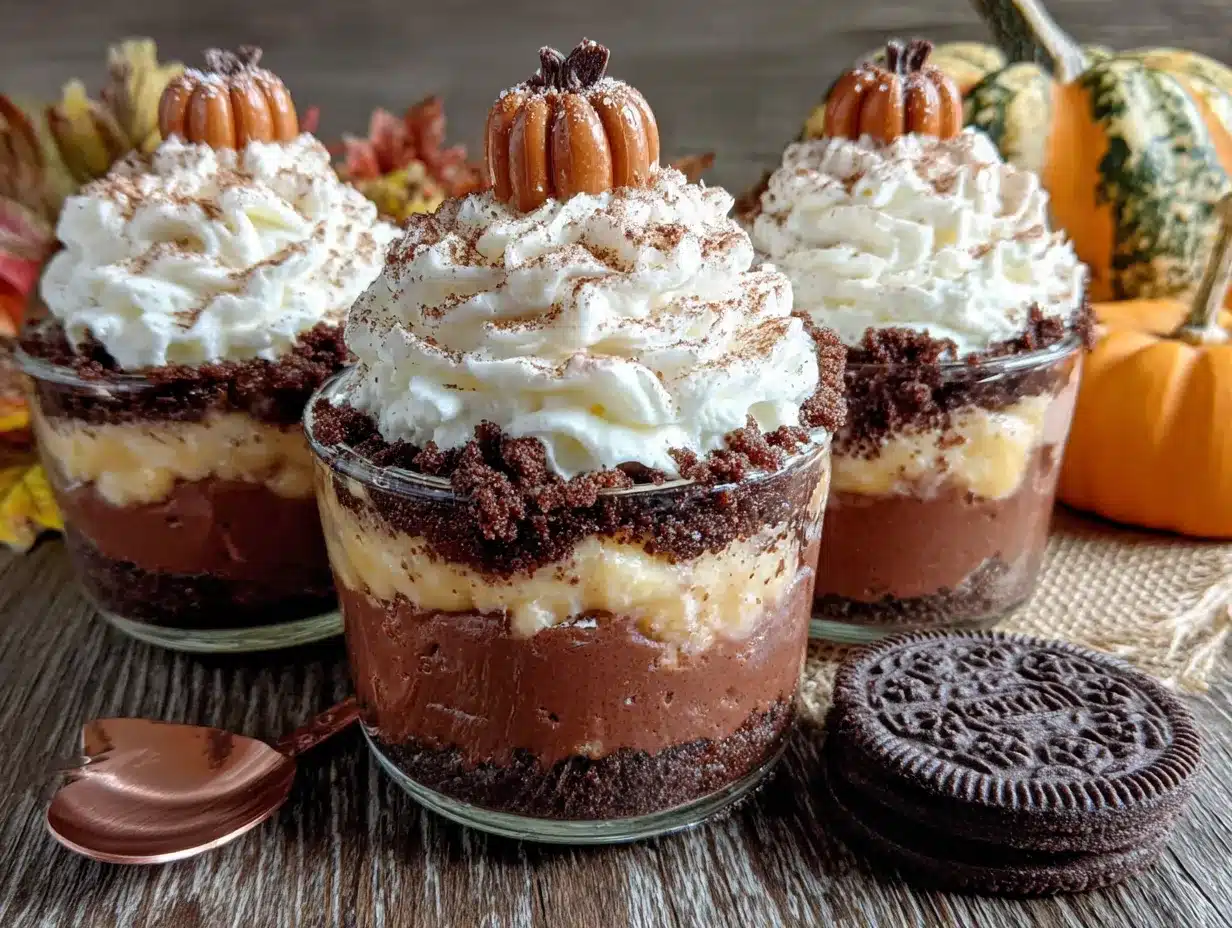
Let’s get to the fun part. Follow these steps, and you’ll have the cutest little pumpkin patch cups in no time.
- Make the cookie dirt: Place the chocolate wafer cookies (cream removed) in a zip-top bag and crush them with a rolling pin until they’re fine crumbs. Or pulse them in a food processor. You want them about the texture of coarse sand. Transfer to a bowl, stir in the melted butter, and set aside.
- Beat the cream cheese: In a large mixing bowl, beat the softened cream cheese with an electric mixer until it’s smooth and fluffy—about 2 minutes. Scrape the sides of the bowl. This step is crucial; lumps here mean lumps in your final dessert.
- Add the pumpkin and flavorings: Add the pumpkin puree, sugar, vanilla extract, and pumpkin pie spice to the cream cheese. Beat on medium speed until everything is well combined and silky. It should look like a light orange mousse.
- Prepare the pudding: In a separate medium bowl, whisk the cold milk and instant vanilla pudding mix together for about 2 minutes until it thickens. It will be very thick—that’s good. Let it sit for a minute to fully set.
- Combine the mixtures: Add the thickened pudding to the pumpkin-cream cheese mixture. Beat on low speed until just combined. Don’t overmix, or it might get too thin. Fold in the whipped topping gently with a spatula until no white streaks remain.
- Assemble the cups: Grab your small cups or clear glasses. Start with a layer of the pumpkin pudding mixture—about 2 tablespoons per cup. Then add a layer of the cookie crumbs (about 1 tablespoon). Repeat the layers until you reach the top, ending with a cookie crumb layer on top to look like “dirt.”
- Chill: Cover the cups with plastic wrap or lids and refrigerate for at least 2 hours, or up to overnight. This is important—the layers need time to set and meld together.
- Decorate: Just before serving, press a couple of gummy worms into the top of each cup so they look like they’re crawling out of the dirt. Add a little pumpkin candy on top if you’re feeling festive. Serve cold.
A quick note: if your pudding mixture seems too runny after adding the whipped topping, don’t panic. It will firm up beautifully in the fridge. I’ve had that happen before when I got distracted by my dog barking at the mailman, and it still turned out perfect after a few hours.
Cooking Tips & Techniques
I’ve made these cups about a dozen times now, and I’ve learned a few things the hard way. Here’s what I wish someone had told me:
- Room temperature cream cheese is non-negotiable. Cold cream cheese will leave you with lumpy filling. Let it sit on the counter for at least 30 minutes before you start. Trust me on this one—I once tried to rush it and ended up with little white flecks in my beautiful orange pudding. Not the look we’re going for.
- Crush those cookies finely. Big chunks of cookie make the layers look messy and don’t give you that “dirt” texture. If you’re using a food processor, pulse in short bursts until it’s like sand. If you’re using a bag, channel your inner rage—it’s very satisfying.
- Don’t skip the chilling time. I know it’s tempting to dig in right away, but the flavors really meld together after a few hours in the fridge. The pudding gets firmer, the cookie crumbs soften slightly, and everything becomes one cohesive, dreamy dessert.
- Use clear cups for the wow factor. Those layers are gorgeous—pumpkin orange, dark chocolate dirt, maybe some green gummy worms peeking out. Don’t hide them in opaque bowls. Clear plastic cups or small mason jars make them look like a professional bakery treat.
- Multitask like a pro: While the cream cheese is softening, crush the cookies. While the pudding is setting, clean up your mixing bowls. This recipe moves fast, so having everything ready before you start assembling makes it a breeze.
Variations & Adaptations
This recipe is super flexible. Here are some ways to make it your own:
- Gluten-Free Version: Use gluten-free chocolate sandwich cookies (like Glutino or Kinnikinnick brand). The rest of the ingredients are naturally gluten-free, so this is an easy swap.
- Vegan Option: Use dairy-free cream cheese (Tofutti or Kite Hill work well), coconut milk instead of regular milk, and a vegan vanilla pudding mix. For the cookie crumbs, there are vegan chocolate wafer cookies available. The texture will be a little softer, but still delicious.
- Pumpkin Spice Latte Twist: Add 1 tablespoon of instant espresso powder to the milk before mixing the pudding. It gives the filling a subtle coffee kick that pairs beautifully with the pumpkin and spice. I tried this last October and it was a huge hit with my coffee-loving friends.
- Individual Mini Desserts: Use shot glasses for tiny, party-friendly portions. Perfect for Halloween parties or Thanksgiving appetizers. Just reduce the layering amounts—about 1 tablespoon of filling and 1 teaspoon of crumbs per layer.
- Seasonal Swaps: In the spring, swap the pumpkin for sweet potato puree and use crushed graham crackers instead of chocolate cookies. Add a pinch of cinnamon and a drizzle of caramel on top. It’s a whole different vibe but just as cozy.
Serving & Storage Suggestions
These cups are best served cold, straight from the fridge. The contrast between the creamy filling and the slightly crunchy cookie dirt is pure magic. I like to add the gummy worms right before serving so they stay firm and fun—if you add them too early, they’ll get soft and lose their bounce.
What to serve with them: A hot cup of coffee or a mug of spiced apple cider is the perfect companion. The warmth of the drink balances the cold, creamy dessert. For a full fall spread, serve these alongside a slice of pumpkin bread or some cinnamon sugar cookies.
Storage: Cover the cups tightly with plastic wrap or lids and store them in the refrigerator for up to 3 days. The cookie crumbs will soften over time, but that’s not necessarily a bad thing—it becomes more like a traditional dirt cake texture. I actually prefer them on day two when everything has melded together.
Freezing: I don’t recommend freezing these cups. The filling can become watery and the texture gets grainy when thawed. They’re so quick to make that you can just whip up a fresh batch whenever you need them.
Nutritional Information & Benefits
Here’s an approximate breakdown per serving (1 cup, based on 8 servings):
- Calories: 310
- Fat: 16g
- Carbohydrates: 38g
- Protein: 5g
- Fiber: 2g
- Sugar: 26g
While these are definitely a treat, there are some redeeming qualities. Pumpkin puree is packed with vitamin A and fiber, which is great for your immune system and digestion. The cream cheese adds a bit of calcium, and the pumpkin pie spice offers anti-inflammatory benefits from cinnamon and ginger. Plus, making them at home means you control the sugar and can swap in lighter ingredients if you want. It’s a dessert that feels indulgent but has a little bit of goodness hiding in there. I always feel better about serving these to my family than something from a box.
Conclusion
These Pumpkin Patch Dirt Pudding Cups are the kind of dessert that makes you feel like a kitchen wizard without actually doing much work. They’re fun, festive, and full of that cozy fall flavor we all crave when the leaves start turning. I love that I can make them ahead of time and just pull them out when guests arrive—no stress, no last-minute baking disasters. If you’re looking for a dessert that will make everyone smile and ask for the recipe, this is it.
Please, make these your own. Swap the gummy worms for candy corn, add a sprinkle of cinnamon on top, or double the batch because trust me, one cup isn’t enough. When you make them, tag me or leave a comment below—I’d love to hear how they turned out. Happy fall baking, friends!
Frequently Asked Questions
Can I use homemade whipped cream instead of Cool Whip?
Absolutely! Whip 1 cup of heavy cream with 2 tablespoons of powdered sugar until stiff peaks form, then fold it into the pudding mixture. It’s a little less stable, so the cups might be slightly softer, but the flavor is incredible.
Do I have to remove the cream from the Oreos?
Not necessarily, but I find that removing the cream gives you a darker, more “dirt-like” crumb. If you leave it in, the crumbs will be a little stickier and lighter in color. Both work fine—it’s just a texture preference.
Can I make these a day ahead?
Yes, and I actually recommend it! Making them the day before gives the flavors time to meld together beautifully. Just wait to add the gummy worms until right before serving so they stay chewy.
What if I don’t have pumpkin pie spice?
No problem. Mix 1/2 teaspoon cinnamon, 1/4 teaspoon nutmeg, 1/4 teaspoon ginger, and a tiny pinch of cloves. That’s exactly what’s in pumpkin pie spice anyway.
Can I double this recipe for a crowd?
Definitely. Just double all the ingredients and use a larger bowl. The assembly takes a little longer, but the process is the same. I’ve made a triple batch for a Halloween block party, and it was gone in 20 minutes.
Pumpkin Dirt Pudding Cups: Easy No-Bake Fall Dessert
These no-bake Pumpkin Dirt Pudding Cups are a fun and festive fall dessert with layers of creamy pumpkin cheesecake filling and crunchy chocolate cookie ‘dirt’. Perfect for Halloween parties, Thanksgiving, or a cozy night in, they’re easy to make and always a crowd-pleaser.
- Prep Time: 20 minutes
- Cook Time: 0 minutes
- Total Time: 2 hours 20 minutes (includes chilling)
- Yield: 8 servings 1x
- Category: Dessert
- Cuisine: American
Ingredients
- 1 package (8 oz) cream cheese, softened
- 1 cup canned pumpkin puree (100% pure pumpkin)
- 1/2 cup granulated sugar
- 1 teaspoon vanilla extract
- 1 teaspoon pumpkin pie spice
- 1/2 cup cold milk (whole milk preferred)
- 1 package (3.4 oz) instant vanilla pudding mix
- 1 1/2 cups crushed chocolate sandwich cookies (cream removed, just wafers)
- 2 tablespoons melted butter
- 1 cup whipped topping (like Cool Whip, thawed)
- Gummy worms (for decoration)
- Optional: small pumpkin-shaped candies or candy corn
Instructions
- Make the cookie dirt: Place the chocolate wafer cookies (cream removed) in a zip-top bag and crush them with a rolling pin until they’re fine crumbs. Or pulse them in a food processor. Transfer to a bowl, stir in the melted butter, and set aside.
- Beat the cream cheese: In a large mixing bowl, beat the softened cream cheese with an electric mixer until smooth and fluffy—about 2 minutes. Scrape the sides of the bowl.
- Add the pumpkin and flavorings: Add the pumpkin puree, sugar, vanilla extract, and pumpkin pie spice to the cream cheese. Beat on medium speed until well combined and silky.
- Prepare the pudding: In a separate medium bowl, whisk the cold milk and instant vanilla pudding mix together for about 2 minutes until it thickens. Let it sit for a minute to fully set.
- Combine the mixtures: Add the thickened pudding to the pumpkin-cream cheese mixture. Beat on low speed until just combined. Fold in the whipped topping gently with a spatula until no white streaks remain.
- Assemble the cups: In small cups or clear plastic cups, start with a layer of the pumpkin pudding mixture (about 2 tablespoons). Add a layer of the cookie crumbs (about 1 tablespoon). Repeat layers until you reach the top, ending with a cookie crumb layer.
- Chill: Cover the cups with plastic wrap or lids and refrigerate for at least 2 hours, or up to overnight.
- Decorate: Just before serving, press a couple of gummy worms into the top of each cup. Add optional pumpkin candies. Serve cold.
Notes
Room temperature cream cheese is essential to avoid lumps. Crush cookies finely for a ‘dirt’ texture. Chilling time is crucial for the layers to set. Add gummy worms just before serving to keep them firm. For a lighter version, use reduced-fat cream cheese and sugar-free pudding mix. For dairy-free, use plant-based cream cheese and almond milk.
Nutrition
- Serving Size: 1 cup
- Calories: 310
- Sugar: 26
- Sodium: 320
- Fat: 16
- Saturated Fat: 9
- Carbohydrates: 38
- Fiber: 2
- Protein: 5
Keywords: pumpkin dirt pudding cups, no-bake fall dessert, pumpkin dessert, dirt cake, Halloween dessert, Thanksgiving dessert, easy pumpkin recipe


