It was 11:47 PM on a random Thursday in October, and I had a desperate need to make a pumpkin pie. Not just any pumpkin pie — the kind with a crust that crunches when you bite into it and a filling that tastes like pure autumn. The problem? I didn’t have a single graham cracker in the house, and the store had been closed for hours. But I did have a half-empty box of gingersnaps from a cookie-baking project that went sideways, and that’s when the idea hit me like a sugar rush.
Honestly, I was tired. My kitchen looked like a small flour bomb had gone off, and I was wearing my favorite sweatshirt with a suspicious smear of butter on the sleeve. But something about the late-night quiet made me bold. I crushed those gingersnaps with a rolling pin — way more satisfying than using a food processor, let me tell you — and mixed them with melted butter, crossing my fingers that this wasn’t going to be a total disaster.
The smell that filled my kitchen was incredible. Spicy, warm, and completely unexpected. When I pulled that pie out of the oven the next afternoon (because yes, I finished at 1 AM and waited until morning to bake it), the crust was this gorgeous deep brown, and the filling had set perfectly. The first bite made me laugh out loud — it was that good. Maybe you’ve been there, standing in your kitchen at a ridiculous hour, making something that feels a little crazy but turns out to be exactly right.
That late-night experiment became my go-to recipe, and I’ve never made a pumpkin pie with a regular crust since. The gingersnap crust adds this warm, spicy kick that regular pie crust just can’t touch. It’s the kind of recipe that makes people ask for the secret, and I’m finally sharing it with you.
Why You’ll Love This Recipe
This isn’t just another pumpkin pie recipe — it’s the one that will earn you permanent hosting duties at every fall gathering. I’ve tested this version at least a dozen times, tweaking the spice ratios and crust texture until everything was just right. Here’s what makes it special:
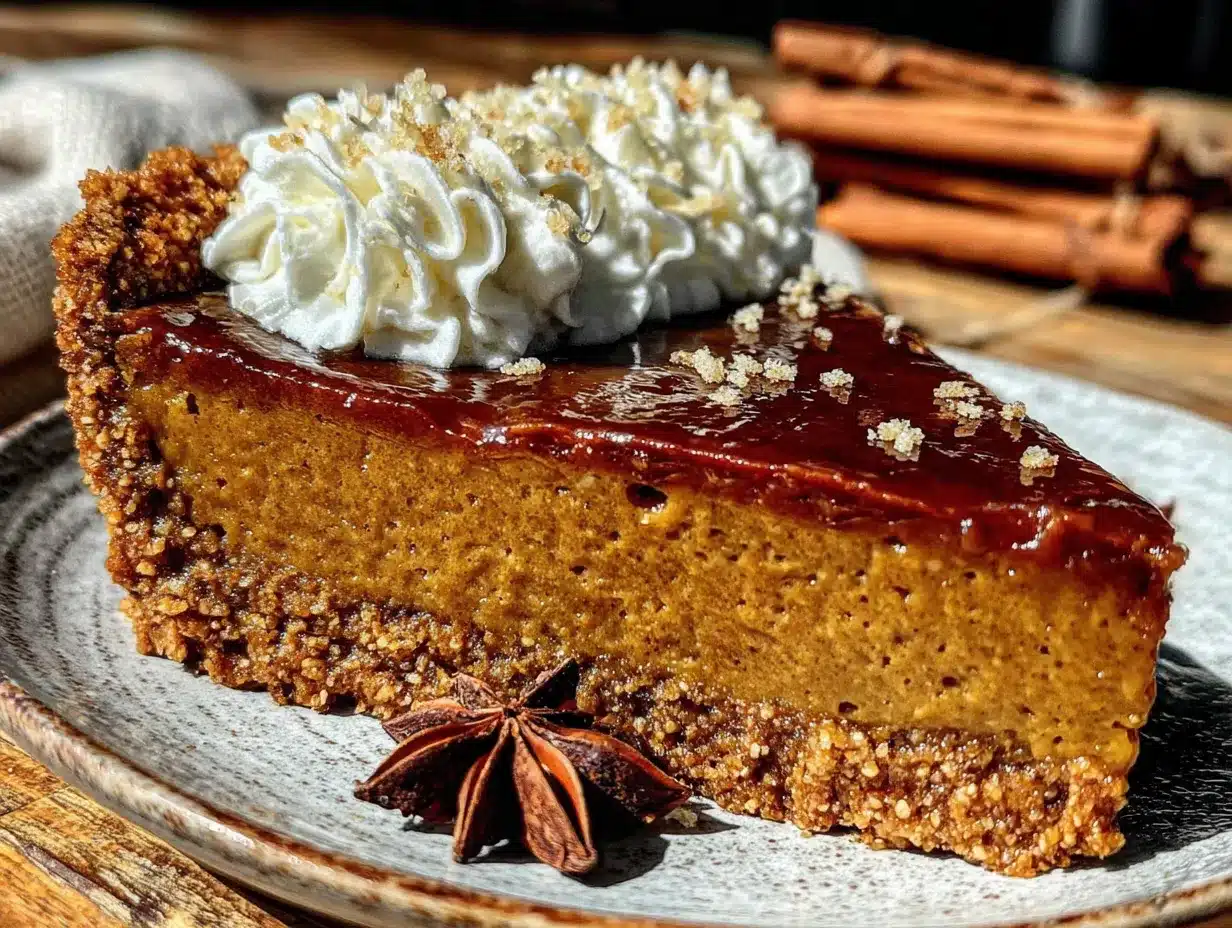
- Show-Stopping Crust: The gingersnap crust is a game-changer. It’s crunchy, spicy, and holds up beautifully against the creamy filling without getting soggy.
- Perfect for Entertaining: You can make this pie a day ahead, which means less stress when guests arrive. It actually tastes better after sitting overnight — the flavors meld together beautifully.
- Simple Ingredients: Nothing fancy here. Most of these items are probably already in your pantry, especially if you’re a fall baking enthusiast like me.
- Crowd-Pleasing Flavor: I’ve served this at three different Thanksgiving dinners and two Friendsgivings, and it disappears faster than anything else on the dessert table. People always ask for seconds.
- Foolproof Method: Even if you’re nervous about making pie from scratch, this recipe is forgiving. The filling sets up perfectly every time, and the crust doesn’t require any rolling or chilling.
- That First Bite Feeling: You know that moment when everyone at the table goes quiet because they’re too busy enjoying their dessert? That’s what this pie delivers. It’s comfort food that makes people close their eyes and smile.
What really sets this recipe apart is the balance. The gingersnap crust isn’t just a gimmick — it actually works with the pumpkin filling in a way that feels intentional and delicious. The spices in the cookies complement the pumpkin pie spice without overwhelming it, and the texture contrast is pure magic.
What Ingredients You Will Need
This recipe uses simple, wholesome ingredients that come together to create something truly special. Most of these are fall baking staples, so you probably have many of them on hand already.
For the Gingersnap Crust
- 2 cups gingersnap cookie crumbs (about 8 ounces, or one standard box of cookies — I prefer Anna’s or Mi-Del brands for their consistent crunch)
- 6 tablespoons unsalted butter, melted (salted butter works in a pinch, just reduce any added salt elsewhere)
- 2 tablespoons granulated sugar (optional, but adds a touch of sweetness — skip if your gingersnaps are already very sweet)
- Pinch of salt (only if using unsalted butter)
For the Pumpkin Filling
- 1 can (15 ounces) pure pumpkin puree (not pumpkin pie filling — Libby’s is my go-to for consistent results)
- 1 can (14 ounces) sweetened condensed milk (this is the secret to that silky, rich texture)
- 2 large eggs, room temperature (cold eggs can make the filling lumpy)
- 1 teaspoon vanilla extract (pure vanilla, not imitation, if you can swing it)
- 1 ½ teaspoons pumpkin pie spice (store-bought is fine, or make your own with cinnamon, nutmeg, ginger, and cloves)
- ½ teaspoon ground cinnamon (for extra warmth)
- ¼ teaspoon ground ginger (to echo the gingersnap crust)
- ¼ teaspoon salt (brings out all the flavors)
For Serving (Optional but Recommended)
- Fresh whipped cream (lightly sweetened, with a dash of cinnamon on top)
- Caramel drizzle (for extra indulgence)
- Toasted pecans (for crunch)
When selecting your gingersnaps, look for cookies that are firm and crunchy rather than soft or chewy. The texture matters here — you want crumbs that will hold together nicely when mixed with butter. If you can find molasses-heavy gingersnaps, even better. They’ll add deeper flavor to the crust.
For the pumpkin puree, stick with canned for consistency. Fresh pumpkin can be watery and unpredictable, which isn’t what you want when you’re trying to impress guests. Trust me, I learned this the hard way during a particularly soggy Thanksgiving experiment.
Equipment Needed
You don’t need a fancy kitchen to make this pie. Here’s what you’ll need:
- 9-inch pie dish (glass or ceramic works best — metal can conduct heat too quickly and burn the crust)
- Mixing bowls (one medium for the crust, one large for the filling)
- Rolling pin or food processor (for crushing cookies — a zip-top bag and a heavy skillet also work in a pinch)
- Whisk (for smoothing out the filling)
- Measuring cups and spoons
- Rubber spatula (for scraping every last bit of filling into the pie dish)
- Baking sheet (place the pie dish on this to catch any drips and make handling easier)
- Cooling rack (for letting the pie cool properly)
I’ve made this pie with a cheap glass pie dish from the grocery store and it turned out beautifully. Don’t let the equipment list intimidate you — this is a low-fuss recipe that works with whatever you have. My one splurge recommendation is a good whisk that feels comfortable in your hand. You’ll be using it for a solid five minutes, and a flimsy whisk can make the job harder than it needs to be.
Preparation Method
Let’s walk through this step by step. The whole process takes about an hour of active time, plus baking and cooling. Trust the process — every step matters.
- Preheat your oven to 350°F (175°C). Position a rack in the center of the oven. This ensures even baking and prevents the crust from burning before the filling sets.
- Make the crust. Place your gingersnap cookies in a zip-top bag and crush them with a rolling pin until you have fine crumbs. Alternatively, pulse them in a food processor until uniform. You should have about 2 cups of crumbs. Transfer to a medium bowl.
- Add melted butter and sugar. Pour the melted butter over the crumbs and add the sugar and salt if using. Stir with a fork until all the crumbs are evenly moistened. The mixture should look like wet sand and hold together when pressed.
- Press the crust into the pie dish. Dump the crumb mixture into your pie dish. Using the bottom of a measuring cup or a flat-bottomed glass, press the crumbs firmly and evenly across the bottom and up the sides. Don’t make the sides too thick — about ¼ inch is perfect. Take your time with this step; a well-packed crust holds together better after baking.
- Pre-bake the crust. Place the crust in the preheated oven and bake for 10 minutes. This sets the crust and prevents it from getting soggy when you add the filling. Remove from the oven and let it cool slightly while you make the filling. Leave the oven on.
- Make the filling. In a large bowl, whisk together the pumpkin puree and sweetened condensed milk until smooth. Add the eggs one at a time, whisking well after each addition. Stir in the vanilla extract, pumpkin pie spice, cinnamon, ginger, and salt. Whisk until everything is completely combined and the mixture is silky smooth — about 2 minutes of steady whisking.
- Pour the filling into the crust. Place your pre-baked crust on a baking sheet (this makes it easier to move in and out of the oven and catches any spills). Slowly pour the filling into the crust, being careful not to overfill. The filling should come almost to the top of the crust but not overflow.
- Bake the pie. Carefully transfer the baking sheet with the pie to the oven. Bake at 350°F for 50 to 60 minutes. The pie is done when the edges are set and the center jiggles just slightly when you gently shake the pan. It will continue to set as it cools.
- Cool completely. Remove the pie from the oven and place it on a cooling rack. Let it cool at room temperature for at least 2 hours. Then refrigerate for at least 4 hours, or overnight. This step is crucial — a warm pie will be runny and won’t slice cleanly.
- Serve and enjoy. Once fully chilled, slice and serve with whipped cream and any other toppings you like. The pie is best served cold or at room temperature.
A few things to watch for: If the edges of the crust start browning too quickly during baking, loosely cover them with strips of aluminum foil. And don’t panic if the filling puffs up a little in the oven — it will settle back down as it cools. The most important tip I can give you is to be patient with the cooling process. I know it’s hard to wait, but a properly chilled pie slices beautifully and tastes so much better.
Cooking Tips & Techniques
After making this pie more times than I can count, I’ve picked up a few tricks that make a real difference. Here are the things I wish someone had told me when I first started making pumpkin pie:
Don’t overmix the filling. I know it’s tempting to keep whisking until everything is perfectly smooth, but overmixing can incorporate too much air into the filling. This can cause cracks to form on the surface as the pie bakes and cools. Whisk just until everything is combined and smooth — about 2 minutes of steady work.
Room temperature ingredients matter. Cold eggs can seize up the filling and create lumps that are hard to smooth out. Let your eggs sit on the counter for about 30 minutes before you start baking. Same goes for the pumpkin puree — letting it come to room temperature helps everything blend together more evenly.
Watch the jiggle test. The best way to tell if your pie is done is to gently shake the pan. The edges should be set and firm, while the center should have a slight wobble — like Jell-O that’s just set. If the whole pie is liquidy, it needs more time. If the center is completely firm and doesn’t move at all, it might be overbaked.
Pre-bake your crust every time. I know it adds an extra step, but it’s non-negotiable. Pre-baking creates a barrier that prevents the crust from absorbing moisture from the filling, which would make it soggy. I learned this lesson when I skipped it once to save time, and ended up with a crust that was more like wet sand than crispy cookie.
Let the pie cool gradually. Don’t put a hot pie directly into the refrigerator. Let it cool at room temperature first, then chill it. Sudden temperature changes can cause the filling to crack or separate. I usually let my pie cool on the counter for about 2 hours before moving it to the fridge.
Variations & Adaptations
One of the best things about this recipe is how easy it is to customize. Here are some variations I’ve tried and loved:
Gluten-Free Version: Use gluten-free gingersnap cookies for the crust. Most major brands offer a gluten-free option, and they work just as well as regular gingersnaps. The filling is naturally gluten-free, so this is an easy swap that makes the pie accessible to everyone at your table.
Dairy-Free Adaptation: Substitute the butter in the crust with coconut oil or a plant-based butter alternative. For the filling, use a can of full-fat coconut milk instead of sweetened condensed milk, and add ⅓ cup of maple syrup or brown sugar for sweetness. The texture will be slightly different — a bit less rich — but still delicious.
Spice It Up: If you love bold flavors, add an extra teaspoon of fresh grated ginger to the filling. You can also mix in a pinch of cayenne pepper or chipotle powder for a sweet-heat combination that’s absolutely addictive. I tried this for a Friendsgiving once, and it was a huge hit with the adventurous eaters.
Chocolate Twist: Melt 4 ounces of dark chocolate and drizzle it into the crust before adding the filling. The chocolate sets into a thin layer that adds a lovely richness. Alternatively, you can swirl melted chocolate into the filling before baking for a marbled effect.
Mini Pie Version: Make individual pies in a muffin tin for a cute, portable option. Press the crust into greased muffin cups, fill with the pumpkin mixture, and bake for about 20 to 25 minutes. These are perfect for parties where guests want their own personal dessert.
Serving & Storage Suggestions
This pie is a showstopper, so present it with confidence. Here’s how to serve and store it for the best results:
Serving Temperature: The pie is best served cold or at room temperature. If you’ve refrigerated it, let it sit on the counter for about 15 to 20 minutes before slicing. This takes the chill off without making the pie warm, which helps the flavors come through more clearly.
Presentation Tips: For a beautiful presentation, top each slice with a generous dollop of whipped cream and a sprinkle of cinnamon or nutmeg. A drizzle of caramel sauce adds an extra touch of elegance. If you’re serving this at a dinner party, arrange the slices on a platter with fresh cranberries and rosemary sprigs for a festive look.
What to Serve Alongside: This pie pairs beautifully with a cup of hot coffee or spiced cider. For a full dessert spread, serve it alongside a crispy garlic chicken for a savory-sweet combination that guests love. You can also offer a cheese plate with sharp cheddar and apple slices for contrast.
Storage Instructions: Cover the pie tightly with plastic wrap or aluminum foil and store it in the refrigerator for up to 5 days. The flavors actually deepen and improve after a day or two, so don’t hesitate to make it ahead. For longer storage, you can freeze the baked, cooled pie for up to 3 months. Wrap it in plastic wrap, then foil, and thaw overnight in the refrigerator before serving.
Reheating Tips: If you prefer warm pie, reheat individual slices in the microwave for about 15 to 20 seconds. For a whole pie, place it in a 300°F oven for 10 to 15 minutes. Be careful not to overheat it, as the filling can become runny.
Nutritional Information & Benefits
Here’s the nutritional breakdown for one slice of pie (based on 8 servings):
- Calories: Approximately 380
- Total Fat: 16g
- Saturated Fat: 9g
- Cholesterol: 75mg
- Sodium: 320mg
- Total Carbohydrates: 54g
- Dietary Fiber: 2g
- Sugars: 38g
- Protein: 6g
While this is definitely a treat, it does offer some nutritional benefits. Pumpkin is packed with vitamin A, which supports eye health and immune function. It’s also a good source of fiber and antioxidants. The eggs provide high-quality protein, and the ginger in the crust has anti-inflammatory properties.
If you’re watching your sugar intake, you can reduce the sugar in the crust or use a sugar substitute in the filling. Just keep in mind that the sweetened condensed milk is a key component of the texture, so swapping it out will change the final result. For a lighter option, serve smaller slices with extra whipped cream — the airy texture makes the portion feel more generous.
Conclusion
This best homemade pumpkin pie with gingersnap crust is more than just a dessert — it’s the kind of recipe that becomes a tradition. The spicy, crunchy crust paired with the silky, spiced filling creates something truly special that your family and friends will request year after year.
I love this recipe because it proves that the best dishes often come from happy accidents. That late-night experiment with a box of gingersnaps turned into a pie that I’m genuinely proud to serve at any gathering. It’s impressive enough for Thanksgiving dinner but simple enough for a random Tuesday when you just need a little autumn comfort.
I’d love to hear how your pie turns out! Leave a comment below and let me know if you tried any variations or served it at a special occasion. Share this recipe with a friend who loves fall baking, and don’t forget to tag me in your photos — I always love seeing your creations. Happy baking, friends, and here’s to many delicious slices ahead!
Frequently Asked Questions
Can I use fresh pumpkin instead of canned?
You can, but I don’t recommend it for this recipe. Fresh pumpkin has a higher water content than canned puree, which can make the filling runny and affect the texture. If you really want to use fresh pumpkin, roast it, puree it, and then strain it through cheesecloth to remove excess moisture. Even then, the results can be unpredictable. Canned pumpkin is more consistent and gives you the silky texture this recipe is known for.
Can I make this pie ahead of time?
Absolutely! In fact, this pie benefits from being made a day ahead. The flavors meld together and deepen as it sits in the refrigerator. Bake the pie, let it cool completely, then cover it tightly and refrigerate for up to 24 hours before serving. Just add the whipped cream and toppings right before serving for the best presentation.
Why did my crust get soggy?
A soggy crust usually happens when it isn’t pre-baked long enough, or when the filling is too wet. Make sure you pre-bake the crust for the full 10 minutes, and let it cool slightly before adding the filling. Also, be careful not to overfill the pie dish — the filling should come almost to the top of the crust but not spill over the edge.
Can I freeze this pumpkin pie?
Yes! This pie freezes beautifully. Let the baked pie cool completely, then wrap it tightly in plastic wrap followed by a layer of aluminum foil. Freeze for up to 3 months. To serve, thaw overnight in the refrigerator. The crust may soften slightly after freezing, but the flavor will still be excellent. I don’t recommend freezing the pie with whipped cream on top — add that fresh after thawing.
How do I know when the pie is done baking?
The best test is the jiggle test. Gently shake the pie pan — the edges should be set and firm, while the center should have a slight wobble. If the whole pie is liquidy, it needs more time. If the center is completely firm and doesn’t move, it’s overbaked. You can also insert a knife about 1 inch from the center — if it comes out clean, the pie is done. The internal temperature should reach 175°F to 180°F.
Pin This Recipe!

Best Homemade Pumpkin Pie with Gingersnap Crust Recipe
This pumpkin pie features a crunchy, spicy gingersnap crust and a silky, spiced filling. It’s a show-stopping dessert perfect for fall gatherings, and it can be made a day ahead for less stress.
- Prep Time: 20 minutes
- Cook Time: 60 minutes
- Total Time: 6 hours 20 minutes (includes cooling and chilling)
- Yield: 8 servings 1x
- Category: Dessert
- Cuisine: American
Ingredients
- 2 cups gingersnap cookie crumbs (about 8 ounces)
- 6 tablespoons unsalted butter, melted
- 2 tablespoons granulated sugar (optional)
- Pinch of salt (only if using unsalted butter)
- 1 can (15 ounces) pure pumpkin puree
- 1 can (14 ounces) sweetened condensed milk
- 2 large eggs, room temperature
- 1 teaspoon vanilla extract
- 1 ½ teaspoons pumpkin pie spice
- ½ teaspoon ground cinnamon
- ¼ teaspoon ground ginger
- ¼ teaspoon salt
- Fresh whipped cream (for serving, optional)
- Caramel drizzle (for serving, optional)
- Toasted pecans (for serving, optional)
Instructions
- Preheat your oven to 350°F (175°C). Position a rack in the center of the oven.
- Make the crust: Place gingersnap cookies in a zip-top bag and crush with a rolling pin until fine crumbs form. Alternatively, pulse in a food processor. Transfer to a medium bowl.
- Add melted butter and sugar: Pour melted butter over crumbs, add sugar and salt if using. Stir with a fork until all crumbs are evenly moistened (mixture should look like wet sand).
- Press the crust into a 9-inch pie dish: Using the bottom of a measuring cup or flat-bottomed glass, press crumbs firmly and evenly across bottom and up sides (about ¼ inch thick).
- Pre-bake the crust: Bake for 10 minutes. Remove from oven and let cool slightly while making filling. Leave oven on.
- Make the filling: In a large bowl, whisk together pumpkin puree and sweetened condensed milk until smooth. Add eggs one at a time, whisking well after each. Stir in vanilla, pumpkin pie spice, cinnamon, ginger, and salt. Whisk until completely combined and silky smooth (about 2 minutes).
- Pour filling into crust: Place pre-baked crust on a baking sheet. Slowly pour filling into crust, being careful not to overfill (filling should come almost to top of crust).
- Bake the pie: Transfer baking sheet with pie to oven. Bake at 350°F for 50 to 60 minutes. Pie is done when edges are set and center jiggles slightly when gently shaken.
- Cool completely: Remove pie from oven and place on a cooling rack. Cool at room temperature for at least 2 hours. Then refrigerate for at least 4 hours, or overnight.
- Serve and enjoy: Once fully chilled, slice and serve with whipped cream and other toppings as desired. Best served cold or at room temperature.
Notes
Pre-bake the crust every time to prevent sogginess. Don’t overmix the filling to avoid cracks. Let the pie cool gradually at room temperature before refrigerating. For a gluten-free version, use gluten-free gingersnap cookies. For dairy-free, substitute butter with coconut oil and use full-fat coconut milk with maple syrup instead of sweetened condensed milk.
Nutrition
- Serving Size: 1 slice
- Calories: 380
- Sugar: 38
- Sodium: 320
- Fat: 16
- Saturated Fat: 9
- Carbohydrates: 54
- Fiber: 2
- Protein: 6
Keywords: pumpkin pie, gingersnap crust, fall dessert, Thanksgiving pie, homemade pumpkin pie


