There used to be a little café in the East Village called The Gourd that made the most incredible seasonal appetizer platters. When they closed their doors in 2018 — a victim of rising rent and a broken espresso machine — I genuinely mourned their Halloween pumpkin veggie tray. It wasn’t just vegetables arranged on a plate; it was a work of art that made you actually want to eat your greens. After six tries — including one spectacular failure where my “pumpkin” looked more like a deflated football — I finally got it.
Honestly, the first attempt was a disaster. I used too much dip, the broccoli stems wouldn’t stay put, and my husband walked into the kitchen and asked if I was making a “sad jack-o-lantern.” But I was determined. That café version had this perfect balance of crunch and creaminess, and the way the ranch dip pooled in the center like pumpkin innards? Pure genius. Let me tell you, recreating that memory became a bit of an obsession.
What I love about this version is that it’s genuinely achievable on a busy weeknight. You know that feeling when you want to bring something fun to a party but you’re exhausted? This is that recipe. It takes about 15 minutes of active prep, uses ingredients you can grab at any grocery store, and honestly looks so impressive that people will think you spent hours on it. Maybe you’ve been there — staring at a veggie platter from the store and thinking, “I could do better.” Well, you absolutely can.
The first time I brought this to my nephew’s Halloween party, I watched a kid who swore he hated vegetables eat three celery sticks. Three! That’s when I knew the recipe had staying power. It’s not just about the nostalgia of that little café; it’s about making vegetables fun for everyone, even the pickiest eaters.
Why You’ll Love This Recipe
This isn’t just another veggie tray — it’s a conversation starter, a crowd-pleaser, and a sneaky way to get everyone eating their vegetables without a single complaint. After testing this with my neighbor’s kids (who are notoriously picky) and bringing it to two separate Halloween potlucks, I can tell you with confidence that this recipe delivers every single time.
- Quick & Easy: Comes together in under 20 minutes, perfect for last-minute Halloween parties or busy weeknights when you need something impressive fast.
- Simple Ingredients: No fancy grocery trips needed; you likely already have most of these vegetables in your fridge right now.
- Perfect for Halloween Parties: Great for school events, office gatherings, or any spooky celebration where you want to stand out.
- Crowd-Pleaser: Always gets rave reviews from kids and adults alike — even my brother who “doesn’t do vegetables” went back for seconds.
- Unbelievably Delicious: The combination of crunchy fresh vegetables with creamy ranch dip is next-level comfort food, and the presentation makes it impossible to resist.
What makes this recipe different from every other veggie tray out there is the technique. Instead of just throwing vegetables on a plate, I’ve developed a method for arranging them that actually looks like a pumpkin — not a blob, not a mess, but a genuine pumpkin shape that makes people say “wow.” The secret is in how you layer the broccoli florets and position the dip bowl.
This recipe isn’t just good — it’s the kind that makes you close your eyes after the first bite of that crunchy cucumber dipped in cool ranch. It’s comfort food reimagined: healthier, faster, but with the same soul-soothing satisfaction. Perfect for impressing guests without stress, or turning a simple snack into something memorable.
What Ingredients You Will Need
This recipe uses simple, fresh ingredients to create a stunning visual effect without any complicated cooking. The beauty of this veggie tray is that it’s entirely customizable — use whatever vegetables you have on hand, as long as they’re colorful and crunchy.
For the Pumpkin Shape
- Broccoli florets — 2 cups, roughly chopped into small, uniform pieces (these form the orange “pumpkin” color when arranged tightly)
- Cauliflower florets — 1 cup, chopped small (adds texture and fills gaps)
- Orange bell pepper — 1 large, sliced into thin strips (adds more “pumpkin color” and sweetness)
- Yellow bell pepper — 1 medium, sliced (for color contrast)
- Cucumber — 1 large, sliced into rounds or half-moons
- Cherry tomatoes — 1 cup, halved (adds pop of red)
- Carrots — 2 medium, cut into sticks or coins (I prefer sticks for easier dipping)
- Celery sticks — 3-4 stalks, cut into 3-inch pieces
For the Dip (Pumpkin “Innards”)
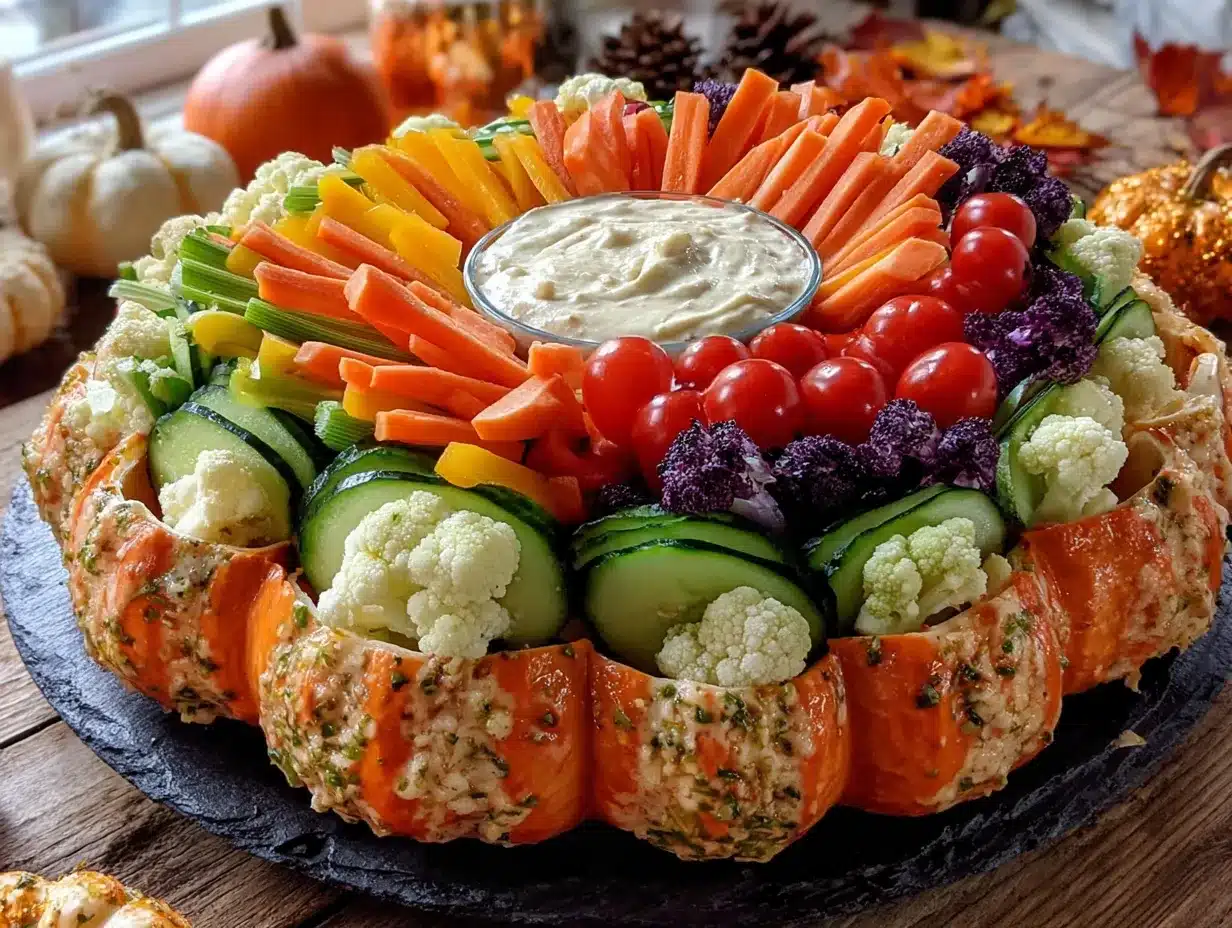
- Ranch dressing — 1 cup (I recommend Hidden Valley for the classic flavor, but any brand works)
- Optional: 1 tablespoon of pumpkin puree mixed into the ranch for color (this is my secret trick — it makes the dip look orange and festive!)
For the Pumpkin Stem
- Green bell pepper — 1 small, cut into a stem shape (about 2 inches long, 1 inch wide)
- Or use: A small piece of celery with the leaves still attached for a more natural look
Ingredient Selection Tips: Look for broccoli and cauliflower with tight, compact florets — they hold their shape better and look more uniform on the tray. For the peppers, choose ones that are firm and brightly colored. I’ve found that organic vegetables tend to have more vibrant colors that really pop on the platter.
Substitution Guidance: You can swap in any crunchy vegetables you have on hand — snap peas, radishes, or even jicama sticks work beautifully. For a dairy-free option, use your favorite vegan ranch dressing. If you’re not a ranch fan, try a Greek yogurt-based dip or even hummus (though it won’t have that same “pumpkin innards” effect).
Equipment Needed
The beauty of this recipe is that you don’t need any special equipment — just basic kitchen tools you probably already own.
- Large round platter or cutting board — at least 12 inches in diameter (I use a wooden cutting board for a rustic look, but a white platter makes the colors pop)
- Small bowl — about 4-6 inches wide for the dip (a round bowl works best for the pumpkin center)
- Sharp knife — for cutting vegetables into uniform pieces
- Cutting board — for prep work
- Vegetable peeler — optional, for carrot ribbons if you want to get fancy
- Paper towels — for drying vegetables after washing (wet vegetables make the dip watery)
Budget-Friendly Options: Don’t have a fancy platter? A large dinner plate or even a piece of parchment paper on a cookie sheet works perfectly. I’ve made this on a paper plate at a picnic before, and it still looked amazing. The key is the arrangement, not the vessel.
Personal Experience: I once forgot my platter at home and had to use a pizza pan — honestly, it worked great! The wide, flat surface was perfect for arranging the vegetables, and the metallic color actually added a nice contrast to the orange and green.
Preparation Method
- Wash and dry all vegetables thoroughly. This is crucial — wet vegetables make the dip watery and the arrangement slide around. Pat everything dry with paper towels and let them air dry for 5 minutes if you have time.
- Prepare the dip. Pour the ranch dressing into your small bowl. If using the pumpkin puree trick, mix in 1 tablespoon until fully combined. The dip should turn a pale orange color — this is what makes the “pumpkin innards” effect work. Set the bowl in the center of your platter.
- Cut the green bell pepper stem. Slice a piece about 2 inches long and 1 inch wide, with a slight curve at the top. Set this aside — it goes on last.
- Chop the broccoli and cauliflower. Cut into small, uniform florets — about 1-inch pieces. You want them small enough to fit together tightly but large enough to still look like vegetables. This is the most time-consuming part, but it’s worth the effort.
- Slice the peppers. Cut the orange and yellow bell peppers into thin strips — about 1/4 inch wide and 2 inches long. These will fill in gaps and add color variation.
- Prepare the remaining vegetables. Slice the cucumber into rounds, halve the cherry tomatoes, cut the carrots into sticks, and chop the celery into 3-inch pieces. Keep each vegetable type in separate piles for easy arranging.
- Start building the pumpkin. Begin with the broccoli florets, placing them tightly around the dip bowl in a circular pattern. Think of this as the base layer — it creates the “orange” color that makes the pumpkin shape recognizable. Press them gently against each other so there are no gaps.
- Add the cauliflower. Sprinkle small cauliflower florets between the broccoli pieces to fill any empty spaces. This adds texture and helps the shape look full and rounded.
- Layer in the pepper strips. Tuck the orange and yellow pepper strips throughout the broccoli, angling them outward slightly. This creates the illusion of pumpkin ridges and adds visual interest.
- Create the outer edge. Arrange cucumber rounds and carrot sticks around the perimeter of the platter, slightly overlapping. This defines the pumpkin shape and gives it a finished look. Think of it as the “rind” of the pumpkin.
- Fill in with cherry tomatoes and celery. Scatter these in any remaining gaps, making sure the overall shape remains round and pumpkin-like. The tomatoes add pops of red that mimic the color variation in real pumpkins.
- Add the stem. Place the green bell pepper stem at the top of the pumpkin, right above the dip bowl. Angle it slightly upward for a natural look. If using celery leaves, tuck them behind the stem for a more realistic effect.
- Final adjustment. Step back and look at your creation. Fill in any bare spots with extra broccoli or pepper strips. The goal is a dense, full appearance — no platter should be visible through the vegetables.
- Serve immediately or cover with plastic wrap and refrigerate for up to 4 hours. Don’t make it too far in advance, or the vegetables will start to wilt.
Sensory Cues: At each stage, you should see a dense, colorful arrangement with no white space. The dip bowl should be completely surrounded by vegetables, like a hidden treasure. When you step back, the overall shape should clearly resemble a pumpkin — round at the bottom, slightly narrower at the top, with the stem as the finishing touch.
Personal Tip: I always keep a few extra broccoli florets on hand for last-minute adjustments. There’s nothing worse than realizing you have a bare spot and no vegetables left to fill it!
Cooking Tips & Techniques
After making this recipe more times than I care to count, I’ve learned a few tricks that make the process smoother and the result more impressive.
The dip bowl size matters. I learned this the hard way. If your bowl is too large, the vegetables won’t create a convincing pumpkin shape. If it’s too small, the dip runs out too quickly. Aim for a bowl that’s about 4-5 inches in diameter — it should take up about one-third of the platter’s surface area.
Don’t skip the drying step. I know it seems fussy, but wet vegetables are the enemy of a good veggie tray. They slide around, make the dip watery, and look less appealing. I once made this in a hurry and skipped drying — the “pumpkin” collapsed within 10 minutes. Never again.
Work from the center outward. Start with the vegetables closest to the dip bowl and work your way to the edges. This creates a natural, layered look that mimics how a real pumpkin grows. Plus, it’s easier to adjust the shape as you go.
Use the “squish test.” After arranging each layer, gently press down on the vegetables with your palm. If they feel loose or wobbly, add more florets to tighten the arrangement. A tight pack holds its shape better and looks more professional.
Common mistake: overloading the center. It’s tempting to pile vegetables right up to the edge of the dip bowl, but leave about 1/2 inch of space. This allows guests to actually reach the dip without knocking over your carefully arranged vegetables.
Timing tip: Prep all the vegetables the night before and store them in separate zip-top bags in the fridge. Then assembly takes just 10 minutes before your party. This is my go-to strategy for busy Halloween nights.
Variations & Adaptations
This recipe is endlessly customizable — here are some of my favorite variations that I’ve tested over the years.
Keto/Low-Carb Version
Swap the carrots and cherry tomatoes for more broccoli, cauliflower, and cucumber. Add some radish slices and bell pepper strips for color. The ranch dip is already keto-friendly, so no changes needed there. I made this for my sister who’s doing keto, and she ate half the tray herself.
Rainbow Halloween Version
Instead of focusing on orange colors, use every color of the rainbow for a “magical” pumpkin effect. Add purple cauliflower, yellow squash, red bell pepper, and green snap peas. This is perfect for kids’ parties where you want maximum visual appeal. My niece calls it the “unicorn pumpkin.”
Spicy Southwest Version
Swap the ranch dip for a spicy chipotle ranch or a creamy jalapeño dip. Add some jicama sticks for crunch and a few slices of fresh jalapeño for heat. This version is great for adult parties where you want a little kick. I brought this to a Halloween barbecue, and it was gone in 20 minutes.
Hummus Center Version
Replace the ranch dip with a bowl of hummus — roasted red pepper hummus works especially well because it maintains the orange color. Add some warm pita chips around the edges for dipping. This is a great option if you’re serving a crowd with different dietary needs.
Seasonal Fall Version
Add some roasted pumpkin seeds (pepitas) scattered around the tray for a fall-themed touch. You can also include thin slices of apple or pear for a sweet contrast to the savory vegetables. This version transitions beautifully from Halloween into Thanksgiving.
Serving & Storage Suggestions
Serving Temperature: This veggie tray is best served cold — the vegetables should be crisp and refreshing. If you’ve refrigerated it, let it sit at room temperature for about 10 minutes before serving to take the chill off. Cold vegetables are crunchier and more refreshing.
Presentation Tips: Place the pumpkin veggie tray on a table with other Halloween-themed foods for maximum impact. I like to surround it with mini pumpkins and fall leaves for a festive touch. If you’re serving it as a centerpiece, make sure guests can access it from all sides.
Complementary Dishes: This pairs beautifully with other Halloween appetizers like deviled eggs (make them look like eyeballs!), spiderweb dip, or mummy hot dogs. For beverages, serve with apple cider or a Halloween-themed punch. The fresh vegetables also balance out heavier party foods like pizza or chips.
Storage Instructions: If you have leftovers (unlikely, but possible!), remove the dip bowl and store the vegetables in an airtight container in the refrigerator for up to 2 days. The dip can be stored separately and used for another meal. Don’t try to reassemble the pumpkin shape — it won’t hold up.
Reheating: This is a cold dish, so no reheating needed! If the vegetables have lost their crunch, you can revive them by soaking in ice water for 10 minutes, then patting dry.
Flavor Development: Interestingly, the flavors don’t change much over time since everything is raw. However, the dip will absorb some flavors from the vegetables if left overnight. I actually prefer the dip on day two — it develops a more complex flavor from sitting with the fresh vegetables.
Nutritional Information & Benefits
This veggie tray is packed with nutrients, making it a guilt-free Halloween indulgence. Here’s the estimated nutritional breakdown per serving (about 1 cup of vegetables with 2 tablespoons of dip):
| Nutrient | Amount Per Serving |
|---|---|
| Calories | 120-150 |
| Total Fat | 8-10g |
| Carbohydrates | 12-15g |
| Fiber | 4-5g |
| Protein | 3-4g |
| Vitamin C | 60-80% DV |
| Vitamin A | 40-50% DV |
| Potassium | 300-400mg |
Health Benefits: Broccoli and cauliflower are cruciferous vegetables rich in antioxidants and fiber. Bell peppers are loaded with vitamin C — more than an orange! Carrots provide beta-carotene for eye health, and cucumbers are hydrating and low in calories. This is one of the healthiest Halloween snacks you can serve.
Dietary Considerations: This recipe is naturally gluten-free, nut-free, and can be made dairy-free by using a vegan ranch dressing. It’s also vegetarian and can be made vegan with a plant-based dip. The only potential allergen is dairy in the ranch dressing, which is easily substituted.
Personal Wellness Perspective: I love that this recipe lets me indulge in Halloween fun without the sugar overload. It’s the perfect balance to all the candy and sweets that dominate this holiday. Plus, kids actually eat vegetables when they’re presented in a fun way — that’s a win in my book.
Conclusion
This easy Halloween veggie tray shaped like a pumpkin is proof that healthy eating doesn’t have to be boring. It’s fun, festive, and genuinely delicious — the kind of recipe that makes you proud to bring it to a party. Whether you’re recreating a memory like I was, or just looking for a quick and impressive appetizer, this recipe delivers every time.
I encourage you to make this your own. Swap in your favorite vegetables, experiment with different dips, and have fun with the presentation. The first time you bring this to a Halloween gathering and watch people’s faces light up, you’ll understand why I was so determined to get it right.
Have you tried making this pumpkin veggie tray? I’d love to hear how it turned out! Drop a comment below and share your own variations — I’m always looking for new ideas. And if you loved this recipe, please share it with your friends and family. Happy Halloween, and happy snacking!
Frequently Asked Questions
Can I make this veggie tray ahead of time?
Yes! You can prep all the vegetables up to 24 hours in advance and store them in separate bags in the fridge. Assemble the tray no more than 4 hours before serving for the best appearance.
What if I don’t have a round platter?
No problem! A large dinner plate, a cutting board, or even a sheet pan lined with parchment paper works perfectly. The shape comes from the arrangement, not the dish.
Can I use different vegetables?
Absolutely! This recipe is very flexible. Snap peas, radishes, jicama, zucchini, or any crunchy vegetable works well. Just keep the colors varied for visual appeal.
How do I keep the vegetables from sliding around?
Make sure all vegetables are thoroughly dried before arranging. You can also put a thin layer of lettuce leaves under the vegetables for grip. Starting with a tight pack around the dip bowl helps everything stay in place.
Is this recipe kid-friendly?
Very! Kids love the fun pumpkin shape and the interactive dipping. My nephew who “hates vegetables” ate three celery sticks from this tray. The presentation makes all the difference.
PrintEasy Halloween Veggie Tray: Best Pumpkin Shape
A fun and festive Halloween veggie tray shaped like a pumpkin, made with fresh vegetables and creamy ranch dip. Perfect for parties, this quick and easy appetizer is a crowd-pleaser that makes eating vegetables fun for everyone.
- Prep Time: 15 minutes
- Cook Time: 0 minutes
- Total Time: 15 minutes
- Yield: 8 servings 1x
- Category: Appetizer
- Cuisine: American
Ingredients
- 2 cups broccoli florets, roughly chopped into small, uniform pieces
- 1 cup cauliflower florets, chopped small
- 1 large orange bell pepper, sliced into thin strips
- 1 medium yellow bell pepper, sliced
- 1 large cucumber, sliced into rounds or half-moons
- 1 cup cherry tomatoes, halved
- 2 medium carrots, cut into sticks or coins
- 3–4 stalks celery, cut into 3-inch pieces
- 1 cup ranch dressing (e.g., Hidden Valley)
- 1 tablespoon pumpkin puree (optional, for color)
- 1 small green bell pepper, cut into a stem shape (about 2 inches long, 1 inch wide)
Instructions
- Wash and dry all vegetables thoroughly. Pat everything dry with paper towels and let them air dry for 5 minutes if possible.
- Pour the ranch dressing into a small bowl. If using pumpkin puree, mix in 1 tablespoon until fully combined. Set the bowl in the center of your platter.
- Cut the green bell pepper into a stem shape about 2 inches long and 1 inch wide, with a slight curve at the top. Set aside.
- Chop the broccoli and cauliflower into small, uniform florets about 1 inch in size.
- Cut the orange and yellow bell peppers into thin strips about 1/4 inch wide and 2 inches long.
- Slice the cucumber into rounds, halve the cherry tomatoes, cut the carrots into sticks, and chop the celery into 3-inch pieces. Keep each vegetable type in separate piles.
- Start building the pumpkin by placing broccoli florets tightly around the dip bowl in a circular pattern. Press them gently against each other so there are no gaps.
- Add small cauliflower florets between the broccoli pieces to fill any empty spaces.
- Tuck orange and yellow pepper strips throughout the broccoli, angling them outward slightly to create pumpkin ridges.
- Arrange cucumber rounds and carrot sticks around the perimeter of the platter, slightly overlapping, to define the pumpkin shape.
- Scatter cherry tomatoes and celery in any remaining gaps, keeping the overall shape round and pumpkin-like.
- Place the green bell pepper stem at the top of the pumpkin, right above the dip bowl. Angle it slightly upward.
- Step back and fill in any bare spots with extra broccoli or pepper strips. The goal is a dense, full appearance with no platter visible.
- Serve immediately or cover with plastic wrap and refrigerate for up to 4 hours.
Notes
Prep all vegetables the night before and store in separate zip-top bags in the fridge for quick assembly. The dip bowl should be about 4-5 inches in diameter. Leave about 1/2 inch of space between vegetables and the dip bowl for easy access. For a dairy-free option, use vegan ranch dressing. To revive vegetables that have lost their crunch, soak in ice water for 10 minutes and pat dry.
Nutrition
- Serving Size: 1 cup of vegetables
- Calories: 135
- Sugar: 6
- Sodium: 320
- Fat: 9
- Saturated Fat: 1.5
- Carbohydrates: 13
- Fiber: 4
- Protein: 3
Keywords: Halloween veggie tray, pumpkin veggie tray, Halloween appetizer, vegetable platter, healthy Halloween snack, easy Halloween recipe


