Maggie wasn’t trying to impress anyone. I had stopped by her place on a random Tuesday in early December to pick up a book I’d lent her, and the smell hit me before I even got through the front door. It was this incredible mix of rich chocolate and fresh mint, with something warm and coffee-like underneath. I stood there in her entryway, coat still on, and just said, “What is that?” She looked up from the stove like she’d forgotten I was coming. “Oh, just some cookies I’m testing for the office party,” she said, waving her hand like it was nothing. But let me tell you, it was not nothing. Those little crinkle cookies, dusted with powdered sugar, were sitting on a cooling rack looking like they’d been plucked straight from a holiday magazine. She handed me one, still warm, and I honestly think I made some kind of noise that was not entirely appropriate for a casual Tuesday afternoon. The chocolate was deep and fudgy, the peppermint was cool and festive, and that mocha undertone? Absolute genius. I nagged her for the recipe for weeks, and she finally texted it to me with the note, “It’s literally just cookies, calm down.” But they’re not just cookies. They’re the kind of cookies that make people stop mid-conversation at a party and ask who brought them. Maybe you’ve been to a holiday gathering where the dessert table is just… fine. These are the ones that change that. I’ve been making them every holiday season since, and they’ve never once let me down.
Why You’ll Love This Recipe
These Peppermint Mocha Crinkle Cookies are the kind of recipe that makes you look like a holiday hero without spending all day in the kitchen. I’ve tested this recipe at least a dozen times across different ovens, different humidity levels, and even a disastrous batch where I forgot the peppermint extract entirely (they were still good, honestly, but not the same). Here’s why these cookies deserve a permanent spot on your holiday baking list:
- Quick & Easy: From mixing bowl to cooling rack in about 45 minutes. No chilling required, which is rare for a crinkle cookie.
- Simple Ingredients: You probably already have most of this in your pantry. The only specialty item is peppermint extract, and that’s easy to find this time of year.
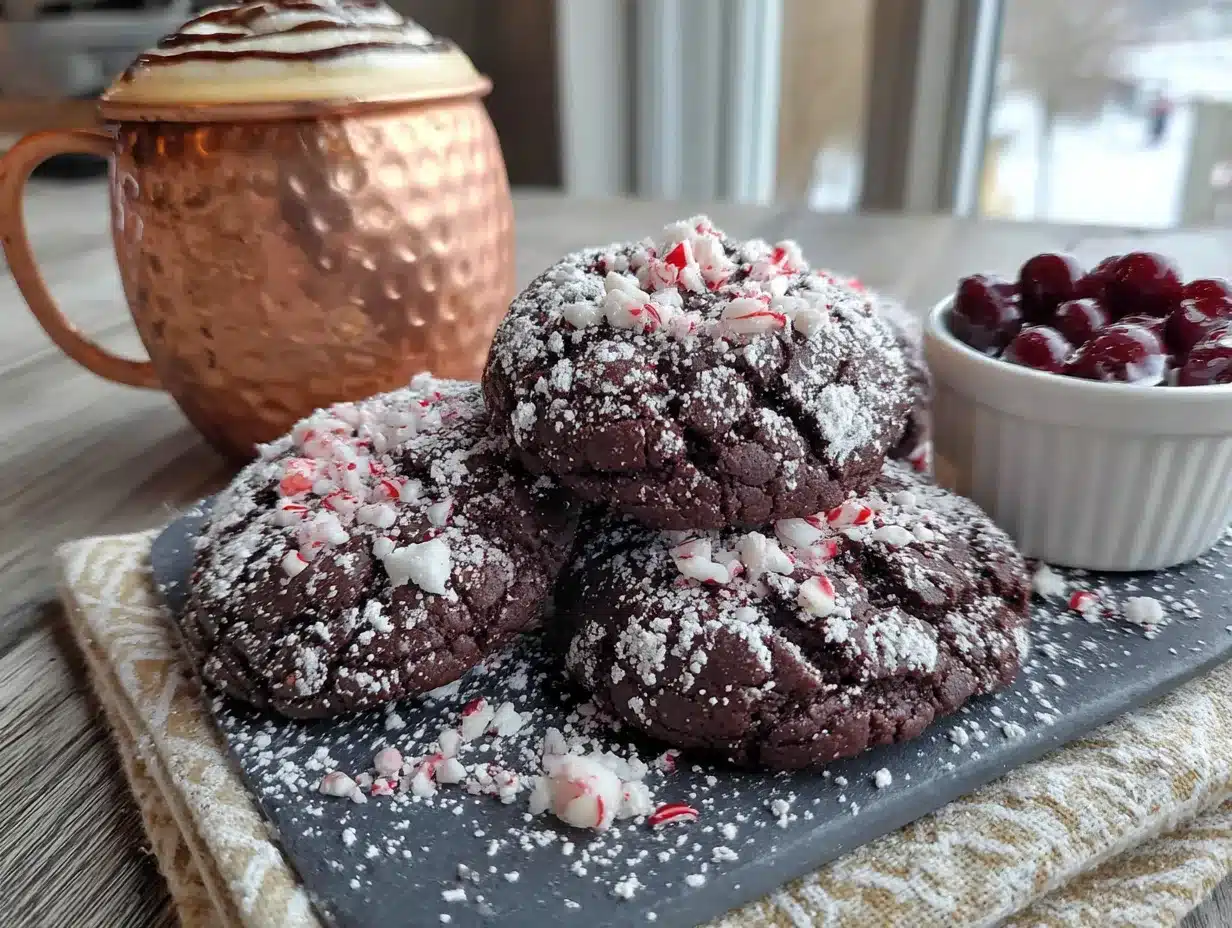
- Perfect for Holiday Parties: These cookies look stunning on a dessert table. The white crinkles against the dark chocolate, with tiny peppermint bits catching the light? Total showstopper.
- Crowd-Pleaser: Kids love the minty sweetness, adults appreciate the mocha depth. I’ve watched people eat three in a row without blinking.
- Unbelievably Delicious: The texture is soft and fudgy in the center with that signature crinkled, crackly top. It’s next-level comfort food dressed up for the holidays.
What makes this version different from every other crinkle cookie out there is the mocha element. Most recipes just do chocolate and peppermint, which is fine, but adding that instant espresso powder takes the chocolate flavor and makes it deeper, more sophisticated. It’s not a coffee-forward cookie—it’s a chocolate cookie that tastes like it went to finishing school. This is the recipe you bring to the cookie swap when you want to win, but politely.
What Ingredients You Will Need
This recipe uses straightforward ingredients that come together to create something genuinely special. The magic is in how they balance each other. Here’s everything you’ll need:
For the Cookie Dough
- 1 ¾ cups (220g) all-purpose flour – Spoon and level for accuracy. Too much flour makes dense cookies.
- ½ cup (50g) unsweetened cocoa powder – I prefer Dutch-processed for a richer, darker color, but natural works fine too.
- 1 ½ teaspoons baking powder – This gives the cookies their lift and that signature crinkle.
- ½ teaspoon salt – Balances the sweetness and enhances the chocolate.
- ½ cup (113g) unsalted butter, softened – Let it sit out for about 30 minutes. Cold butter won’t cream properly.
- 1 cup (200g) granulated sugar – We’ll use some of this for rolling too.
- 2 large eggs, room temperature – Cold eggs can seize the butter mixture. Pop them in warm water for 5 minutes if you forgot.
- 1 teaspoon vanilla extract – Adds warmth and rounds out the mint.
- 1 teaspoon peppermint extract – Go with a good brand like McCormick or Nielsen-Massey. Cheap extracts can taste artificial.
- 1 tablespoon instant espresso powder – This is the secret weapon. It doesn’t make the cookies taste like coffee—it makes the chocolate taste more like chocolate.
For Rolling and Topping
- ½ cup (100g) granulated sugar – For the first roll. It helps the powdered sugar stick.
- ½ cup (60g) powdered sugar – For the crinkly white coating. Sift it first to avoid clumps.
- ¼ cup (40g) crushed peppermint candies or candy canes – Optional but highly recommended for that festive crunch on top.
One thing I’ve learned from making these over and over: quality matters with the peppermint extract. I once grabbed a store brand on impulse, and the cookies had this weird medicinal aftertaste. Stick with a trusted brand, and you’ll be fine. Also, if you’re dairy-free, you can swap the butter for a good vegan butter stick—just make sure it’s the kind meant for baking, not the spreadable tub variety.
Equipment Needed
You don’t need a fancy kitchen to pull these off, but having the right tools makes the process smoother. Here’s what I use:
- Electric mixer (stand or hand-held): Creaming the butter and sugar properly is key. You can do it by hand with a wooden spoon, but your arm will hate you.
- Large mixing bowls (at least two): One for dry ingredients, one for wet.
- Whisk and rubber spatula: The whisk for combining dry ingredients, the spatula for folding everything together without overmixing.
- Baking sheets (2-3): Light-colored metal sheets work best. Dark sheets can over-brown the bottoms.
- Parchment paper or silicone baking mats: Non-negotiable for easy cleanup and even baking.
- Cooling rack: Lets air circulate so the cookies don’t steam and get soggy.
- Small bowls for rolling sugars: One for granulated, one for powdered. Keeps things tidy.
- Cookie scoop (about 1.5 tablespoons): Ensures uniform size so everything bakes evenly. A 1.5-tablespoon scoop is perfect.
If you don’t have a cookie scoop, just use two spoons to portion the dough. It’s messier but works. And if you don’t have a cooling rack, you can transfer the cookies to a plate after a few minutes on the sheet—just be careful not to break them while they’re still warm.
Preparation Method
Alright, let’s make these cookies. I’ve broken this down step by step so you can follow along without any surprises. Trust me on the order here—it matters.
- Preheat your oven to 350°F (175°C). Line two baking sheets with parchment paper or silicone mats. Set them aside while you make the dough.
- Whisk the dry ingredients together. In a medium bowl, combine the flour, cocoa powder, baking powder, salt, and instant espresso powder. Whisk until everything is evenly distributed. The espresso powder sometimes clumps, so break those up with your fingers if you see any.
- Cream the butter and sugar. In a large bowl, beat the softened butter and granulated sugar together on medium speed for about 2-3 minutes. You want it light and fluffy—look for a pale, creamy texture. Scrape down the sides of the bowl halfway through.
- Add the eggs and extracts. Beat in the eggs one at a time, mixing well after each. Then add the vanilla and peppermint extracts. The mixture might look slightly curdled at this point—that’s totally normal. Don’t panic.
- Combine wet and dry ingredients. Gradually add the flour mixture to the butter mixture, mixing on low speed. Stop as soon as the flour disappears. Overmixing will make the cookies tough. The dough will be soft and a little sticky—that’s what we want.
- Set up your rolling station. Place the granulated sugar in one small bowl and the sifted powdered sugar in another. If you’re using crushed peppermint, mix it into the powdered sugar now.
- Portion and roll the dough. Using your cookie scoop or a spoon, portion out rounded tablespoons of dough (about 20g each). Roll each portion into a ball between your palms. Drop the ball into the granulated sugar first, roll to coat, then transfer to the powdered sugar bowl and coat generously. The powdered sugar layer is what creates that beautiful crinkle effect, so be thorough.
- Place on baking sheets. Arrange the coated dough balls about 2 inches apart on the prepared sheets. They spread quite a bit, so don’t overcrowd. I usually get about 12 per sheet.
- Bake immediately. Pop one sheet in the oven and bake for 10-12 minutes. The cookies should look puffed and cracked, with the edges set but the centers still soft. They’ll continue setting as they cool. If you bake them until they look fully done in the oven, they’ll be overbaked.
- Cool properly. Let the cookies rest on the baking sheet for 5 minutes. This is crucial—they’re too fragile to move right away. After 5 minutes, transfer them to a wire rack to cool completely. Repeat with the remaining dough.
One thing I learned the hard way: don’t skip the granulated sugar step. I tried it once thinking I could just roll in powdered sugar, and the cookies came out looking sad and barely crinkled. That double coating is what gives them their signature look.
Cooking Tips & Techniques
After making these cookies more times than I care to count, I’ve picked up a few tricks that make the process smoother and the results more consistent. Here’s what I wish someone had told me:
Don’t overmix the dough. I know I said this already, but it’s worth repeating. Once you add the flour, mix just until you can’t see any more white streaks. Overworking the dough develops gluten, and that leads to tough, cakey cookies instead of soft, fudgy ones. You want them to be tender, not bouncy.
Use a light hand with the peppermint extract. A full teaspoon sounds right, and it is, but if you’re nervous about it being too strong, start with ¾ teaspoon. You can always add more, but you can’t take it out. I once had a friend who doubled the peppermint thinking it would be “extra festive,” and the cookies tasted like toothpaste. Respect the balance.
Bake one sheet at a time. I know it’s tempting to crowd the oven, but rotating sheets halfway through and baking them separately ensures even heat distribution. If you bake two sheets at once, the bottom one will likely over-brown while the top one under-bakes. It adds time, but it’s worth it.
Watch for the visual cues. The cookies are done when the edges look set and the tops are covered in cracks with the centers still looking slightly underdone. If you press gently on one, it should feel soft but not raw. Pull them out at that point and let the residual heat finish the job.
Crush the peppermint finely. If you’re adding crushed candy to the powdered sugar, make sure the pieces are small—think coarse sand. Big chunks can create uneven spots where the cookie sticks to your teeth. I put the candy canes in a ziplock bag and go at them with a rolling pin. Works every time.
Variations & Adaptations
One of the best things about this recipe is how flexible it is. I’ve played around with it quite a bit, and here are some variations that turned out surprisingly well:
Gluten-Free Version: Swap the all-purpose flour for a 1:1 gluten-free baking flour blend. I’ve used King Arthur’s Measure for Measure and Bob’s Red Mill with great results. The texture is slightly more delicate, so handle the dough gently. No other adjustments needed.
White Chocolate Peppermint: Fold in ½ cup of white chocolate chips (about 85g) after combining the wet and dry ingredients. The white chocolate adds a creamy sweetness that pairs beautifully with the mint. Just be aware that the chips might peek through the crinkle coating, which looks pretty but isn’t the classic look.
Double Chocolate Mocha: Add ¼ cup (45g) of mini chocolate chips to the dough along with the dry ingredients. This amps up the chocolate factor and gives you little melty pockets of fudgy goodness. Use dark chocolate chips for a more sophisticated flavor.
Dairy-Free Adaptation: Use a high-quality vegan butter stick (like Miyoko’s or Country Crock Plant Butter) in place of regular butter. Make sure your chocolate chips are dairy-free if you’re adding them. The texture will be slightly less tender but still delicious.
Spiced Holiday Version: Add ½ teaspoon of cinnamon and ¼ teaspoon of nutmeg to the dry ingredients. It gives the cookies a subtle warmth that complements the peppermint and chocolate. I tried this on a whim one year and it was a hit at my family’s Christmas Eve gathering.
Serving & Storage Suggestions
These cookies are at their absolute best within 24 hours of baking, when the edges are still slightly crisp and the centers are soft and fudgy. Here’s how to serve and store them for maximum enjoyment:
Serving Temperature: Room temperature is ideal. The flavors are more pronounced, and the texture is perfect. If you’re serving them at a party, arrange them on a festive platter with a light dusting of extra powdered sugar for that snowy effect.
What to Serve Alongside: A warm mug of hot cocoa, peppermint mocha coffee, or even a glass of cold milk. For an adult gathering, they pair surprisingly well with a dark stout or a peppermint martini. I’ve also served them alongside a cheese board as a sweet counterpoint to sharp cheddar—weirdly good.
Storage Instructions: Store in an airtight container at room temperature for up to 5 days. Place a slice of bread in the container to keep them soft—the cookies will absorb the moisture and stay tender. Change the bread every other day.
Freezing: These freeze beautifully. Layer the cooled cookies between sheets of parchment paper in a freezer-safe container. They’ll keep for up to 3 months. Thaw at room temperature for about 30 minutes before serving. You can also freeze the unbaked dough balls—just roll them in sugar, place on a baking sheet, freeze until solid, then transfer to a freezer bag. Bake directly from frozen, adding 1-2 minutes to the baking time.
Reheating: If you want that just-baked warmth, pop a cookie in the microwave for 8-10 seconds. It’s not quite the same as fresh from the oven, but it’s close enough for a late-night craving.
Flavor Development: Interestingly, the mocha flavor deepens after a day or two. The peppermint fades slightly, but the chocolate and coffee notes become more pronounced. So if you’re planning ahead, these are actually better on day two for the mocha lovers.
Nutritional Information & Benefits
Let’s be real—these are holiday cookies, not health food. But here’s the breakdown so you know what you’re working with. Per cookie (based on 24 cookies):
| Nutrient | Amount |
|---|---|
| Calories | 145 |
| Total Fat | 6g |
| Saturated Fat | 3.5g |
| Carbohydrates | 22g |
| Sugar | 15g |
| Protein | 2g |
| Sodium | 95mg |
On the bright side, cocoa powder is rich in antioxidants called flavonoids, which are good for heart health. Peppermint has been known to aid digestion—though I’m not sure that justifies a third cookie. The espresso powder provides a tiny caffeine boost, so these are actually a decent afternoon pick-me-up if you’re honest with yourself about portion control.
If you’re watching your sugar intake, you can reduce the granulated sugar to ¾ cup, but the texture will be slightly less tender. For a lower-fat option, substitute half the butter with unsweetened applesauce—just know the cookies will be more cake-like and less fudgy.
Potential allergens include gluten, dairy, and eggs. Make the adaptations listed above if you’re accommodating dietary restrictions.
Conclusion
These Peppermint Mocha Crinkle Cookies have become my go-to holiday bake for a reason. They’re forgiving enough for a beginner baker but impressive enough to steal the show at any gathering. The combination of rich chocolate, cool peppermint, and that subtle mocha depth is something you don’t find in every cookie recipe, and that’s what makes them special. I’ve brought them to cookie swaps, office parties, and family dinners, and they’ve never come home with leftovers. Honestly, I think that’s the highest compliment a cookie can get.
I’d love to hear how these turn out for you. Did you try any of the variations? Did your guests fight over the last one? Leave a comment below and let me know—I read every single one, and your stories honestly make my day. And if you snap a photo, tag me on social media so I can see your beautiful crinkles. Happy baking, and here’s to a holiday season filled with warm cookies and good company.
Frequently Asked Questions
Can I make the dough ahead of time and chill it?
You can, but I don’t recommend it for this recipe. The dough is meant to be baked right after rolling in sugar. Chilling can make the coating less effective, and the cookies may not crinkle as nicely. If you need to prep ahead, freeze the baked cookies instead.
Why didn’t my cookies crinkle?
This usually happens for one of three reasons: the dough was overmixed, the powdered sugar coating was too thin, or the oven wasn’t hot enough. Make sure your powdered sugar layer is thick and that your oven is fully preheated to 350°F (175°C). A fresh batch of baking powder helps too.
Can I use mint extract instead of peppermint extract?
Technically yes, but the flavor will be different. Peppermint extract is made from peppermint plants and has a cleaner, cooler taste. Mint extract is usually a blend of spearmint and peppermint, which can taste more like gum than cookies. Stick with peppermint for the best results.
How do I crush candy canes without making a huge mess?
Put the candy canes in a sturdy ziplock bag, remove as much air as possible, and seal it. Wrap the bag in a kitchen towel and go at it with a rolling pin or the bottom of a heavy skillet. The towel absorbs the noise and keeps everything contained. Works like a charm.
Can I double this recipe?
Absolutely. This recipe doubles beautifully. Just make sure you have enough baking sheets and space to work. The dough can sit at room temperature for about 30 minutes while you bake the first batch, but any longer and it might get too sticky to handle easily.
Pin This Recipe!

Best Peppermint Mocha Crinkle Cookies Recipe

These Peppermint Mocha Crinkle Cookies are soft, fudgy, and perfectly festive with a rich chocolate base, cool peppermint, and a subtle mocha depth. They’re quick to make, require no chilling, and are guaranteed to be the star of any holiday cookie swap or party.
- Prep Time: 15 minutes
- Cook Time: 12 minutes
- Total Time: 45 minutes
- Yield: 24 cookies 1x
- Category: Dessert
- Cuisine: American
Ingredients
- 1 ¾ cups (220g) all-purpose flour
- ½ cup (50g) unsweetened cocoa powder (Dutch-processed preferred)
- 1 ½ teaspoons baking powder
- ½ teaspoon salt
- ½ cup (113g) unsalted butter, softened
- 1 cup (200g) granulated sugar
- 2 large eggs, room temperature
- 1 teaspoon vanilla extract
- 1 teaspoon peppermint extract
- 1 tablespoon instant espresso powder
- ½ cup (100g) granulated sugar (for rolling)
- ½ cup (60g) powdered sugar (for rolling, sifted)
- ¼ cup (40g) crushed peppermint candies or candy canes (optional)
Instructions
- Preheat your oven to 350°F (175°C). Line two baking sheets with parchment paper or silicone mats.
- In a medium bowl, whisk together the flour, cocoa powder, baking powder, salt, and instant espresso powder until evenly distributed. Break up any clumps of espresso powder with your fingers.
- In a large bowl, beat the softened butter and 1 cup granulated sugar together on medium speed for 2-3 minutes until light and fluffy. Scrape down the sides of the bowl halfway through.
- Beat in the eggs one at a time, mixing well after each. Add the vanilla and peppermint extracts and mix until combined. The mixture may look slightly curdled—this is normal.
- Gradually add the flour mixture to the butter mixture, mixing on low speed just until the flour disappears. Do not overmix. The dough will be soft and slightly sticky.
- Set up your rolling station: Place the ½ cup granulated sugar in one small bowl and the sifted powdered sugar (mixed with crushed peppermint, if using) in another.
- Using a cookie scoop or spoon, portion out rounded tablespoons of dough (about 20g each). Roll each portion into a ball between your palms. Roll the ball first in the granulated sugar to coat, then in the powdered sugar mixture, coating generously.
- Place the coated dough balls about 2 inches apart on the prepared baking sheets. Bake one sheet at a time for 10-12 minutes. The cookies should look puffed and cracked, with edges set but centers still soft.
- Let the cookies rest on the baking sheet for 5 minutes (they are fragile when hot). Then transfer to a wire rack to cool completely. Repeat with remaining dough.
Notes
Don’t skip the granulated sugar rolling step—it helps the powdered sugar stick and creates the signature crinkle. Use a light hand with peppermint extract; start with ¾ teaspoon if unsure. Bake one sheet at a time for even results. Cookies are done when edges are set and tops are cracked but centers still look slightly underdone. For best texture, serve within 24 hours. Store in an airtight container at room temperature for up to 5 days; add a slice of bread to keep them soft. Freeze baked cookies for up to 3 months, or freeze unbaked dough balls and bake directly from frozen, adding 1-2 minutes to baking time.
Nutrition
- Serving Size: 1 cookie
- Calories: 145
- Sugar: 15
- Sodium: 95
- Fat: 6
- Saturated Fat: 3.5
- Carbohydrates: 22
- Fiber: 1
- Protein: 2
Keywords: peppermint mocha crinkle cookies, holiday cookies, chocolate peppermint cookies, crinkle cookies, easy cookie recipe, Christmas cookies


