I used to think one-pan dinners were a myth. You know, one of those things people post on Instagram that looks gorgeous but leaves you scrubbing a baking sheet for twenty minutes afterward. My neighbor, a woman named Carol who has strong opinions about everything from compost bins to the proper way to fold fitted sheets, swore by them. “Hand me that skillet,” she’d say whenever I complained about my mountain of dirty dishes. I’d nod politely and go back to my three-pot pasta routine.
Then last Tuesday happened. I had a fridge full of chicken thighs, a sad little bundle of thyme that was wilting by the minute, and absolutely zero energy for the usual kitchen circus. I was determined to prove Carol wrong—or at least make something edible without creating a sink full of evidence. I grabbed my favorite cast iron pan, threw in some butter and garlic because honestly, when has that combination ever let anyone down, and figured I’d just make it up as I went along.
The rice went in a little too early. I forgot to check the liquid ratio twice. At one point, I burned my finger on the handle because I’m apparently incapable of remembering that hot metal stays hot. But when I lifted the lid, the smell that hit me—that rich, garlicky, buttery aroma mixed with the scent of perfectly cooked rice—made me stop mid-motion. It was the kind of smell that makes you close your eyes and forget about the mess for a second.
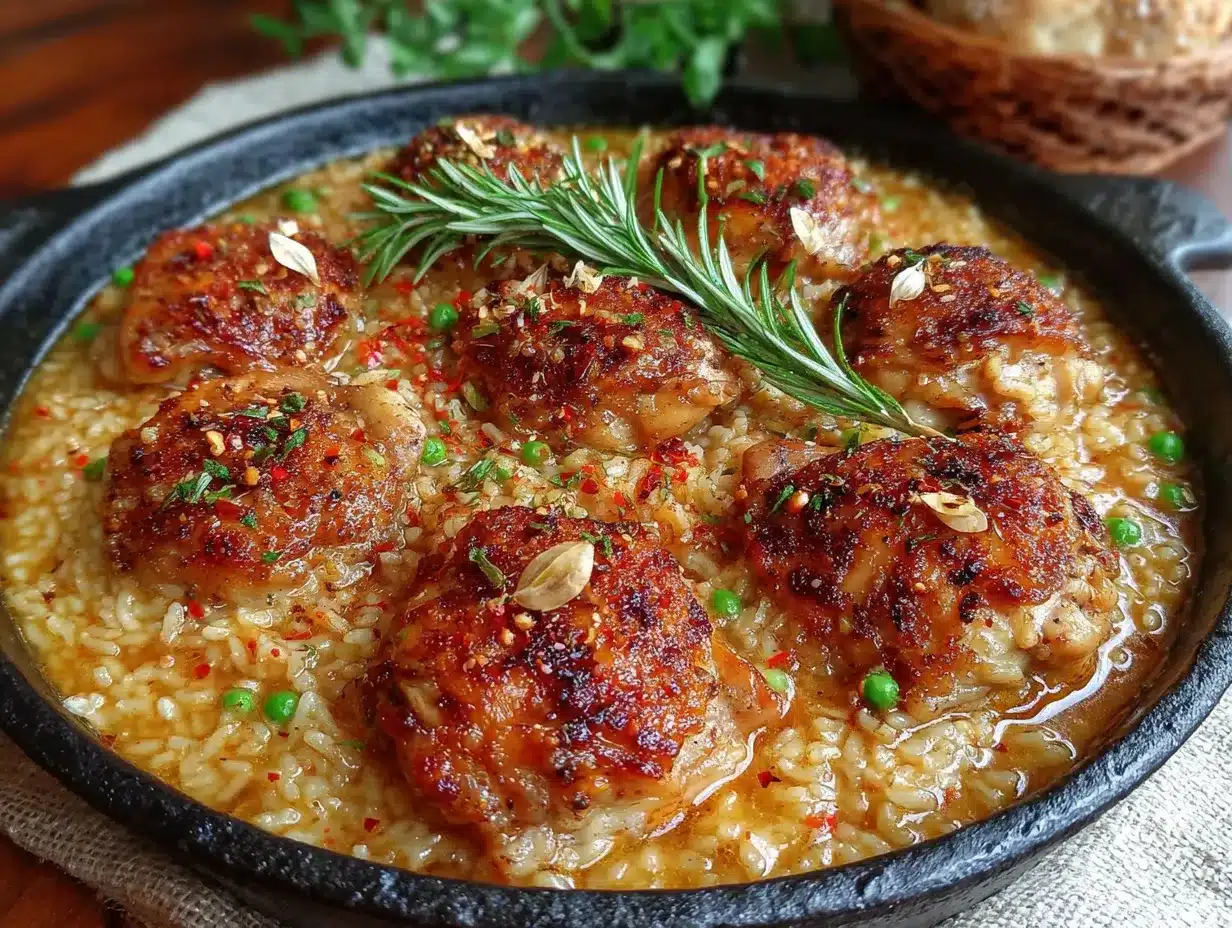
I took a bite standing at the counter, leaning over the pan like some kind of kitchen gremlin. And honestly? It was better than anything I’d made in my usual multi-pan chaos. The chicken was tender. The rice was fluffy and soaked up all that garlic butter goodness. I texted Carol a photo, and she sent back a single word: “Told you.”
This recipe stayed with me because it proved something I’d been stubborn about for years—that simple doesn’t mean boring, and that sometimes the best meals come from the messiest attempts. Maybe you’ve been there, skeptical about the whole one-pan thing, convinced it can’t possibly taste as good as the effort you put in. I get it. But let me tell you, this cozy one-pan garlic butter chicken and rice might just change your mind.
Why You’ll Love This Recipe
Let me be straight with you—I’ve tested this recipe six times. Six. I wanted to make sure it wasn’t just beginner’s luck or that one magical Tuesday. Every single time, it delivered. Here’s why this one is different from every other chicken and rice recipe floating around the internet.
- One Pan, Minimal Mess : This isn’t just a gimmick. You use one skillet from start to finish. No transferring to a baking dish, no extra pots for the rice, no separate bowl for mixing. Your sink will thank you, and honestly, so will your sanity on a busy weeknight.
- Simple Ingredients You Already Have : Chicken, rice, butter, garlic, onion, chicken broth, and a few pantry spices. That’s it. No chasing down specialty ingredients at three different stores. I literally made this with what I had on hand that Tuesday, and it worked perfectly.
- Perfect for Cozy Nights In : This is the kind of dinner you want when it’s cold outside, when you’ve had a rough day, or when you just need something warm and familiar. It’s comfort food that doesn’t require a complicated recipe or a hour of active cooking time.
- Crowd-Pleaser Status : I served this to my picky brother-in-law who claims he “doesn’t do rice dishes.” He asked for seconds. Then he asked for the recipe. That’s the kind of power this dish has.
- Unbelievably Delicious Texture : The rice cooks in the chicken drippings and garlic butter, so every grain is infused with flavor. The chicken gets a beautiful golden sear on the outside while staying juicy on the inside. It’s the kind of meal where you’ll find yourself picking at the pan long after you’re full.
What makes this recipe different from the rest is the technique. Instead of dumping everything in at once and hoping for the best, you sear the chicken first to build that deep, savory flavor base. Then you toast the rice in the same pan with the garlic and butter before adding the liquid. That little extra step—toasting the rice—makes a world of difference. It gives the dish a nutty, almost risotto-like quality that you just don’t get from the dump-and-bake method.
This isn’t just good. It’s the kind of recipe that makes you feel like you’ve got your life together, even when you absolutely don’t. It’s comfort food reimagined—simpler, faster, but with the same soul-soothing satisfaction that makes you take a deep breath and finally relax.
What Ingredients You Will Need
This recipe uses simple, wholesome ingredients that work together to create something genuinely special. Most of these are pantry staples, which is exactly why this dish has become my emergency dinner go-to. Here’s what you’ll need and why each ingredient matters.
For the Chicken
- 4 boneless, skinless chicken thighs (about 1.5 pounds) — I prefer thighs over breasts here because they stay juicier during the cooking process. If you only have breasts, that works too, just watch the cooking time closely so they don’t dry out. Look for thighs that are roughly the same size so they cook evenly.
- 1 teaspoon salt — I use fine sea salt for even seasoning. Don’t skip this step—properly seasoned chicken is the foundation of the whole dish.
- ½ teaspoon black pepper — Freshly ground if you have it, but pre-ground works fine in a pinch.
- ½ teaspoon paprika — This adds a subtle warmth and helps the chicken develop that gorgeous golden color during searing. Smoked paprika works beautifully here too if you want a deeper flavor.
- ¼ teaspoon garlic powder — Yes, we’re using fresh garlic later too. The powder adds a different kind of garlicky depth that blends into the seasoning rub.
For the Rice and Base
- 2 tablespoons unsalted butter — I recommend using a good quality butter here since it’s such a prominent flavor. Kerrygold or any European-style butter adds a richness that really shines.
- 4 cloves garlic, minced — Fresh garlic is non-negotiable for this recipe. The pre-minced stuff in a jar has a different flavor profile and won’t give you the same aromatic punch. Take the extra thirty seconds to mince it yourself.
- 1 small yellow onion, diced — About ¾ cup once chopped. The onion melts into the rice as it cooks, adding sweetness and depth. You can use a white onion if that’s what you have, but yellow onions are sweeter and work better here.
- 1 cup long-grain white rice — I’ve tested this with jasmine rice and basmati, and both work beautifully. Avoid short-grain rice or brown rice here—they require different liquid ratios and cooking times. Uncle Ben’s or any standard long-grain white rice is perfect.
- 2 cups low-sodium chicken broth — Using low-sodium broth lets you control the salt level. If you only have regular broth, reduce the added salt in the recipe slightly. I prefer Swanson or Kitchen Basics for consistent results.
- ½ cup water — This helps the rice cook evenly and prevents the broth from becoming too concentrated as it reduces.
- 1 tablespoon fresh thyme leaves (or 1 teaspoon dried) — Fresh thyme adds a lovely earthiness that pairs perfectly with the garlic butter. If you’re using dried, add it when you add the broth so it has time to rehydrate.
- Fresh parsley for garnish — Optional but highly recommended. That pop of green makes the dish look finished and adds a fresh note to cut through the richness.
Optional Add-Ins
- ½ cup frozen peas — Stir these in during the last five minutes of cooking for a pop of color and sweetness. My kids love this addition.
- ¼ cup grated Parmesan cheese — Sprinkle this over the finished dish for an extra layer of savory goodness. It’s not traditional, but it’s delicious.
- Red pepper flakes — If you like a little heat, add a pinch when you sauté the garlic. It won’t make the dish spicy, just more interesting.
Equipment Needed
The beauty of this recipe is that you don’t need much. Here’s what you’ll need to pull this off.
- A large, heavy-bottomed skillet with a lid — This is the star of the show. I use a 12-inch cast iron skillet because it holds heat beautifully and gives the chicken a perfect sear. A stainless steel skillet with a tight-fitting lid works just as well. Non-stick will work too, but you won’t get quite the same browning on the chicken. Whatever you use, make sure it’s oven-safe if you plan to finish the dish in the oven (though this recipe is entirely stovetop).
- A sharp knife and cutting board — For mincing garlic and dicing the onion. A dull knife makes this job miserable, trust me.
- Measuring cups and spoons — Accuracy matters here, especially with the rice-to-liquid ratio. Eyeballing it can lead to mushy or undercooked rice.
- Tongs — For flipping the chicken without piercing the meat and losing those precious juices. If you don’t have tongs, a spatula works, just be gentle.
- A wooden spoon or silicone spatula — For stirring the rice and scraping up all those delicious browned bits from the bottom of the pan. That’s where the flavor lives.
If you don’t have a lid that fits your skillet, don’t worry. You can use a sheet of aluminum foil tightly crimped around the edges. It won’t be perfect, but it’ll do the job. I’ve done this more times than I care to admit.
Preparation Method
Alright, let’s get cooking. This comes together in about 45 minutes, and most of that is hands-off time while the rice does its thing.
- Pat the chicken dry with paper towels. This is crucial for getting a good sear. Wet chicken steams instead of browning, and we want that golden, crispy exterior. Season both sides of the chicken thighs with salt, pepper, paprika, and garlic powder. Let them sit at room temperature for about 10 minutes while you prep the other ingredients.
- Heat your skillet over medium-high heat. Add 1 tablespoon of the butter and let it melt until it’s foaming but not browning. Swirl the pan to coat the bottom. Place the chicken thighs in the pan, skin-side down if they have skin, or just one side down for boneless. Don’t crowd the pan—if your chicken thighs are large, you might need to do this in two batches.
- Sear the chicken for 4-5 minutes per side. You’re looking for a deep golden-brown color. Don’t move the chicken around once it’s in the pan—let it develop that crust. Flip with tongs and cook the other side for another 4 minutes. The chicken won’t be fully cooked through yet, and that’s fine. Transfer the chicken to a plate and set aside.
- Reduce the heat to medium. Add the remaining 1 tablespoon of butter to the pan. Once it melts, add the diced onion and cook for 2-3 minutes until it starts to soften and turn translucent. Scrape up any browned bits from the bottom of the pan as you stir—that’s pure flavor.
- Add the minced garlic and cook for 30 seconds. Garlic burns fast, so keep stirring and don’t walk away. You’ll know it’s ready when the kitchen smells amazing and the garlic is fragrant but not brown.
- Add the rice to the pan. Stir it around in the butter, onion, and garlic mixture for about 2 minutes. You want the rice to look slightly translucent at the edges and smell a little nutty. This toasting step is what makes the rice so flavorful, so don’t rush it.
- Pour in the chicken broth and water. Add the fresh thyme leaves (or dried thyme) and give everything a good stir. Scrape the bottom of the pan one more time to make sure all those flavorful bits are incorporated into the liquid. Bring the mixture to a gentle boil.
- Nestle the chicken thighs back into the pan. Place them on top of the rice, pushing them down slightly so they’re partially submerged. Any juices that accumulated on the plate should go into the pan too—don’t waste that flavor.
- Reduce the heat to low, cover the skillet, and let it simmer for 18-20 minutes. Resist the urge to lift the lid and peek. The steam is what cooks the rice, and every time you lift that lid, you’re letting it escape. Set a timer and walk away.
- After 18 minutes, check the rice. Lift the lid carefully—steam is hot! The rice should be tender and have absorbed most of the liquid. If it’s still a little wet, cover and cook for 2-3 more minutes. If the rice is done but there’s still some liquid, remove the lid and let it simmer uncovered for a minute or two.
- Let the pan rest off the heat for 5 minutes. This allows the rice to finish absorbing any remaining moisture and makes it fluffier. Fluff the rice gently with a fork, being careful not to break up the chicken too much.
- Garnish with fresh parsley and serve. If you’re adding Parmesan or red pepper flakes, now’s the time. Spoon the rice and chicken onto plates, making sure everyone gets some of those garlicky, buttery rice grains.
Cooking Tips & Techniques
I’ve made this recipe enough times to know where things can go wrong. Here are the lessons I learned the hard way so you don’t have to.
Don’t skip the chicken drying step. I know it seems fussy, but moisture is the enemy of browning. That first time I made this, I was in a hurry and skipped patting the chicken dry. The sear was mediocre, and the whole dish lacked that deep, savory flavor that comes from properly browned meat. Take the extra thirty seconds—it matters.
Watch your heat levels. Medium-high for searing, medium for sautéing, low for simmering. I once left the heat on medium-high after adding the broth, and the liquid boiled away before the rice had a chance to cook. The chicken was fine, but the rice was crunchy and sad. Low and slow is the way to go once that lid goes on.
Use a timer for the rice. I know, I know, you think you’ll remember. You won’t. I’ve burned rice more times than I want to admit because I got distracted by a text message or started loading the dishwasher. Set a timer for 18 minutes and don’t touch that lid until it goes off.
If your rice is still crunchy after 20 minutes, add a little more liquid. Sometimes rice absorbs liquid faster depending on how old it is or the humidity in your kitchen. Add ¼ cup of water or broth, cover, and cook for another 5 minutes. It’s a simple fix that saves the whole dish.
Let the pan rest. That five-minute rest at the end isn’t optional. The rice continues to absorb moisture as it sits, and the chicken relaxes and becomes more tender. I learned this lesson when I was too hungry to wait and ended up with rice that was good but not great. Patience pays off here.
Use a fork to fluff the rice, not a spoon. A spoon mashes the grains together and makes them sticky. A fork separates them gently and keeps that nice, fluffy texture. It’s a small thing, but it makes a difference in how the final dish looks and feels.
Variations & Adaptations
One of the best things about this recipe is how flexible it is. Here are some ways I’ve adapted it depending on what I have in the fridge or who I’m cooking for.
Creamy Garlic Butter Chicken and Rice: Stir in ¼ cup of heavy cream or half-and-half during the last five minutes of cooking. It makes the rice extra rich and almost risotto-like. I did this one night when I had leftover cream from a baking project, and it was dangerously good. Just don’t tell your cardiologist.
Vegetarian Version: Skip the chicken entirely and use vegetable broth instead of chicken broth. Add a can of drained chickpeas or white beans along with the broth for protein. Sauté some mushrooms along with the onion for that savory, umami flavor that replaces the chicken. I made this for my vegetarian sister-in-law, and she asked for the recipe before she even finished eating.
Spicy Kick: Add ½ teaspoon of cayenne pepper or red pepper flakes along with the garlic. You can also use andouille sausage instead of chicken for a Cajun-inspired version. My husband loves this variation—he says it wakes up the dish without overwhelming it.
Lemon Herb Twist: Add the zest of one lemon along with the garlic, and squeeze the juice of half a lemon over the finished dish. Swap the thyme for fresh rosemary or oregano. This version is brighter and more refreshing, perfect for spring or summer evenings when you still want comfort food but something a little lighter.
Dairy-Free Adaptation: Use olive oil or a high-quality vegan butter instead of regular butter. The flavor will be slightly different, but it still works beautifully. I’ve tested this with both, and the olive oil version has a lovely fruity note that complements the garlic nicely.
Add Vegetables: Stir in a cup of frozen peas and carrots during the last five minutes of cooking. You can also add chopped bell peppers along with the onion, or throw in a handful of spinach right before serving and let it wilt into the rice. This is my go-to move when I want to pretend I’m eating a balanced meal.
Serving & Storage Suggestions
This dish is incredibly versatile when it comes to serving, and it stores beautifully for leftovers—if you have any left, that is.
How to Serve: Spoon the rice onto plates and place a chicken thigh on top. Garnish with fresh parsley and a squeeze of lemon if you want to brighten things up. This dish pairs beautifully with a simple green salad dressed with vinaigrette—the acidity cuts through the richness of the garlic butter. Steamed green beans or roasted asparagus also work wonderfully on the side. For a truly cozy meal, serve it with crusty bread to soak up any extra buttery juices from the pan.
Temperature: Serve this dish hot, straight from the skillet. The rice tends to firm up as it cools, so don’t let it sit around too long before serving. If you’re making it ahead, reheat it gently with a splash of broth to loosen the rice back up.
Storage: Store leftovers in an airtight container in the refrigerator for up to 4 days. The flavors actually meld and deepen overnight, so day-two leftovers are often even better than the first serving. I’ve been known to make a double batch just for the leftovers.
Reheating: The best way to reheat this is in a skillet over medium-low heat with a tablespoon of water or broth. Cover and let it steam for 5-7 minutes, stirring occasionally. The microwave works in a pinch, but it tends to dry out the rice and make the chicken rubbery. If you must use the microwave, cover the bowl with a damp paper towel to add moisture.
Freezing: This dish freezes surprisingly well. Let it cool completely, then transfer to a freezer-safe container. It will keep for up to 3 months. Thaw overnight in the refrigerator and reheat as directed above. The rice might be slightly softer after freezing, but the flavor is still fantastic.
Nutritional Information & Benefits
While I’m not a nutritionist, I do pay attention to what goes into my body, and I love that this recipe uses whole, recognizable ingredients. Here’s a rough breakdown per serving (based on 4 servings).
- Calories: Approximately 485 per serving
- Protein: 32g — Chicken thighs are an excellent source of lean protein that keeps you full and satisfied.
- Carbohydrates: 42g — The rice provides steady energy, especially if you use brown rice (though cooking times will vary).
- Fat: 18g — The butter adds richness, but you can reduce it to 1 tablespoon if you’re watching your fat intake.
- Fiber: 1g — Adding vegetables like peas or spinach bumps this up significantly.
- Sodium: 680mg — Using low-sodium broth and controlling your salt helps keep this in check.
Health Benefits: Garlic is known for its immune-boosting properties and anti-inflammatory effects. Chicken provides essential B vitamins for energy metabolism. Onions contain antioxidants that support heart health. And honestly, the mental health benefit of a warm, comforting meal after a long day is something that doesn’t show up in any nutrition label, but it’s real.
Dietary Considerations: This recipe is naturally gluten-free (just double-check your broth label). For a lower-carb option, you can substitute cauliflower rice, but the cooking time and liquid ratio will need adjustment. If you’re watching your saturated fat, use olive oil instead of half the butter.
Conclusion
This cozy one-pan garlic butter chicken and rice has become my go-to for those evenings when I need something that feels like a hug in a bowl. It’s the recipe I turn to after a long day, when the weather is cold, or when I just need to prove to myself that I can still make something delicious without turning my kitchen into a disaster zone.
I love that it’s forgiving enough for beginners but satisfying enough for experienced cooks. I love that it uses ingredients I almost always have on hand. And I really love that it leaves me with just one pan to wash at the end of the night.
Try it this week. Customize it with whatever you have in your fridge. Add the peas, skip the parsley, throw in some extra garlic—make it yours. And when you take that first bite and feel yourself relax, come back and tell me about it. I’d love to hear how it turned out for you.
Drop a comment below, share a photo of your creation, or let me know what variations you tried. Happy cooking, friends. You’ve got this.
Frequently Asked Questions
Can I use chicken breasts instead of thighs?
Absolutely. Chicken breasts will work, but they cook faster and can dry out more easily. I recommend using bone-in, skin-on breasts for the best flavor and moisture. Reduce the initial searing time to 3-4 minutes per side, and check the internal temperature after the rice has cooked—it should reach 165°F. If the breasts are thick, you might need to slice them in half horizontally to ensure even cooking.
Why is my rice mushy?
Mushy rice usually means too much liquid or too long a cooking time. Make sure you’re using the exact 2 cups of broth and ½ cup of water called for in the recipe. Also, check that your lid fits tightly—if too much steam escapes, the rice can overcook as you try to compensate. Finally, resist the urge to stir the rice once it’s covered. Stirring releases starch and makes the rice gummy.
Can I make this in a slow cooker or Instant Pot?
For the Instant Pot, use the sauté function to sear the chicken and cook the aromatics, then add the rice and liquid. Pressure cook on high for 5 minutes with a natural release. For a slow cooker, I don’t recommend it—the rice tends to turn to mush over long cooking times. The stovetop method really is the best for this particular recipe.
How do I prevent the rice from burning on the bottom?
This happens when the heat is too high during the simmering stage. Make sure you reduce the heat to low before covering the pan. If your stovetop runs hot, use a heat diffuser or even move the pan to a smaller burner. A heavy-bottomed pan also helps distribute heat more evenly and prevents hot spots.
Can I double this recipe?
Yes, but you’ll need a larger pan—at least a 14-inch skillet or a Dutch oven. The key is not to overcrowd the pan when searing the chicken. Sear the chicken in batches if needed, then proceed with the recipe. You may need to increase the simmering time by 5-10 minutes since there’s more rice and liquid to cook through.
Pin This Recipe!

Cozy One-Pan Garlic Butter Chicken and Rice – Easy Dinner

A comforting one-pan meal featuring juicy chicken thighs and fluffy rice cooked in a rich garlic butter sauce. Perfect for busy weeknights, this recipe delivers deep flavor with minimal cleanup.
- Prep Time: 10 minutes
- Cook Time: 35 minutes
- Total Time: 45 minutes
- Yield: 4 servings 1x
- Category: Main Course
- Cuisine: American
Ingredients
- 4 boneless, skinless chicken thighs (about 1.5 pounds)
- 1 teaspoon salt
- ½ teaspoon black pepper
- ½ teaspoon paprika
- ¼ teaspoon garlic powder
- 2 tablespoons unsalted butter
- 4 cloves garlic, minced
- 1 small yellow onion, diced (about ¾ cup)
- 1 cup long-grain white rice
- 2 cups low-sodium chicken broth
- ½ cup water
- 1 tablespoon fresh thyme leaves (or 1 teaspoon dried)
- Fresh parsley for garnish
- ½ cup frozen peas (optional)
- ¼ cup grated Parmesan cheese (optional)
- Red pepper flakes (optional)
Instructions
- Pat the chicken dry with paper towels. Season both sides with salt, pepper, paprika, and garlic powder. Let sit at room temperature for 10 minutes.
- Heat a large, heavy-bottomed skillet over medium-high heat. Add 1 tablespoon of butter and let it melt until foaming. Place chicken thighs in the pan and sear for 4-5 minutes per side until deep golden brown. Transfer chicken to a plate and set aside.
- Reduce heat to medium. Add remaining 1 tablespoon of butter. Add diced onion and cook for 2-3 minutes until softened and translucent, scraping up browned bits from the pan.
- Add minced garlic and cook for 30 seconds until fragrant.
- Add rice to the pan and stir for 2 minutes until slightly translucent and nutty.
- Pour in chicken broth and water. Add thyme and stir, scraping the bottom of the pan. Bring to a gentle boil.
- Nestle the chicken thighs back into the pan on top of the rice, pushing them down slightly. Pour in any accumulated juices from the plate.
- Reduce heat to low, cover the skillet, and simmer for 18-20 minutes. Do not lift the lid.
- After 18 minutes, check the rice. If still wet, cover and cook 2-3 more minutes. If done but excess liquid remains, simmer uncovered for 1-2 minutes.
- Remove from heat and let rest, covered, for 5 minutes. Fluff rice gently with a fork.
- Garnish with fresh parsley and serve hot. Add Parmesan or red pepper flakes if desired.
Notes
Pat chicken dry for best sear. Use low heat for simmering to prevent burning. Let pan rest 5 minutes before serving for fluffier rice. For crunchy rice, add ¼ cup more liquid and cook 5 more minutes. Use a fork to fluff rice, not a spoon.
Nutrition
- Serving Size: 1 chicken thigh with
- Calories: 485
- Sugar: 2
- Sodium: 680
- Fat: 18
- Saturated Fat: 8
- Carbohydrates: 42
- Fiber: 1
- Protein: 32
Keywords: one-pan dinner, garlic butter chicken, chicken and rice, easy weeknight dinner, comfort food, one skillet meal


