I was standing in line at the hardware store—of all places—holding a bag of lightbulbs and a new oven mitt I definitely didn’t need, when the man behind me started talking about chicken thighs.
He was maybe seventy, wearing a flannel shirt with a hole in the elbow, and he had the kind of calm confidence that comes from decades of feeding people without making a big deal about it. “You look like someone who cooks,” he said. I wasn’t sure if that was a compliment or an observation about the flour smudge on my jeans, but I nodded.
That’s how I ended up learning about the single best way to get crispy chicken skin without standing over a splattering pan for twenty minutes. He scribbled the method on the back of a receipt from his pocket—I still have it somewhere, smudged and faded—and told me the secret wasn’t fancy equipment or complicated brines. It was patience and a cold pan.
Honestly, I almost forgot about it. But a few nights later, staring into the fridge with no dinner plan and a hungry family, I remembered that crumpled receipt. I had chicken thighs thawed on the counter, a head of garlic getting soft, and half a stick of butter that needed using. So I tried it.
The first bite was one of those moments where you stop chewing and just stare at the food. The skin was shatteringly crisp, the meat was juicy, and the garlic butter sauce pooled in the pan like liquid gold. I texted my sister a photo with the caption “this changes everything.” She asked if I was okay.
I wasn’t, really—I was annoyed I hadn’t known about this method sooner. Maybe you’ve been there, standing in your kitchen wondering why your chicken always comes out soggy or dry or both. Let me tell you, this crispy one-pan garlic butter chicken thighs recipe is the one that finally fixed that for me. And it came from a guy buying duct tape and extension cords.
Why You’ll Love This Recipe
I’ve tested this method more times than I can count, and each time it delivers the same reliable results. The technique comes from years of trial and error—burned fingers, greasy stovetops, and more than a few sad, rubbery chicken skins. But this version? It works every single time.
- Quick & Easy: From fridge to table in about 35 minutes. No marinating overnight, no complicated steps. Just good food fast.
- Simple Ingredients: Chicken thighs, butter, garlic, salt, pepper, and a few pantry staples. You probably have everything right now.
- Perfect for Busy Weeknights: One pan means minimal cleanup. That’s a win in my book any day of the week.
- Crowd-Pleaser: I’ve served this to picky kids, foodie friends, and my dad who “doesn’t eat chicken thighs.” Everyone goes back for seconds.
- Unbelievably Delicious: The skin gets so crispy it cracks when you bite into it, and the garlic butter sauce is the kind of thing you want to drink with a straw.
What makes this recipe different from all the other chicken thigh recipes out there? It’s the cold-start method. Most recipes tell you to sear chicken in a hot pan, but that often leads to uneven cooking and burnt butter. Starting the chicken in a cold pan lets the fat render slowly, giving you that deep golden crust without the fuss. It’s not just another version—it’s the best version I’ve found, and I’ve tried a lot.
This is the kind of meal that makes you close your eyes after the first bite. It’s comfort food that feels indulgent but fits into eating well without sacrifice. Perfect for impressing guests without stress, or turning a simple Tuesday night into something memorable.
What Ingredients You Will Need
This recipe uses simple, wholesome ingredients to deliver bold flavor and that irresistible crispy texture. Most of these are pantry staples, so you likely won’t need a special trip to the grocery store.
- Bone-in, skin-on chicken thighs (4-6 thighs, about 2 pounds) — This cut is key for crispy skin and juicy meat. The bone adds flavor and helps the meat stay moist. I prefer Bell & Evans or organic thighs from Costco for consistent quality.
- Unsalted butter (4 tablespoons, softened) — Unsalted lets you control the salt level. Kerrygold is my go-to for its rich flavor, but any good quality butter works. Make sure it’s at room temperature so it melts evenly.
- Garlic (6-8 cloves, minced) — Fresh garlic is non-negotiable here. Pre-minced jarred garlic tends to burn and tastes bitter. Look for firm, plump cloves without green sprouts in the center.
- Salt (1 teaspoon, plus more for seasoning) — I use fine sea salt for even distribution. Diamond Crystal kosher salt is also great if you prefer a lighter hand.
- Black pepper (½ teaspoon, freshly ground) — Freshly ground pepper makes a noticeable difference in flavor. Skip the pre-ground stuff for this one.
- Paprika (1 teaspoon) — Adds color and a subtle smokiness. Smoked paprika is lovely here, but sweet Hungarian paprika works too.
- Garlic powder (½ teaspoon) — Not to be confused with garlic salt. This boosts the garlic flavor without adding extra moisture.
- Dried thyme (½ teaspoon) — Earthy and slightly floral, thyme pairs beautifully with garlic and butter. You can substitute dried rosemary or oregano if needed.
- Chicken broth (¼ cup) — Helps deglaze the pan and creates the sauce. Low-sodium broth is best so you can control the salt. In a pinch, water works, but broth adds more depth.
- Fresh parsley (2 tablespoons, chopped, for garnish) — Optional but highly recommended for a pop of color and freshness.
- Lemon juice (1 tablespoon, optional) — A squeeze at the end brightens the dish and cuts through the richness. I add it about half the time, depending on my mood.
Substitution guidance: Use ghee instead of butter for a dairy-free option with even more nutty flavor. For a lower-fat version, you can use chicken breast cutlets, but reduce cooking time to about 12-15 minutes and expect less crispy skin. If you don’t have fresh garlic, try 1 teaspoon of garlic powder, but honestly, fresh is worth it here.
Equipment Needed
You don’t need a fancy kitchen to nail this recipe. Here’s what you’ll actually use:
- Large oven-safe skillet (12-inch cast iron or stainless steel) — Cast iron gives the best heat distribution and crispiest skin. I use my trusty Lodge 12-inch skillet that I’ve had for years. A stainless steel pan works too, just make sure it’s oven-safe up to 400°F.
- Tongs — For flipping the chicken without piercing the skin. Spring-loaded tongs with silicone grips save your hands from splatters.
- Sharp knife — For mincing garlic. A dull knife makes this job frustrating and dangerous.
- Cutting board — Wooden or plastic, just make sure it’s stable. I prefer a large wooden board that doesn’t slide around.
- Paper towels — Essential for patting the chicken dry. This step makes or breaks the crispiness, so don’t skip it.
- Instant-read thermometer (optional but recommended) — Takes the guesswork out of doneness. Chicken thighs should reach 165°F at the thickest part. I use a ThermoPro digital thermometer that cost about $15.
- Measuring spoons — For precise seasoning. Eyeballing works if you’re experienced, but measuring ensures consistency.
Budget-friendly tip: If you don’t have a cast iron skillet, a heavy-bottomed nonstick pan that’s oven-safe works fine. Just be careful not to use metal utensils that could scratch the coating. I’ve even made this in a stainless steel sauté pan with great results—the key is giving the chicken enough space to crisp, not crowding the pan.
Preparation Method
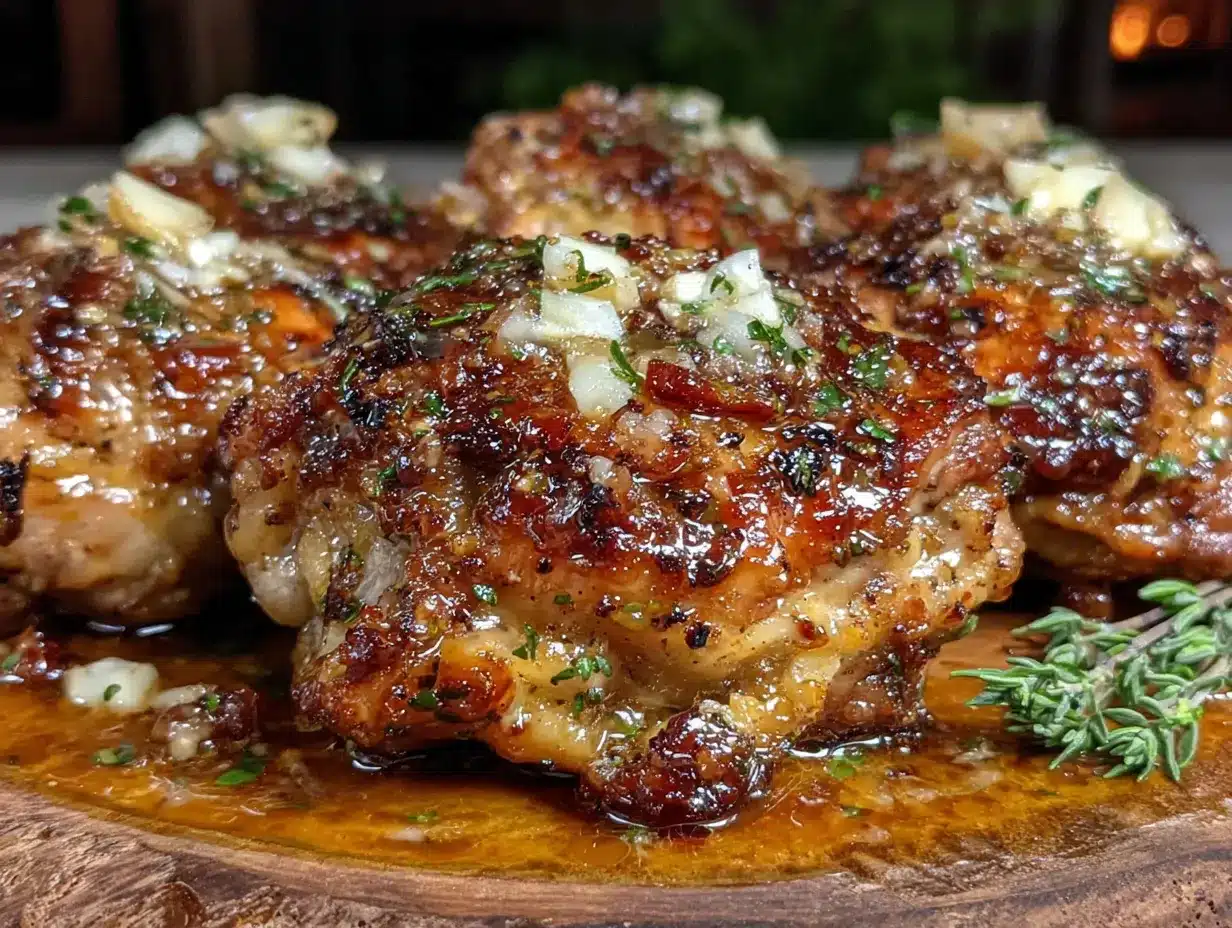
This method is where the magic happens. Follow these steps closely, and you’ll get that perfect crispy skin every time.
-
Prep the chicken. Pat the chicken thighs dry with paper towels. This is the most important step—moisture is the enemy of crispy skin. Leave them on a plate, uncovered, in the fridge for 10-15 minutes if you have time. This dries the skin even more.
-
Season generously. In a small bowl, mix 1 teaspoon salt, ½ teaspoon black pepper, 1 teaspoon paprika, ½ teaspoon garlic powder, and ½ teaspoon dried thyme. Sprinkle this mixture evenly over both sides of the chicken thighs. Don’t be shy—the skin needs good seasoning to be flavorful.
-
Prep the garlic butter. In another small bowl, mash 4 tablespoons softened unsalted butter with the minced garlic (6-8 cloves) using a fork. Mix until well combined. Set aside at room temperature. This compound butter will melt into the pan and create the sauce.
-
Cold pan start. Place your skillet on the stovetop, but do NOT turn on the heat yet. Arrange the seasoned chicken thighs skin-side down in the cold pan. Yes, cold. This is the secret. The fat renders slowly as the pan heats up, giving you deep, even browning without burning the butter or spices.
-
Turn on the heat. Set the burner to medium heat. Let the chicken cook undisturbed for 12-15 minutes. You’ll hear a gentle sizzle that gradually gets louder. Resist the urge to move the chicken—let the skin develop that golden crust. After about 10 minutes, peek under one thigh. The skin should be deep golden brown and crispy.
-
Flip and sear. Using tongs, carefully flip each chicken thigh. The skin side should be beautifully browned and crisp. Cook for another 5-7 minutes on the second side. The chicken should feel firm to the touch and reach an internal temperature of 165°F in the thickest part.
-
Make the sauce. Remove the chicken to a plate and set aside. There should be about 2 tablespoons of rendered fat in the pan. If there’s more, spoon some out. Add the garlic butter mixture to the pan and stir until melted and fragrant, about 30 seconds. Be careful not to burn the garlic—it should smell nutty, not bitter.
-
Deglaze the pan. Pour in ¼ cup chicken broth and scrape up any browned bits from the bottom of the pan with a wooden spoon. Let it simmer for 1-2 minutes until slightly thickened. The sauce will be rich, garlicky, and absolutely delicious.
-
Return the chicken. Place the chicken thighs back in the pan, skin-side up, spooning some of the garlic butter sauce over the top. Let them warm through for 1-2 minutes. If you like extra crispy skin, pop the skillet under the broiler for 2-3 minutes—watch closely so it doesn’t burn.
-
Rest and serve. Remove from heat and let the chicken rest for 5 minutes. This allows the juices to redistribute. Sprinkle with fresh parsley and a squeeze of lemon juice if desired. Serve immediately with the pan sauce spooned over the top.
Troubleshooting tip: If your skin isn’t crispy after 15 minutes, your heat might be too low. Turn it up to medium-high for the last 3 minutes. If the skin is burning but the meat isn’t cooked through, your heat is too high—lower it and cover the pan for the last 5 minutes to finish cooking gently.
Cooking Tips & Techniques
I’ve made this recipe more times than I can count, and I’ve learned a few things the hard way. Here’s what I wish someone had told me.
Don’t crowd the pan. If your skillet is too small, the chicken will steam instead of crisp. Leave at least ½ inch of space between each thigh. If you’re cooking for a crowd, use two pans or cook in batches. I learned this after a sad, soggy batch that tasted more like boiled chicken than crispy goodness.
Patience is everything. The first time I made this, I flipped the chicken after 5 minutes because I was impatient. Big mistake. The skin wasn’t ready, and it stuck to the pan. Let it cook undisturbed for the full 12-15 minutes. You’ll know it’s ready when the skin releases easily from the pan without pulling.
Watch the garlic. Garlic burns fast. When you add the garlic butter to the pan, keep the heat medium-low and stir constantly. Burnt garlic tastes bitter and ruins the whole dish. If you’re nervous, add the garlic after the broth, letting it simmer gently instead of sizzling in hot butter.
Use a thermometer. I used to guess doneness by cutting into the chicken, which let all the juices run out. An instant-read thermometer changed my life. Chicken thighs are done at 165°F, but they’re even better at 175-180°F—the higher temperature breaks down more connective tissue, making the meat extra tender and juicy.
Make extra sauce. The garlic butter sauce is the best part. I usually double the butter and garlic amounts and add an extra splash of broth. Leftover sauce is amazing on rice, pasta, or roasted vegetables. One time I even used it as a dipping sauce for crusty bread—no regrets.
Variations & Adaptations
This recipe is forgiving and easy to adapt. Here are some variations I’ve tried and loved.
Spicy version: Add ½ teaspoon red pepper flakes to the garlic butter, or sprinkle cayenne pepper over the chicken before cooking. I made this for a friend who loves heat, and she said it was the best chicken she’d ever eaten. A drizzle of sriracha or chili crisp at the end works too.
Herb-crusted: Mix 2 tablespoons finely chopped fresh herbs (rosemary, thyme, sage, or a combination) into the garlic butter. Spread it under the skin before cooking for extra flavor that infuses the meat. This is my go-to for Sunday dinners when I want something a little fancier.
Lemon-garlic: Add the zest of one lemon to the seasoning mix, and squeeze the juice over the finished dish. The acidity cuts through the richness beautifully. I often do this in summer when I want something bright and fresh.
Dairy-free: Substitute the butter with ghee or a high-quality vegan butter like Miyoko’s. The flavor changes slightly, but the crispiness stays intact. I’ve tested this for a friend with lactose intolerance, and she couldn’t tell the difference.
Oven method: If you prefer hands-off cooking, sear the chicken in the skillet for 5 minutes per side, then transfer to a 400°F oven for 15-20 minutes. The skin won’t be quite as crispy, but it’s still delicious and requires less attention.
One-pan meal: After removing the chicken to rest, add sliced mushrooms, green beans, or asparagus to the pan and sauté in the garlic butter until tender. This turns the dish into a complete meal with no extra dishes.
Serving & Storage Suggestions
This chicken is best served hot, straight from the pan. The skin stays crispy for about 10-15 minutes before it starts to soften, so eat it right away if you can.
Serving temperature: Serve immediately after resting. The ideal serving temperature is around 140°F—warm enough to be comforting but not so hot that it burns your mouth. Spoon the pan sauce over the top just before serving.
What to serve with it: This chicken pairs beautifully with mashed potatoes (the garlic butter sauce is amazing on them), roasted vegetables, or a simple green salad. I love it with crusty bread to soak up every drop of sauce. For a lighter meal, serve over cauliflower rice or zucchini noodles. A glass of crisp white wine like Sauvignon Blanc or a light red like Pinot Noir complements the garlic butter perfectly.
Storage: Store leftover chicken in an airtight container in the refrigerator for up to 4 days. The skin will soften, but the flavor remains delicious. I often shred the leftover chicken and use it in salads, sandwiches, or pasta dishes.
Reheating: For best results, reheat in a skillet over medium heat with a splash of chicken broth or water. Cover the pan for 2-3 minutes to warm through, then uncover for 1-2 minutes to crisp the skin again. The microwave works in a pinch but will make the skin soggy. To reheat from frozen, thaw overnight in the fridge, then reheat in a 350°F oven for 10-15 minutes.
Freezing: This recipe freezes well. Place cooled chicken thighs in a single layer on a baking sheet and freeze until solid, then transfer to a freezer bag. They’ll keep for up to 3 months. The skin won’t be as crispy after freezing, but the meat stays juicy and flavorful.
Flavor development: The garlic butter sauce actually tastes better the next day as the flavors meld together. If you have leftovers, save the sauce separately and use it as a dressing for roasted vegetables or a dip for bread.
Nutritional Information & Benefits
Here’s the estimated nutritional breakdown for one serving (one chicken thigh with sauce):
| Nutrient | Amount |
|---|---|
| Calories | 420 |
| Protein | 32g |
| Fat | 30g |
| Saturated Fat | 12g |
| Carbohydrates | 3g |
| Fiber | 0g |
| Sugar | 1g |
| Sodium | 680mg |
Chicken thighs are an excellent source of protein, which supports muscle health and keeps you feeling full. They also contain B vitamins, selenium, and phosphorus. The butter provides fat-soluble vitamins A, D, E, and K, while garlic offers immune-supporting compounds like allicin.
Dietary considerations: This recipe is naturally gluten-free and low-carb (about 3g net carbs per serving). For a lower-fat option, remove the skin before eating—you’ll still get the flavor from the sauce. If you’re watching sodium, use unsalted butter and low-sodium broth, and reduce the added salt to ½ teaspoon.
Potential allergens: Contains dairy (butter). For a dairy-free version, use ghee or vegan butter. Always check your broth label for gluten if that’s a concern—most brands are gluten-free, but some contain wheat-based thickeners.
My wellness perspective: I believe in eating food that nourishes both body and soul. This recipe fits into a balanced lifestyle because it uses real, whole ingredients and doesn’t require any processed shortcuts. It’s indulgent enough to feel like a treat but wholesome enough to eat regularly. That’s the sweet spot, honestly.
Conclusion
This crispy one-pan garlic butter chicken thighs recipe is the kind of dish that makes you feel like a hero in the kitchen with minimal effort. It’s quick, it’s delicious, and it uses ingredients you probably already have. The cold-start method is a game-changer—I’ve never found another technique that delivers such consistently crispy skin with so little fuss.
I love this recipe because it reminds me that the best cooking advice often comes from unexpected places. That man at the hardware store didn’t know he was changing the way I make chicken forever. He just knew a good trick and wanted to share it. That’s what cooking is all about—passing along the little things that make life better.
Now I want to hear from you. Have you tried this method? Did it work as well for you as it did for me? What variations did you experiment with? Drop a comment below and let me know—I read every single one and I love seeing how you make this recipe your own. And if you loved it as much as I do, share it with a friend who needs a reliable weeknight dinner in their back pocket.
Happy cooking, friends. Here’s to crispy skin and buttery garlic sauce.
Frequently Asked Questions
Can I use boneless, skinless chicken thighs?
You can, but you’ll lose the crispy skin and the bone-in flavor. Boneless thighs cook faster (about 8-10 minutes per side) and won’t be as juicy. If you use them, reduce the cooking time and check for doneness at 165°F. The sauce will still be delicious, but the texture will be different.
Why is my chicken skin not getting crispy?
Most likely, the chicken wasn’t dry enough before cooking, or the pan was overcrowded. Pat the skin very dry with paper towels and leave the chicken uncovered in the fridge for 10-15 minutes before cooking. Also, make sure each thigh has space around it in the pan—steam from crowded chicken prevents crisping.
Can I make this recipe ahead of time?
You can prep the seasoning mix and garlic butter up to 3 days ahead. Store them separately in the fridge. For best results, cook the chicken fresh, but leftovers keep well for 4 days. The skin will soften, but the flavor remains excellent. Reheat in a skillet for best texture.
What’s the best pan to use for this recipe?
Cast iron is my top choice because it holds heat evenly and gives the best crust. A heavy stainless steel skillet works well too. Avoid nonstick pans if possible—they don’t get hot enough for proper browning, and the high heat can damage the coating over time.
Can I use chicken breasts instead of thighs?
Yes, but the results will be different. Chicken breasts are leaner and dry out faster. Use bone-in, skin-on breasts and cook for about 15 minutes skin-side down, then 10-12 minutes on the other side. Check the internal temperature at 165°F. The meat won’t be as forgiving as thighs, so watch it closely.
Pin This Recipe!

Crispy One-Pan Garlic Butter Chicken Thighs

This crispy one-pan garlic butter chicken thighs recipe delivers shatteringly crisp skin and juicy meat with a rich garlic butter sauce, all made in one pan in about 35 minutes. The cold-start method ensures perfect browning without fuss.
- Prep Time: 10 minutes
- Cook Time: 25 minutes
- Total Time: 35 minutes
- Yield: 4 servings 1x
- Category: Main Course
- Cuisine: American
Ingredients
- 4–6 bone-in, skin-on chicken thighs (about 2 pounds)
- 4 tablespoons unsalted butter, softened
- 6–8 cloves garlic, minced
- 1 teaspoon fine sea salt, plus more for seasoning
- ½ teaspoon freshly ground black pepper
- 1 teaspoon paprika (smoked or sweet Hungarian)
- ½ teaspoon garlic powder
- ½ teaspoon dried thyme
- ¼ cup low-sodium chicken broth
- 2 tablespoons fresh parsley, chopped (for garnish)
- 1 tablespoon lemon juice (optional)
Instructions
- Pat the chicken thighs dry with paper towels. For extra crispiness, leave them uncovered in the fridge for 10-15 minutes.
- In a small bowl, mix 1 teaspoon salt, ½ teaspoon black pepper, 1 teaspoon paprika, ½ teaspoon garlic powder, and ½ teaspoon dried thyme. Sprinkle evenly over both sides of the chicken.
- In another small bowl, mash 4 tablespoons softened unsalted butter with the minced garlic using a fork until well combined. Set aside at room temperature.
- Place a large oven-safe skillet (12-inch cast iron or stainless steel) on the stovetop. Do not turn on the heat. Arrange the seasoned chicken thighs skin-side down in the cold pan.
- Turn the burner to medium heat. Cook undisturbed for 12-15 minutes, until the skin is deep golden brown and crispy.
- Using tongs, carefully flip each chicken thigh. Cook for another 5-7 minutes, until the chicken reaches an internal temperature of 165°F in the thickest part.
- Remove the chicken to a plate and set aside. If there is more than 2 tablespoons of rendered fat in the pan, spoon some out.
- Add the garlic butter mixture to the pan and stir until melted and fragrant, about 30 seconds. Be careful not to burn the garlic.
- Pour in ¼ cup chicken broth and scrape up any browned bits from the bottom of the pan. Let simmer for 1-2 minutes until slightly thickened.
- Return the chicken thighs to the pan, skin-side up, spooning some of the garlic butter sauce over the top. Let warm through for 1-2 minutes. For extra crispy skin, broil for 2-3 minutes.
- Remove from heat and let rest for 5 minutes. Sprinkle with fresh parsley and a squeeze of lemon juice if desired. Serve immediately with the pan sauce.
Notes
Pat the chicken very dry for maximum crispiness. Do not crowd the pan; leave at least ½ inch between thighs. For dairy-free, use ghee or vegan butter. The garlic butter sauce tastes even better the next day.
Nutrition
- Serving Size: 1 chicken thigh with
- Calories: 420
- Sugar: 1
- Sodium: 680
- Fat: 30
- Saturated Fat: 12
- Carbohydrates: 3
- Protein: 32
Keywords: crispy chicken thighs, garlic butter chicken, one-pan chicken, weeknight dinner, easy chicken recipe, cold-start method


