My friend Priya watched me fumbling with a piping bag at her Diwali party last year, my hands shaking as I tried to make perfect little swirls. She didn’t say anything at first—just handed me a cup of chai and waited until I’d taken a sip. Then she said, “You’re overthinking it. Watch.” She took the bag, twisted the top, and in about four seconds flat, made a tiny ghost that looked like it was waving. I laughed so hard I almost spilled my chai. That moment stuck with me, not because the ghost was perfect (it wasn’t), but because she made it look so easy. Like it was no big deal. And honestly, that’s exactly what these ghost meringue cookies are. They’re not fussy. They’re not demanding. They’re the kind of thing you can whip up on a Tuesday night when you suddenly remember your kid’s class party is tomorrow morning. I mean, we’ve all been there, right?
These easy ghost meringue cookies with chocolate chip eyes have become my go-to Halloween treat for one simple reason: they look impressive but take almost no real effort. The meringue comes together in about ten minutes, and the hardest part is just waiting for them to bake low and slow. You don’t need any special cookie cutters or fancy decorating skills. Just a piping bag (or even a zip-top bag with the corner snipped off), some chocolate chips, and about twenty minutes of hands-on time. I’ve made these for Halloween parties, school bake sales, and even just for fun on a rainy October afternoon when the kids were bouncing off the walls.
What I love most about this recipe is how forgiving it is. I’ve forgotten to wipe down my bowl with lemon juice before starting. I’ve over-whipped the egg whites. I’ve made ghosts that looked more like lumpy clouds than spooky spirits. And you know what? They still tasted amazing. Light, airy, with that perfect little crunch that gives way to a melt-in-your-mouth center. Plus, the chocolate chip eyes add just the right amount of sweetness. This recipe stayed with me because it’s the kind of thing you can make with a three-year-old “helping” or while you’re half-watching a movie. No stress, no drama, just really cute cookies that make people smile.
Why You’ll Love This Recipe
Let me tell you why these ghost meringue cookies have earned a permanent spot in my Halloween rotation. First off, they’re ridiculously easy. We’re talking five ingredients, one bowl, and about ten minutes of active prep time. You don’t need to be a pastry chef or even a confident baker to nail these. I’ve made them with my niece who’s seven, and she handled the piping like a pro. The recipe is practically foolproof.
Here’s what makes these cookies stand out:
- Quick & Easy: From start to finish, you’re looking at about 10 minutes of hands-on work. The oven does the rest. Perfect for busy weeknights when you need a last-minute treat for a school event or party.
- Simple Ingredients: Egg whites, sugar, vanilla, cream of tartar, and chocolate chips. That’s it. No fancy extracts, no specialty flours, no trip to three different stores.
- Perfect for Halloween: These little ghosts are the star of any Halloween spread. Kids go crazy for them, and adults can’t resist grabbing one (or three). They’re also great for classroom parties, office potlucks, or just decorating the dessert table.
- Crowd-Pleaser: I’ve never met anyone who didn’t like these. They’re light, not too sweet, and that chocolate chip eye situation is just plain fun. Even people who claim they don’t like meringue end up reaching for seconds.
- Unbelievably Delicious: The texture is what gets me every time. That crisp outer shell that shatters when you bite into it, followed by the soft, marshmallowy center. It’s like eating a cloud that decided to dress up for Halloween.
What makes this recipe different from all the other ghost meringue cookies out there? It’s the technique. I’ve tested this recipe about eight times to get the texture just right—crisp on the outside, chewy on the inside, with chocolate chip eyes that actually stay put instead of sliding off. The secret is in how you fold in the chocolate chips and the exact oven temperature that dries them out without browning them. This isn’t just another meringue recipe I found online and tweaked. This is the version I’ve perfected through trial and error, late-night baking sessions, and more than a few batches that ended up looking like sad, flat pancakes.
And honestly? This recipe connects with something deeper. It’s comfort food for the Halloween season. It’s the kind of treat that makes you feel like a kid again, standing in the kitchen with flour on your nose, waiting for the timer to ding. Every time I make these, I think about Priya handing me that chai and telling me to relax. That’s the energy these cookies bring. No pressure, just fun.
What Ingredients You Will Need
This recipe uses simple, everyday ingredients to create something that looks way more complicated than it actually is. Most of these are probably already sitting in your pantry right now. Here’s what you’ll need and why each one matters.
For the Meringue:
- 3 large egg whites, room temperature (about 90g or 3.2 ounces) — Room temperature egg whites whip up to a much higher volume than cold ones. I usually set mine out on the counter about 30 minutes before I start. If you’re in a rush, put the eggs in a bowl of warm water for 5 minutes. The difference is noticeable, honestly.
- 3/4 cup granulated sugar (150g or 5.3 ounces) — Regular white sugar works best here. Don’t use powdered sugar or brown sugar. The granulated sugar dissolves into the egg whites and creates that stable, glossy structure. I’ve tried using superfine sugar before and it works fine, but regular granulated is totally fine too.
- 1/2 teaspoon cream of tartar — This is the stabilizer that keeps your meringue from collapsing. If you don’t have cream of tartar, you can substitute with 1 teaspoon of lemon juice or white vinegar. But honestly, cream of tartar gives the most reliable results. A tiny bottle costs about two bucks and lasts forever.
- 1 teaspoon vanilla extract — Pure vanilla extract adds warmth and depth. Imitation vanilla works in a pinch, but the flavor won’t be quite as rich. I use Nielsen-Massey vanilla because I’m particular about it, but any brand will do.
- A pinch of salt (about 1/8 teaspoon) — Salt balances the sweetness and helps the egg whites hold their structure. Don’t skip it. It’s not about making the cookies salty, it’s about making them taste like themselves.
For the Eyes:
- 1/4 cup mini chocolate chips (about 45g or 1.6 ounces) — Mini chips are perfect for ghost eyes because they’re small enough to look cute but big enough to stay visible. Regular chocolate chips work too, but they look a bit oversized. I prefer Ghirardelli mini chips because they hold their shape well during baking, but any brand is fine. You can also use dark chocolate chips for a slightly less sweet option.
Ingredient Selection Tips:
When it comes to egg whites, fresh eggs whip up better than older ones. If your eggs are a few weeks old, they’ll still work, but you might need to whip them a little longer. I always separate my eggs while they’re cold (the yolks break less easily), then let the whites come to room temperature. And here’s a tip I learned the hard way—make sure not a single speck of yolk gets into the whites. Even a tiny bit of yolk will prevent the meringue from whipping properly. If you do get yolk in there, fish it out with a clean spoon. If it breaks, just start over with fresh eggs. Trust me, I’ve learned this lesson about six times.
Substitution Guidance:
If you need a cream of tartar substitute, use 1 teaspoon of lemon juice or white vinegar. It works, but the meringue might be slightly less stable. For a vanilla alternative, try almond extract or even peppermint extract for a fun twist. Just use half the amount since extracts are stronger. And if you want to make these dairy-free, double-check that your chocolate chips are dairy-free. Most dark chocolate chips are, but milk chocolate chips usually aren’t.
One more thing—I always recommend buying a little extra sugar and chocolate chips than you think you’ll need. Why? Because sometimes you drop a chocolate chip on the floor. Or you accidentally over-measure and have to start over. Or you just want to eat a few chips while you work. No judgment here.
Equipment Needed
You don’t need a lot of fancy equipment for these ghost meringue cookies. Here’s what you’ll actually use:
- Electric mixer (stand mixer or hand mixer) — You can whip egg whites by hand with a whisk, but I wouldn’t recommend it unless you’re looking for an arm workout. A hand mixer works perfectly fine and takes about 5-7 minutes. A stand mixer with the whisk attachment is faster (about 3-4 minutes). I use my KitchenAid stand mixer because it’s what I have, but I’ve made these with a $20 hand mixer and they turned out exactly the same.
- Large mixing bowl — Glass, metal, or ceramic all work. Just make sure it’s completely clean and dry. Any grease residue will ruin your meringue. I wipe mine down with a little lemon juice on a paper towel before starting, just to be safe.
- Piping bag with a round tip (or a zip-top bag) — A piping bag gives you more control, but a zip-top bag with the corner snipped off works just as well. I’ve used both. The zip-top bag method is actually easier for kids to handle. If using a piping bag, I recommend a #12 round tip or similar size.
- Baking sheet lined with parchment paper — Parchment paper is non-negotiable here. Meringue will stick to wax paper and ungreased baking sheets. Silicone baking mats also work great. I use Reynolds parchment paper because it’s what my grocery store carries.
- Cooling rack — For letting the cookies cool completely after baking. You can use a wire cooling rack or just let them sit on the baking sheet. Either way works.
Budget-Friendly Alternatives:
If you don’t have a piping bag, a sturdy zip-top bag works perfectly. Just fill it with the meringue, seal the top, and snip off about 1/4 inch from one corner. No need to buy special tips. And if you don’t have a cooling rack, just let the cookies cool on the baking sheet. They’ll be fine. The only thing I wouldn’t skip is the parchment paper. Trust me on this one.
Maintenance Tip:
After you’re done, soak your mixing bowl and whisk attachment in hot soapy water right away. Dried meringue is a nightmare to scrub off. I learned this the hard way after letting a bowl sit overnight. It took about twenty minutes of soaking and scrubbing to get it clean.
Preparation Method
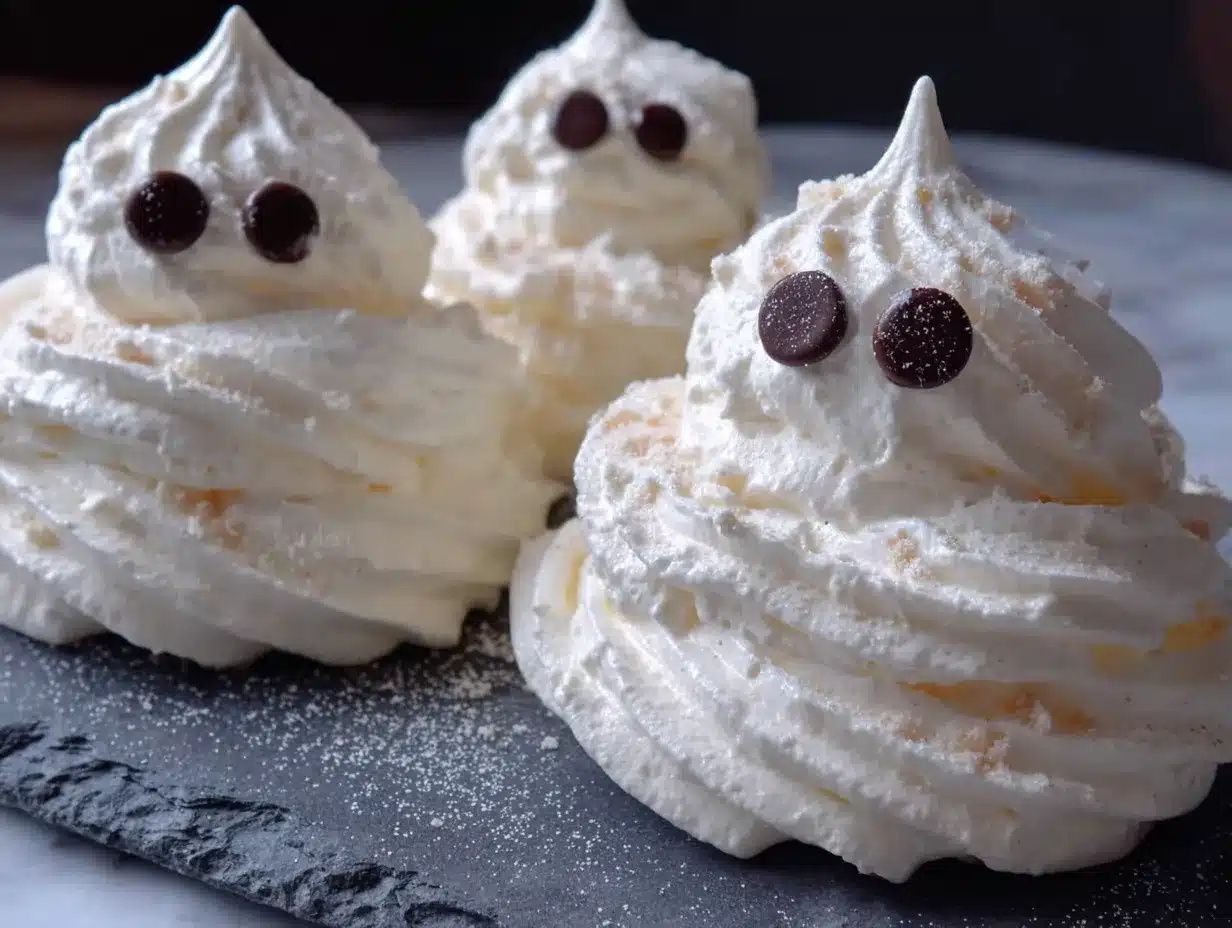
Let’s get these ghost meringue cookies made. I’ll walk you through every step, including what to look for and what to avoid. Take your time, and remember—they don’t have to be perfect.
- Preheat your oven to 200°F (93°C) and line a large baking sheet with parchment paper. Yes, 200°F. I know it sounds low, but that’s the secret to getting meringues that are crisp on the outside and chewy on the inside without browning. Give the oven a full 15 minutes to preheat. While it’s heating up, make sure your oven rack is in the middle position.
- Prepare your mixing bowl and whisk attachment. Wipe them down with a paper towel dipped in a little lemon juice or white vinegar. This removes any trace of grease that could sabotage your meringue. I know it seems fussy, but I’ve skipped this step before and ended up with flat, sad meringue that never whipped up. Just do it.
- Separate your eggs. Crack each egg and let the white fall into a small bowl, then transfer it to your large mixing bowl. This way, if you break a yolk, you only lose one egg instead of contaminating the whole batch. I use the three-bowl method: one for cracking, one for collecting whites, and one for yolks. It sounds excessive, but it saves headaches. You should have about 90g (3.2 ounces) of egg white total.
- Add the cream of tartar and salt to the egg whites. Start whipping on medium speed (speed 4 on a KitchenAid, medium on a hand mixer). After about 30 seconds, you’ll see the mixture start to get frothy and bubbly. This is normal. Keep going for another minute or two until soft peaks form—when you lift the whisk, the peaks should flop over gently.
- Start adding the sugar, one tablespoon at a time. With the mixer running on medium speed, add a spoonful of sugar, let it incorporate for about 15 seconds, then add the next. This slow addition helps the sugar dissolve completely. If you dump it all in at once, you’ll end up with grainy meringue. I’ve done it both ways, and the slow method is worth the extra minute. The mixture will start to look glossy and smooth.
- Add the vanilla extract once all the sugar is incorporated. Turn the mixer up to medium-high speed (speed 6-8 on a KitchenAid) and whip for another 3-4 minutes. You’re looking for stiff, glossy peaks. How do you know when it’s ready? Lift the whisk—the meringue should stand up straight without drooping. You can also rub a little between your fingers. If it feels smooth and not grainy, the sugar has dissolved. If it feels gritty, keep whipping for another minute.
- Test the meringue. This is the part I always do. Turn the bowl upside down over your head. If the meringue stays put, it’s ready. If it slides out, keep whipping. I’m not kidding. I’ve done this every time and it’s never failed. Just make sure your bowl is clean so you don’t drip meringue on yourself.
- Fold in the chocolate chips. Add about 2 tablespoons of the mini chocolate chips to the meringue. Use a rubber spatula to gently fold them in—cut down through the center, scrape along the bottom, and bring it up over the top. Do this about 6-8 times, just until the chips are distributed. Don’t overmix or you’ll deflate the meringue. You want some chips visible on the surface for the eyes.
- Transfer the meringue to your piping bag. If using a zip-top bag, place it in a tall glass and fold the top edges over the rim. This makes filling it so much easier. Spoon the meringue in, filling the bag about halfway. Don’t overfill or it’ll be hard to twist closed. Twist the top of the bag to seal it and snip off about 1/4 inch from the corner if using a zip-top bag.
- Pipe the ghosts. Hold the bag perpendicular to the baking sheet, about 1/2 inch above the surface. Squeeze gently to create a round blob about 1.5 inches wide. Stop squeezing, then pull the bag straight up to create a little peak on top. That peak is the ghost’s head. Leave about 1 inch between each ghost—they don’t spread much, but you want good air circulation. You should get about 24-30 ghosts depending on size.
- Add the eyes. While the meringue is still wet, gently press 2 mini chocolate chips into each ghost for eyes. Place them close together near the top of the blob. Don’t push them in too deep or they’ll disappear into the meringue. Just a light press so they stick. If you want, you can add a third chip for a mouth, but I like the two-eye look best.
- Bake for 1 hour 15 minutes to 1 hour 30 minutes. Place the baking sheet in the preheated oven and bake until the meringues are dry to the touch and easily lift off the parchment paper. They should be firm on the outside but still slightly soft inside. If they feel sticky or flexible, give them another 10-15 minutes. Every oven is different, so start checking at the 1 hour mark.
- Turn off the oven and let the meringues cool inside. This is the most important step. Leave the cookies in the oven with the door closed for at least 1 hour, or even overnight. This gradual cooling prevents cracking and ensures they dry out completely. I usually make these in the evening, let them cool in the oven overnight, and package them up in the morning. The texture is always perfect.
- Remove and enjoy. Once completely cool, gently lift the ghosts off the parchment paper. They should release easily. If they stick, they need more time in the oven. Store them in an airtight container at room temperature.
Cooking Tips & Techniques
After making these ghost meringue cookies about a dozen times, I’ve picked up a few tricks that make the process smoother and the results more consistent. Here’s what I’ve learned, including a few mistakes I’ve made so you don’t have to.
The Bowl Must Be Spotless
I cannot stress this enough. Any trace of grease, oil, or even residual dish soap will prevent your egg whites from whipping properly. I once used a bowl that had a tiny smear of butter on the rim from earlier baking. My meringue never got past the frothy stage. Now I always wipe my bowl and whisk with lemon juice before starting. It takes five seconds and saves a lot of frustration.
Room Temperature Eggs Matter
Cold egg whites whip up to less volume and take longer to reach stiff peaks. I set my eggs out on the counter about 30 minutes before I start. If I forget, I put them in a bowl of warm water for 5 minutes. The difference is noticeable. Room temperature whites whip up fluffier and more stable.
Don’t Overwhip
There’s a fine line between stiff peaks and overwhipped meringue. Once you hit stiff peaks, stop. If you keep going, the meringue will start to look grainy and curdled. The egg whites will separate and you’ll end up with a watery mess. I’ve done this exactly once and it was heartbreaking. Watch closely during the last minute of whipping. When the peaks stand up straight and glossy, you’re done.
Low and Slow is the Way to Go
The low oven temperature is crucial. If you bake meringues at a higher temperature, they’ll brown on the outside and stay gooey on the inside. At 200°F (93°C), they dry out evenly without changing color. Patience is key here. Don’t be tempted to crank up the heat to speed things up. I tried that once and ended up with brown ghosts that looked more like potatoes.
Humidity is Your Enemy
Meringue is sensitive to humidity. If you live in a humid climate or it’s a rainy day, your meringues might take longer to dry out or end up sticky. I avoid making these on humid days if I can help it. If you have to make them in humid weather, add an extra 15-20 minutes to the baking time and let them cool in the oven for at least 2 hours.
Multitasking Strategy
Here’s how I time everything. I preheat the oven first, then separate my eggs while it heats up. By the time the oven is ready, my egg whites have come to room temperature. I whip the meringue, pipe the ghosts, and get them in the oven within about 15 minutes. Then I clean up while they bake. The active time is minimal, so I usually make these while I’m also doing something else, like prepping dinner or helping with homework.
Variations & Adaptations
One of the best things about these ghost meringue cookies is how easy they are to customize. Here are some variations I’ve tried and loved.
Flavor Variations:
- Peppermint Ghosts: Replace the vanilla extract with 1/2 teaspoon of peppermint extract. The minty flavor is perfect for Christmas or winter holidays. I made these for a holiday party and they disappeared in minutes. Use white chocolate chips instead of dark for a different look.
- Chocolate Ghosts: Sift 2 tablespoons of cocoa powder into the sugar before adding it to the egg whites. You’ll get chocolate-flavored ghosts that look like little chocolate clouds. I’ve made these for kids who love chocolate and they were a hit.
- Lemon Ghosts: Replace the vanilla with 1 teaspoon of lemon extract and add 1 teaspoon of lemon zest. The citrus flavor is bright and refreshing. These are great for spring or summer parties.
Dietary Adaptations:
- Gluten-Free: These cookies are naturally gluten-free since they’re made with egg whites and sugar. Just make sure your chocolate chips are certified gluten-free if that’s a concern for you.
- Dairy-Free: Use dairy-free chocolate chips. Most dark chocolate chips are dairy-free, but always check the label. Enjoy Life brand makes good dairy-free mini chips.
- Lower Sugar: You can reduce the sugar to 1/2 cup (100g) instead of 3/4 cup. The meringue will be slightly less stable and might not hold its shape as well, but it still works. I’ve tried this and the texture is a bit softer but still delicious.
Seasonal Variations:
- Pumpkin Spice Ghosts: Add 1 teaspoon of pumpkin pie spice to the sugar before whipping. The warm spices complement the vanilla beautifully. I make these in October and they smell like fall.
- Christmas Tree Meringues: Instead of piping ghosts, pipe small cone shapes and decorate with green sprinkles or a star on top. Same recipe, different shape.
Personal Variation:
My favorite variation is adding a drop of black food coloring to half the meringue to create a marble effect. I fold it in gently so it doesn’t fully mix, then pipe as usual. The ghosts end up with subtle gray streaks that look spooky. I did this for a Halloween party and everyone thought they looked like little storm clouds. It’s a tiny change that makes a big visual impact.
Serving & Storage Suggestions
These ghost meringue cookies are best served at room temperature, straight from the container. Here’s how to serve and store them for maximum enjoyment.
Serving Suggestions:
Arrange the ghosts on a platter or cake stand for Halloween parties. They look adorable next to a bowl of punch or on a dessert table. For a fun presentation, I like to scatter a few around a pumpkin or place them on a plate with black and orange sprinkles. Kids especially love finding the chocolate chip eyes. I’ve also used them as cupcake toppers—just stick one on top of a frosted cupcake and you’ve got an instant Halloween treat.
Complementary Dishes:
These cookies pair well with hot chocolate, coffee, or a glass of cold milk. For a Halloween dessert spread, serve them alongside pumpkin pie, caramel apples, or chocolate cupcakes. They’re light enough to balance out heavier desserts. I once served them with a side of whipped cream for dipping, and it was a huge hit.
Storage Instructions:
Store the cookies in an airtight container at room temperature for up to 2 weeks. Do not refrigerate them—the moisture in the fridge will make them sticky and soft. If you live in a humid climate, add a silica gel packet to the container to absorb excess moisture. I keep mine in a glass jar with a tight-fitting lid on the counter. They stay crisp for about a week, then start to soften slightly. They’re still delicious, just less crunchy.
Freezer Instructions:
You can freeze these cookies for up to 3 months. Place them in a single layer in a freezer-safe container with parchment paper between layers. Thaw at room temperature for about 15 minutes before serving. The texture might be slightly softer after freezing, but they’re still good. I’ve frozen batches for Halloween parties in advance and they’ve held up well.
Reheating:
If your cookies have softened, you can crisp them up by placing them on a baking sheet in a 200°F (93°C) oven for 10-15 minutes. Let them cool completely before serving. This works like a charm. I’ve done this with cookies that were a week old and they came out perfectly crisp again.
Flavor Development:
These cookies actually taste better after a day or two. The flavors meld together and the texture becomes more uniform. I usually make them a day before I plan to serve them. The chocolate chip eyes also set better after a day, so they’re less likely to fall off when you handle them.
Nutritional Information & Benefits
Here’s the estimated nutritional breakdown for one ghost meringue cookie (based on 30 cookies per batch):
| Nutrient | Amount per Cookie |
|---|---|
| Calories | 32 |
| Total Fat | 0.5g |
| Saturated Fat | 0.3g |
| Cholesterol | 0mg |
| Sodium | 8mg |
| Total Carbohydrates | 7g |
| Sugars | 7g |
| Protein | 0.5g |
Health Benefits:
While these cookies are definitely a treat, they do have a few redeeming qualities. They’re fat-free (except for the chocolate chips), cholesterol-free, and naturally gluten-free. Egg whites are a good source of protein and contain no fat or cholesterol. The chocolate chips provide a small amount of antioxidants from cocoa. Plus, because they’re so light and airy, you naturally eat less of them compared to denser cookies. I mean, you could eat five of these and still consume fewer calories than one regular chocolate chip cookie.
Dietary Considerations:
These cookies are naturally gluten-free, dairy-free (if using dairy-free chocolate chips), and nut-free. They contain eggs, so they’re not suitable for those with egg allergies. The sugar content is relatively high per serving, so they’re not ideal for low-sugar diets. But as an occasional treat, they’re a lighter option than most Halloween candies.
My Personal Perspective:
I don’t pretend these are health food. They’re cookies, and they’re meant to be enjoyed. But I appreciate that they’re made with simple, recognizable ingredients and don’t contain any artificial colors or preservatives. When my kids ask for a Halloween treat, I’d rather give them these than a bag of neon-colored candy from the store. At least I know exactly what’s in them.
Conclusion
These easy ghost meringue cookies with chocolate chip eyes are the kind of recipe that makes you look like a hero with almost no effort. They’re cute, they’re delicious, and they come together with ingredients you probably already have in your kitchen. Whether you’re making them for a Halloween party, a school bake sale, or just because you want to do something fun with your kids on a rainy afternoon, they never disappoint.
What I love most about this recipe is how forgiving it is. You don’t need to be a perfect baker to make perfect-looking ghosts. The meringue is forgiving, the chocolate chips hide any imperfections, and the low oven temperature gives you plenty of room for error. Every time I make these, I think about Priya handing me that chai and telling me to relax. That’s the energy you need in the kitchen. Just relax, have fun, and let the ghosts be a little imperfect. They’ll still taste amazing.
I’d love to hear how yours turn out. Did you add any fun variations? Did your kids help with the piping? Drop a comment below and let me know. And if you’re looking for more Halloween treats, check out our Halloween desserts roundup for more spooky ideas. Happy baking, and may your ghosts be ever so slightly lopsided!
Frequently Asked Questions
Can I make these ghost meringue cookies without a piping bag?
Absolutely! A zip-top bag with the corner snipped off works perfectly. You can also use a small spoon to drop dollops of meringue onto the baking sheet. They won’t look as uniform, but they’ll still be delicious. I’ve used the spoon method when I couldn’t find my piping bag and the ghosts turned out cute in a rustic way.
Why did my meringue turn out flat and runny?
This usually happens for one of three reasons: your bowl or whisk had grease residue, you got yolk in the egg whites, or you didn’t whip them long enough. Make sure your equipment is spotless, separate your eggs carefully, and whip until stiff peaks form. If your meringue is runny, it’s best to start over with fresh egg whites.
Can I use liquid egg whites from a carton?
I don’t recommend it. Liquid egg whites from a carton are pasteurized and often contain stabilizers that prevent them from whipping up properly. They’ll never reach stiff peaks like fresh egg whites will. Stick with fresh eggs for the best results. I’ve tried carton whites once and ended up with flat, sad meringue.
How do I know when the meringues are done baking?
They should be dry to the touch and lift easily off the parchment paper. If they feel sticky or flexible, give them more time. The internal temperature should be around 200°F (93°C) if you want to check with a thermometer. But honestly, the touch test is more reliable. I always let them cool in the oven for at least an hour to ensure they’re fully dried out.
Can I double this recipe?
Yes, you can double the recipe easily. Just make sure your mixing bowl is large enough to accommodate the increased volume. You might need to bake them in batches or use two baking sheets. If using two sheets, rotate them halfway through baking for even drying. I’ve made double batches for parties and they’ve turned out perfectly every time.
Pin This Recipe!

Easy Ghost Meringue Cookies with Chocolate Chip Eyes
These easy ghost meringue cookies with chocolate chip eyes are a fun and simple Halloween treat. Made with just five ingredients, they come together in about ten minutes of hands-on time and bake low and slow for a crisp exterior and marshmallowy center.
- Prep Time: 10 minutes
- Cook Time: 1 hour 15 minutes
- Total Time: 2 hours 25 minutes (including cooling time)
- Yield: 24-30 cookies 1x
- Category: Dessert
- Cuisine: American
Ingredients
- 3 large egg whites, room temperature (about 90g or 3.2 ounces)
- 3/4 cup granulated sugar (150g or 5.3 ounces)
- 1/2 teaspoon cream of tartar
- 1 teaspoon vanilla extract
- 1/8 teaspoon salt
- 1/4 cup mini chocolate chips (about 45g or 1.6 ounces)
Instructions
- Preheat your oven to 200°F (93°C) and line a large baking sheet with parchment paper. Ensure the oven rack is in the middle position.
- Prepare your mixing bowl and whisk attachment by wiping them down with a paper towel dipped in lemon juice or white vinegar to remove any grease.
- Separate your eggs, letting the whites fall into a small bowl, then transfer to the large mixing bowl. Use the three-bowl method to avoid yolk contamination.
- Add the cream of tartar and salt to the egg whites. Start whipping on medium speed until frothy, then continue until soft peaks form (peaks flop over gently).
- With the mixer running on medium speed, add the sugar one tablespoon at a time, letting each incorporate for about 15 seconds. Continue until all sugar is added and the mixture looks glossy and smooth.
- Add the vanilla extract and increase speed to medium-high. Whip for 3-4 minutes until stiff, glossy peaks form. The meringue should stand up straight when the whisk is lifted.
- Test the meringue by turning the bowl upside down over your head. If it stays put, it’s ready.
- Fold in about 2 tablespoons of the mini chocolate chips using a rubber spatula, gently folding 6-8 times until distributed. Some chips should remain visible on the surface.
- Transfer the meringue to a piping bag fitted with a round tip, or a zip-top bag with the corner snipped off. Fill the bag about halfway and twist the top to seal.
- Pipe the ghosts onto the prepared baking sheet: hold the bag perpendicular about 1/2 inch above the surface, squeeze to create a round blob about 1.5 inches wide, then pull straight up to create a peak. Leave 1 inch between ghosts.
- While the meringue is still wet, gently press 2 mini chocolate chips into each ghost for eyes, placing them close together near the top. Do not push them in too deep.
- Bake for 1 hour 15 minutes to 1 hour 30 minutes, until the meringues are dry to the touch and easily lift off the parchment paper. Start checking at the 1-hour mark.
- Turn off the oven and let the meringues cool inside with the door closed for at least 1 hour, or overnight, to prevent cracking and ensure they dry out completely.
- Once completely cool, gently lift the ghosts off the parchment paper. Store in an airtight container at room temperature.
Notes
Ensure the bowl and whisk are completely clean and grease-free. Room temperature egg whites whip better. Do not overmix after adding chocolate chips. Humidity can affect meringue; add extra baking time if needed. Let cookies cool in the oven for best texture.
Nutrition
- Serving Size: 1 cookie
- Calories: 32
- Sugar: 7
- Sodium: 8
- Fat: 0.5
- Saturated Fat: 0.3
- Carbohydrates: 7
- Protein: 0.5
Keywords: ghost meringue cookies, Halloween cookies, meringue cookies, chocolate chip eyes, easy Halloween treat, gluten-free cookies, dairy-free cookies


