It was 11:47 PM on a random Tuesday in early November, and I had that specific, weird craving for a Thanksgiving appetizer that didn’t exist yet. I had spent the whole day testing turkey recipes for a client, and my kitchen looked like a flour bomb had gone off. I didn’t have the energy for a full charcuterie board with fancy meats and expensive cheeses, but I had a block of cream cheese, some shredded cheddar, a bag of pecans, and this wild idea that maybe—just maybe—I could shape a cheese ball into a turkey. Honestly, I was tired, my back hurt from standing over the stove, and I was running on my third cup of coffee. But something about the late hour made me feel like the normal rules didn’t apply. You know that feeling when you’re too exhausted to overthink, so you just go for it?
So I started mixing. Cream cheese, cheddar, a little garlic powder, some Worcestershire sauce—stuff I actually had. I rolled it into a ball, then shaped it into something vaguely bird-like. I stuck pretzel sticks in for feathers, used a candy corn for the beak, and placed two peppercorns for eyes. It looked ridiculous. Honestly, it looked like a kindergarten art project. But then I tasted the cheese ball, and let me tell you, I let out a little gasp. It was creamy, savory, and had this perfect tangy kick. I grabbed a cracker, scooped up a chunk, and stood there in my messy kitchen at midnight, eating a cheese ball shaped like a turkey and feeling like I had discovered fire.
That silly turkey cheese ball became the foundation for something bigger. I started thinking about Thanksgiving hosting—how everyone obsesses over the main course but forgets the appetizer game. People are hungry when they walk in the door, and they’re standing around awkwardly holding a drink. That’s where this Easy Thanksgiving Charcuterie Board with Turkey Cheese Ball comes in. It’s the thing that makes people say, “Oh my gosh, did you make this?” and suddenly the party starts. Maybe you’ve been there—scrambling at the last minute, trying to look put together when you’re actually a mess. This board is your secret weapon. It looks impressive, tastes incredible, and honestly, it’s the easiest way to steal the show before the turkey even hits the table.
Why You’ll Love This Recipe
Let me be real with you for a second. I’ve been developing recipes for over a decade, and I’ve tested more Thanksgiving appetizers than I can count. Some are fussy, some require weird ingredients you’ll never use again, and some just don’t deliver on flavor. This one is different. It’s the kind of recipe that makes you look like a rockstar host with minimal effort, and I’m not exaggerating when I say it’s become my most-requested holiday dish.
- Completely Customizable: This board is a blank canvas. You can swap in your family’s favorite cheeses, meats, and crackers without changing the structure. The turkey cheese ball is the anchor, and everything else just fills in around it.
- Make-Ahead Magic: The cheese ball can be made up to three days in advance. The board can be assembled in under 20 minutes on the day of your gathering. This is huge for hosting because you can actually enjoy your own party instead of being stuck in the kitchen.
- Guaranteed Crowd-Pleaser: I’ve brought this to potlucks, Friendsgivings, and family dinners, and it always gets devoured first. The combination of creamy cheese ball, salty meats, crunchy nuts, and sweet dried fruit hits every single craving.
- Visually Stunning: Let’s face it—people eat with their eyes first. The turkey cheese ball is an instant conversation starter, and the colorful arrangement of ingredients makes for incredible photos. Your guests will be snapping pictures before they even grab a plate.
- No Special Skills Required: If you can mix ingredients in a bowl and arrange things on a board, you can make this. There’s no baking, no complicated techniques, no stress. It’s literally just assembly.
What makes this recipe different from every other charcuterie board out there is the turkey cheese ball. It’s not just a gimmick—it’s genuinely delicious. I use a blend of cream cheese and sharp cheddar with a touch of ranch seasoning mix (trust me on this one) that creates this addictive, creamy texture. The outside is coated in toasted pecans and fresh herbs, which adds crunch and freshness. And the best part? When you slice into it, it looks beautiful on a cracker. This isn’t just another version of a cheese ball—it’s your best version. It’s the one that makes people ask for the recipe before they’ve even finished their first helping.
This recipe is perfect for hosts who want to impress without stress. It’s the appetizer that says, “I’ve got this,” even if you’re internally panicking about the turkey in the oven. It’s comfort food reimagined—familiar enough to feel like Thanksgiving, but creative enough to feel special. Close your eyes after that first bite, and you’ll taste exactly what I mean.
What Ingredients You Will Need
This recipe uses simple, wholesome ingredients that you can find at any grocery store. Most of these are probably already in your pantry or fridge, which makes this perfect for last-minute hosting emergencies. Let me walk you through each component and why it matters.
For the Turkey Cheese Ball
- 16 oz cream cheese, softened (I recommend Philadelphia brand for the creamiest texture—trust me, the cheaper brands can be grainy)
- 2 cups sharp cheddar cheese, shredded (Buy a block and shred it yourself; pre-shredded cheese has anti-caking agents that affect the texture)
- 1 packet ranch seasoning mix (Hidden Valley is my go-to, but any brand works; this is the secret ingredient that makes everyone ask what’s in it)
- 1/4 cup Worcestershire sauce (Adds that savory umami depth you can’t quite identify)
- 1/2 teaspoon garlic powder (Not garlic salt—we’re controlling the sodium ourselves)
- 1/2 teaspoon onion powder (Balances the flavors beautifully)
- 1 cup pecans, finely chopped (Toast them first for maximum flavor; raw pecans are fine but toasted is next-level)
- 2 tablespoons fresh parsley, finely chopped (Adds color and freshness; dried parsley won’t give the same effect)
- 1 tablespoon fresh chives, finely chopped (Optional but recommended for that mild oniony pop)
For the Turkey Decorations
- Pretzel sticks (For the tail feathers; use gluten-free pretzels if needed)
- 1 candy corn (For the beak; an orange bell pepper triangle works too if you’re avoiding candy)
- 2 black peppercorns or black sesame seeds (For the eyes; you can also use tiny dots of black olive)
- 1 red bell pepper strip or red apple slice (For the wattle—that red dangly thing under the beak)
For the Charcuterie Board
- 8 oz assorted cured meats (Prosciutto, salami, soppressata—mix it up for variety; I like to include at least one spicy option)
- 8 oz assorted cheeses (Brie, aged gouda, and a blue cheese add nice variety; cut some into cubes and leave some in wedges)
- 1 cup assorted olives (Castelvetrano green olives and kalamata olives are my favorites; buy them pitted to save your guests the trouble)
- 1 cup dried fruit (Dried apricots, figs, and cranberries are perfect for Thanksgiving; they add natural sweetness that balances the savory)
- 1 cup nuts (Almonds, walnuts, or more pecans; raw or roasted both work)
- 1 cup fresh fruit (Red grapes, apple slices, or pear slices; toss apple slices in lemon juice to prevent browning)
- 1 box assorted crackers (Include a variety of textures—buttery, seedy, and crunchy; I recommend a mix of water crackers, wheat thins, and baguette slices)
- Fresh herbs for garnish (Rosemary sprigs, thyme, and sage look beautiful and smell amazing; they’re also edible if anyone wants to try)
Ingredient Selection Tip: When choosing your cream cheese, make sure it’s at room temperature before mixing. Cold cream cheese creates lumps that are nearly impossible to smooth out. Leave it on the counter for about 30 minutes before you start. For the cheddar, I prefer a sharp or extra-sharp variety because it stands up to the cream cheese without getting lost. And please, for the love of all things delicious, toast those pecans. Spread them on a baking sheet at 350°F for 5-7 minutes, and your kitchen will smell like heaven. The flavor difference is night and day.
Substitution Guidance: If you’re feeding a crowd with dietary restrictions, this recipe is surprisingly flexible. Use dairy-free cream cheese and vegan cheddar shreds for a dairy-free version. Gluten-free crackers and pretzels make the whole board gluten-free. For a nut-free option, skip the pecan coating and use crushed bacon bits or everything bagel seasoning instead. The turkey cheese ball is forgiving—don’t be afraid to experiment.
Equipment Needed
You don’t need fancy equipment for this recipe, which is part of its beauty. Here’s what you’ll need:
- Large mixing bowl (For combining the cheese ball ingredients; a glass or stainless steel bowl works best)
- Hand mixer or stand mixer (A hand mixer is perfect here; you can also mix by hand with a wooden spoon if you’re feeling strong, but the mixer ensures a smooth, lump-free texture)
- Plastic wrap (For shaping and chilling the cheese ball; it makes cleanup so much easier)
- Large wooden cutting board or serving platter (At least 18 inches wide to accommodate everything; a marble slab or slate board also looks beautiful)
- Small bowls or ramekins (For olives, nuts, and any wet ingredients that might leak onto the board; I use little ceramic dishes from my local thrift store)
- Cheese knives or small spreaders (At least two, so guests don’t have to share; I like having a separate knife for the cheese ball and the other cheeses)
- Paring knife (For cutting fruit and shaping the turkey decorations)
- Cutting board (For prepping ingredients; a small one works fine)
- Measuring cups and spoons (For accurate ingredient portions)
Budget-Friendly Options: If you don’t have a large wooden board, use a baking sheet lined with parchment paper. It sounds casual, but it actually looks rustic and charming. For small bowls, use ramekins or even clean yogurt containers in a pinch. A hand mixer can be found at thrift stores for under $10, but honestly, a sturdy fork and some elbow grease will get the job done.
Personal Experience: I learned the hard way that plastic wrap is non-negotiable here. The first time I made this, I shaped the cheese ball directly on the board and tried to chill it without wrapping it. It picked up flavors from the fridge and developed a weird dry skin on the outside. Wrap it tightly, and your cheese ball will stay perfectly moist and fresh.
Preparation Method
Alright, let’s get to the fun part. This recipe is broken into two phases: making the turkey cheese ball and assembling the board. You can do the cheese ball up to three days ahead, which I highly recommend for stress-free hosting.
Phase 1: Make the Turkey Cheese Ball (20 minutes active + 2 hours chilling)
- Soften the cream cheese. Take your cream cheese out of the fridge about 30 minutes before you start. It should be soft enough that you can easily press your finger into it. If you forget (I do this all the time), microwave it in 10-second bursts until soft but not melted.
- Mix the base. In your large mixing bowl, combine the softened cream cheese, shredded cheddar, ranch seasoning mix, Worcestershire sauce, garlic powder, and onion powder. Beat with your hand mixer on medium speed until everything is fully combined and smooth. Scrape down the sides of the bowl at least once. The mixture should be thick, creamy, and slightly sticky. Taste it—yes, raw, it’s safe. Adjust the seasoning if needed. I usually add a pinch more garlic powder because I’m obsessed with it.
- Chill the mixture. Cover the bowl with plastic wrap and refrigerate for at least 1 hour. This step is crucial because the mixture needs to firm up enough to shape. If you skip this, you’ll end up with a sticky mess on your hands.
- Prepare the coating. While the mixture chills, toast your pecans in a dry skillet over medium heat for 3-4 minutes, stirring constantly, until they smell fragrant. Let them cool completely, then chop them finely. Mix the chopped pecans with the fresh parsley and chives in a small bowl.
- Shape the turkey body. Lay a large piece of plastic wrap on your counter. Scoop the chilled cheese mixture onto the center of the plastic wrap. Use your hands to shape it into a ball, then gently elongate one side to form a pear-like shape—the round part is the body, the narrower part is the head. Don’t stress about perfection; the coating will hide imperfections. Wrap the plastic wrap tightly around the shaped cheese ball and refrigerate for another 1-2 hours, or until firm.
- Apply the coating. Unwrap the chilled cheese ball and place it on a clean surface. Gently press the pecan-herb mixture all over the surface, covering it completely. The coating should stick to the outside. Use your hands to pat it gently into place. If some spots are bare, just press more coating on.
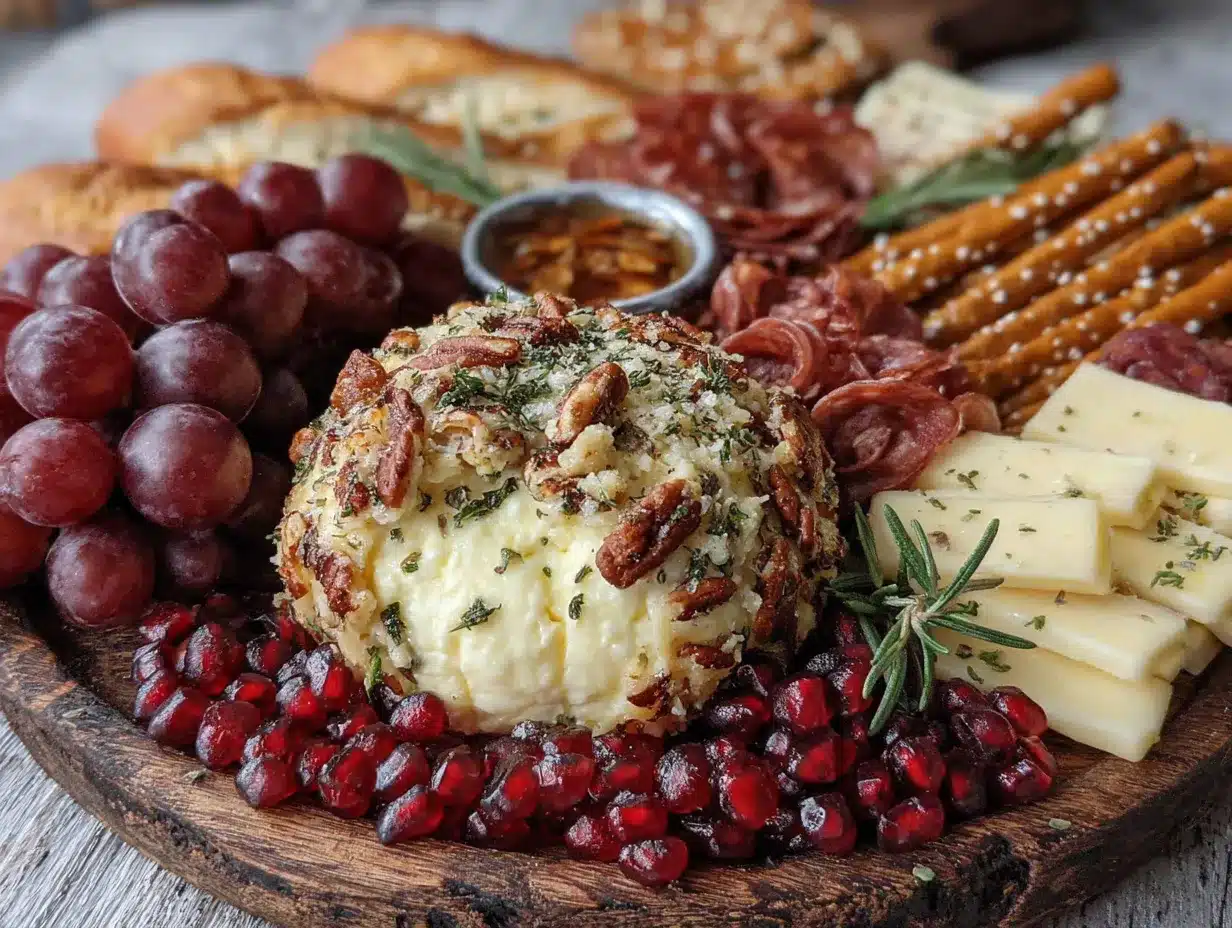
- Add the turkey face. This is where the magic happens. For the eyes, gently press two black peppercorns into the head area. For the beak, insert the candy corn point-first into the center of the face. For the wattle, place a small strip of red bell pepper just below the beak. For the tail feathers, insert pretzel sticks into the back of the body in a fan pattern. Press them in firmly so they stay upright. Place the finished turkey cheese ball on your serving board.
Phase 2: Assemble the Charcuterie Board (15 minutes)
- Position the turkey. Place your turkey cheese ball in the center or slightly off-center on your board. It’s the star of the show, so give it prominent placement.
- Add the small bowls. Place your small bowls or ramekins around the board. Fill one with olives, one with dried fruit, and one with any wet ingredients like pickles or marinated vegetables. This prevents liquids from making the crackers soggy.
- Arrange the meats. Fold or roll your cured meats and place them in small clusters around the board. I like to create little salami roses by folding slices and standing them on their edges—it looks fancy but takes 10 seconds. Place prosciutto in loose, wavy ribbons.
- Add the cheeses. Cut your block cheeses into cubes or thin slices and arrange them in small piles. Leave the brie whole or cut it into wedges. Place them at different points on the board so guests don’t have to reach across.
- Fill in with crackers. Arrange crackers in small stacks or fans around the board. Place them near the cheese ball and other cheeses for easy pairing. Don’t stack them too high—they’ll topple over.
- Scatter the nuts and fruit. Sprinkle almonds, walnuts, and fresh grapes in the empty spaces. Tuck apple slices and pear slices between the meats and cheeses. The goal is to fill every inch of the board so it looks abundant and inviting.
- Garnish and serve. Tuck fresh rosemary sprigs, thyme, and sage leaves around the board for color and fragrance. Place cheese knives or spreaders near each cheese. Serve immediately or refrigerate until guests arrive (remove from fridge 20 minutes before serving for best flavor).
Sensory Cue: When you’re mixing the cheese ball, it should feel smooth and slightly resistant, like thick frosting. When you press the pecan coating on, you should hear a gentle crunch as the nuts adhere. The finished board should look like a colorful landscape—green herbs, red fruits, golden crackers, and the proud turkey in the center.
Cooking Tips & Techniques
I’ve made this board about a dozen times now, and I’ve learned a few things the hard way. Let me save you from my mistakes.
Don’t Overmix the Cheese Ball. I know it’s tempting to keep beating until it’s perfectly smooth, but overmixing can make the cream cheese watery and affect the texture. Mix just until combined, then stop. The mixture should be uniform but still thick.
Chill Between Steps. This is the most important tip I can give you. The cheese mixture needs to be cold before shaping, and the shaped ball needs to be cold before coating. If you skip these chill times, you’ll end up with a flat, misshapen blob. Trust the process—it’s worth the wait.
Toast Your Nuts. I cannot stress this enough. Raw pecans are fine, but toasted pecans are transcendent. The heat releases their natural oils and intensifies their flavor. Plus, the texture becomes crunchier, which creates a perfect contrast with the creamy cheese ball. Toast them in a dry skillet over medium heat and watch them carefully—they burn fast.
Use Room Temperature Ingredients. Cold cream cheese creates lumps that are impossible to smooth out. Cold cheddar doesn’t incorporate well. Take everything out of the fridge 30 minutes before you start. If you’re in a rush, microwave the cream cheese in 10-second bursts, but be careful not to melt it.
Make It a Day Ahead. The cheese ball actually tastes better after a day in the fridge. The flavors meld and deepen, and the texture becomes even creamier. Make the cheese ball up to three days ahead, but add the pretzel sticks and face decorations on the day you serve it—they’ll stay crisp and fresh.
Common Mistake to Avoid: Don’t add too many wet ingredients to the board. Olives, pickles, and marinated vegetables can leak liquid and make crackers soggy. Always use small bowls or ramekins for anything wet. I learned this the hard way when my beautiful board turned into a soggy mess after 20 minutes at a party.
Timing Strategy: If you’re hosting a dinner party, assemble the board about 30 minutes before guests arrive. Leave the cheese ball at room temperature for 20 minutes before serving—it spreads much more easily when it’s slightly softened. Put the board out as people walk in the door, and watch it disappear.
Variations & Adaptations
One of the best things about this recipe is how flexible it is. Here are some variations I’ve tried and loved.
Dietary Variations
- Dairy-Free Version: Use dairy-free cream cheese (Kite Hill makes a great one) and vegan cheddar shreds. The texture will be slightly different, but the flavor is still fantastic. Coat with toasted sunflower seeds instead of pecans for a nut-free option.
- Gluten-Free Version: Use gluten-free crackers and gluten-free pretzel sticks. Everything else in the recipe is naturally gluten-free. Just double-check your ranch seasoning mix—some brands contain gluten.
- Low-Carb/Keto Version: Skip the crackers and pretzels entirely. Serve with cucumber rounds, bell pepper strips, and celery sticks for dipping. The cheese ball itself is naturally low-carb and keto-friendly.
Flavor Variations
- Spicy Southwest: Add 1/4 cup finely chopped pickled jalapeños and 1 teaspoon cumin to the cheese mixture. Coat with crushed tortilla chips and chili powder. Use pepper jack cheese instead of cheddar for extra heat.
- Herb Garden: Add 2 tablespoons each of fresh dill, fresh basil, and fresh chives to the cheese mixture. Coat with a mixture of toasted pine nuts and fresh herbs. This version is bright, fresh, and perfect for spring gatherings.
- Bacon Lover’s: Cook 6 strips of bacon until crispy, crumble them, and mix half into the cheese mixture. Use the remaining bacon as part of the coating along with the pecans. This version is dangerously addictive.
Seasonal Adaptations
- Christmas Version: Shape the cheese ball into a Christmas tree instead of a turkey. Use pretzel sticks as the trunk, and decorate with pomegranate seeds and fresh rosemary. Serve with cranberry sauce on the side.
- Summer Picnic Version: Use a lighter cheese mixture with goat cheese and lemon zest. Skip the pretzel feathers and use fresh vegetable sticks instead. Serve with fresh berries and melon slices.
Personal Variation: My absolute favorite twist is the Everything Bagel version. I mix everything bagel seasoning into the cheese mixture and coat the outside with more everything bagel seasoning instead of pecans. It’s salty, savory, and incredibly addictive. I serve it with mini bagel chips and cream cheese. My friends beg me to bring this to every gathering.
Serving & Storage Suggestions
This board is designed to be served at room temperature, which makes it perfect for entertaining. Here’s how to get the best experience.
Serving Temperature: Take the cheese ball out of the fridge about 20-30 minutes before serving. It should be slightly softened but still hold its shape. Cold cheese ball is hard to spread and doesn’t release its full flavor. Room temperature cheese is creamy, aromatic, and spreads like a dream.
Presentation Tips: Place the board on a large, flat surface where guests can easily reach it from both sides. Arrange cheese knives and small plates nearby. I like to put out small napkins and a few toothpicks for easy grabbing. If you’re feeling fancy, add a small sign with the name of the dish—guests love knowing what they’re eating.
Complementary Dishes: This board pairs beautifully with a crisp white wine like Sauvignon Blanc or a light Pinot Noir. For non-alcoholic options, serve sparkling water with lemon or a festive cranberry spritzer. If you’re serving this as a pre-dinner appetizer, follow it with a light soup or salad to balance the richness.
Storage Instructions: Leftover cheese ball can be wrapped tightly in plastic wrap and stored in the refrigerator for up to 5 days. The assembled board doesn’t store well—the crackers get stale and the fruit oxidizes. If you have leftover components, store them separately. The cheese ball actually tastes better the next day, so don’t throw it away.
Reheating Notes: You don’t need to reheat the cheese ball—just let it sit at room temperature for 20 minutes before serving again. If the coating has softened, you can refresh it with a sprinkle of fresh chopped pecans or herbs.
Flavor Development: Here’s a little secret: the cheese ball is actually better on day two. The flavors meld together overnight, creating a deeper, more complex taste. The ranch seasoning really settles in, and the Worcestershire sauce becomes more pronounced. If you can plan ahead, make the cheese ball a day before you need it. Your taste buds will thank you.
Nutritional Information & Benefits
Let’s be honest—this is a celebration dish, not a health food. But that doesn’t mean it’s without merit. Here’s what you’re working with.
Estimated Nutritional Values (per serving, approximately 2 tablespoons of cheese ball + a few crackers and accompaniments):
- Calories: 280-350
- Protein: 8-10g
- Fat: 22-28g
- Carbohydrates: 12-18g
- Fiber: 2-3g
- Sugar: 5-8g
- Sodium: 450-600mg
Health Benefits: The cheese ball provides a good amount of protein and calcium from the cream cheese and cheddar. Pecans are packed with healthy fats, fiber, and antioxidants—they’re great for heart health. The fresh herbs add a small amount of vitamins and antioxidants. The board as a whole encourages mindful eating because you’re picking and choosing small portions rather than mindlessly snacking from a bag.
Dietary Considerations: This recipe contains dairy, gluten (in crackers and pretzels), and nuts (pecans). It can be adapted for dairy-free, gluten-free, and nut-free diets as noted in the variations section. Always check labels on ranch seasoning and Worcestershire sauce for hidden allergens.
Personal Wellness Perspective: I believe in balance. This board is for celebrations—Thanksgiving, Friendsgiving, holiday parties. It’s not an everyday snack, and that’s okay. Food is about connection and joy, and this board delivers both. Serve it alongside a big green salad or a vegetable platter to round out the meal. Enjoy it, savor it, and don’t feel guilty about it. Life is too short for boring appetizers.
Conclusion
So here’s the thing—this Easy Thanksgiving Charcuterie Board with Turkey Cheese Ball started as a late-night experiment in a messy kitchen, and it’s become my most-requested holiday recipe. It’s the appetizer that makes people stop, smile, and say, “Wait, you made that?” And honestly, that’s the best feeling as a host. You get to look like a culinary genius while actually having spent most of your time relaxing with your guests.
What I love most about this board is how it brings people together. There’s something about gathering around a beautiful spread of food that makes conversations flow naturally. People linger, they try new combinations, they laugh about the turkey-shaped cheese ball. It sets the tone for the whole meal—warm, welcoming, and a little bit playful.
I want you to make this your own. Change the meats, swap the cheeses, experiment with the decorations. Make it reflect your family’s traditions and your personal taste. And when you do, I’d love to hear about it. Drop a comment below and tell me how your board turned out. Did your guests love it? Did you try a fun variation? Share your photos and tag me—I can’t wait to see your creations.
Now go ahead, grab that cream cheese, and make something memorable. Your Thanksgiving table is waiting.
Frequently Asked Questions
Can I make the turkey cheese ball ahead of time?
Absolutely! The cheese ball can be made up to three days in advance. Just wrap it tightly in plastic wrap and store it in the refrigerator. Add the pretzel sticks and face decorations on the day you serve it so they stay crisp and fresh.
How do I prevent the cheese ball from cracking when I shape it?
Make sure your cream cheese is fully softened before mixing, and don’t skip the first chill step. If the mixture is too cold, it can crack when you shape it. If it’s too warm, it won’t hold its shape. The sweet spot is about 1 hour of chilling after mixing.
What can I use instead of pretzel sticks for the turkey feathers?
You can use thin breadsticks, carrot sticks, celery sticks, or even bell pepper strips for a colorful alternative. For a gluten-free option, use gluten-free pretzel sticks or vegetable sticks. Just make sure whatever you use is sturdy enough to stand upright.
How long will the charcuterie board stay fresh at room temperature?
The board is safe at room temperature for about 2 hours. After that, the cheese and meats should be refrigerated. If you’re serving for a longer period, put out smaller amounts and refresh the board as needed. The cheese ball itself can be returned to the fridge and served again later.
Can I freeze the cheese ball?
I don’t recommend freezing the cheese ball. The texture of cream cheese changes when frozen and thawed—it becomes grainy and watery. The cheese ball is best made fresh or up to three days ahead and stored in the refrigerator. If you have leftovers, they’ll keep in the fridge for up to 5 days.
Pin This Recipe!
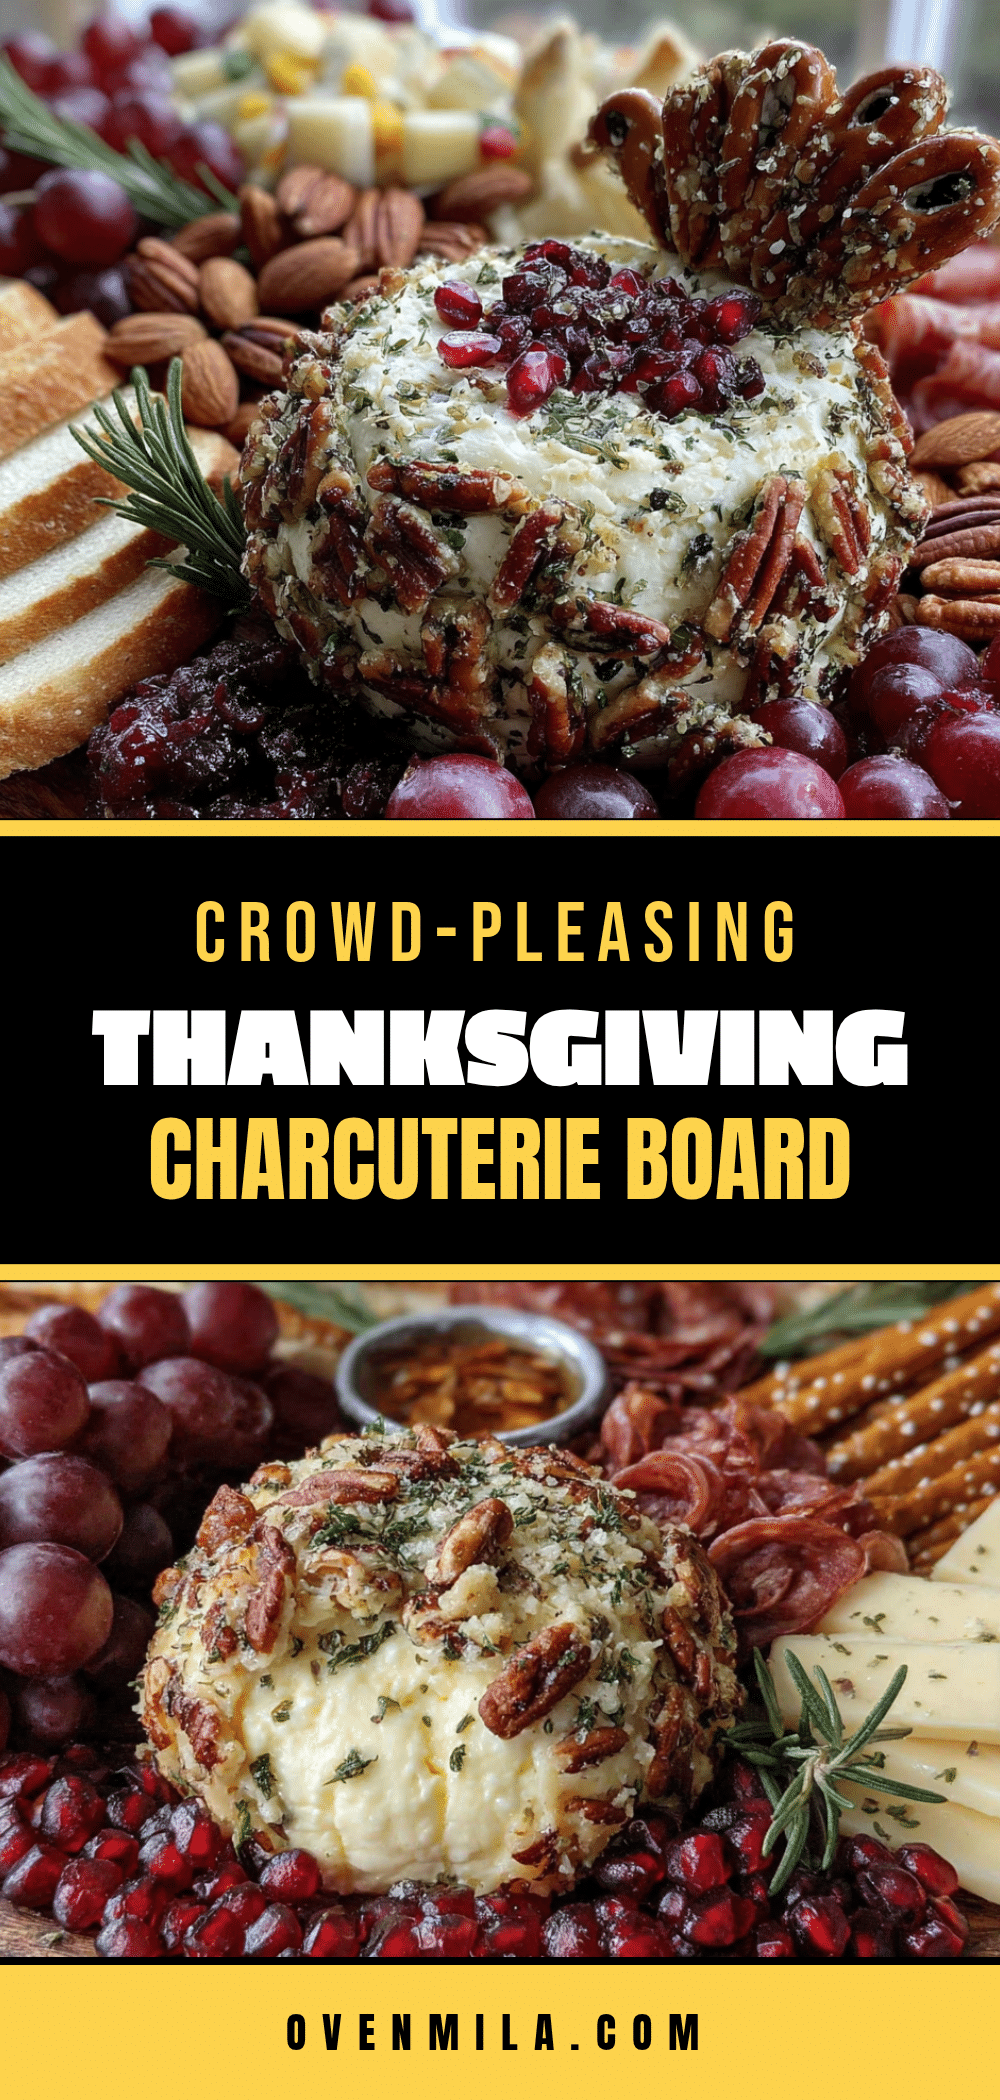
Easy Thanksgiving Charcuterie Board with Turkey Cheese Ball
A fun and festive Thanksgiving appetizer featuring a creamy turkey-shaped cheese ball surrounded by an assortment of cured meats, cheeses, olives, dried fruit, nuts, and crackers. Perfect for impressing guests with minimal effort.
- Prep Time: 20 minutes
- Cook Time: 5 minutes
- Total Time: 2 hours 25 minutes (includes chilling)
- Yield: 8 servings 1x
- Category: Appetizer
- Cuisine: American
Ingredients
- 16 oz cream cheese, softened
- 2 cups sharp cheddar cheese, shredded
- 1 packet ranch seasoning mix
- 1/4 cup Worcestershire sauce
- 1/2 teaspoon garlic powder
- 1/2 teaspoon onion powder
- 1 cup pecans, finely chopped
- 2 tablespoons fresh parsley, finely chopped
- 1 tablespoon fresh chives, finely chopped
- Pretzel sticks (for tail feathers)
- 1 candy corn (for beak)
- 2 black peppercorns or black sesame seeds (for eyes)
- 1 red bell pepper strip or red apple slice (for wattle)
- 8 oz assorted cured meats (prosciutto, salami, soppressata)
- 8 oz assorted cheeses (brie, aged gouda, blue cheese)
- 1 cup assorted olives (Castelvetrano green olives, kalamata olives)
- 1 cup dried fruit (dried apricots, figs, cranberries)
- 1 cup nuts (almonds, walnuts, or more pecans)
- 1 cup fresh fruit (red grapes, apple slices, pear slices)
- 1 box assorted crackers
- Fresh herbs for garnish (rosemary sprigs, thyme, sage)
Instructions
- Soften the cream cheese: Take cream cheese out of fridge 30 minutes before starting. If forgotten, microwave in 10-second bursts until soft but not melted.
- Mix the base: In a large mixing bowl, combine softened cream cheese, shredded cheddar, ranch seasoning mix, Worcestershire sauce, garlic powder, and onion powder. Beat with hand mixer on medium speed until fully combined and smooth. Scrape down sides at least once. Taste and adjust seasoning if needed.
- Chill the mixture: Cover bowl with plastic wrap and refrigerate for at least 1 hour until firm enough to shape.
- Prepare the coating: While mixture chills, toast pecans in a dry skillet over medium heat for 3-4 minutes, stirring constantly, until fragrant. Let cool completely, then chop finely. Mix chopped pecans with fresh parsley and chives in a small bowl.
- Shape the turkey body: Lay a large piece of plastic wrap on counter. Scoop chilled cheese mixture onto center. Shape into a ball, then gently elongate one side to form a pear-like shape (round part is body, narrower part is head). Wrap tightly in plastic wrap and refrigerate for another 1-2 hours until firm.
- Apply the coating: Unwrap chilled cheese ball and place on clean surface. Gently press pecan-herb mixture all over surface, covering completely. Pat gently into place.
- Add the turkey face: Press two black peppercorns into head area for eyes. Insert candy corn point-first into center of face for beak. Place small strip of red bell pepper just below beak for wattle. Insert pretzel sticks into back of body in a fan pattern for tail feathers. Press firmly so they stay upright. Place finished turkey cheese ball on serving board.
- Position the turkey: Place turkey cheese ball in center or slightly off-center on board.
- Add small bowls: Place small bowls or ramekins around board. Fill one with olives, one with dried fruit, and one with any wet ingredients like pickles or marinated vegetables.
- Arrange the meats: Fold or roll cured meats and place in small clusters around board. Create salami roses by folding slices and standing on edges. Place prosciutto in loose, wavy ribbons.
- Add the cheeses: Cut block cheeses into cubes or thin slices and arrange in small piles. Leave brie whole or cut into wedges. Place at different points on board.
- Fill in with crackers: Arrange crackers in small stacks or fans around board, near cheese ball and other cheeses.
- Scatter nuts and fruit: Sprinkle almonds, walnuts, and fresh grapes in empty spaces. Tuck apple slices and pear slices between meats and cheeses. Fill every inch of board.
- Garnish and serve: Tuck fresh rosemary sprigs, thyme, and sage leaves around board for color and fragrance. Place cheese knives or spreaders near each cheese. Serve immediately or refrigerate until guests arrive (remove from fridge 20 minutes before serving for best flavor).
Notes
The cheese ball can be made up to 3 days in advance. Add pretzel sticks and face decorations on serving day for crispness. For best flavor, let cheese ball sit at room temperature 20 minutes before serving. To prevent soggy crackers, use small bowls for wet ingredients like olives. The cheese ball tastes even better on day two as flavors meld.
Nutrition
- Serving Size: 2 tablespoons cheese
- Calories: 315
- Sugar: 6.5
- Sodium: 525
- Fat: 25
- Saturated Fat: 12
- Carbohydrates: 15
- Fiber: 2.5
- Protein: 9
Keywords: Thanksgiving, charcuterie board, turkey cheese ball, appetizer, holiday, easy, make-ahead


