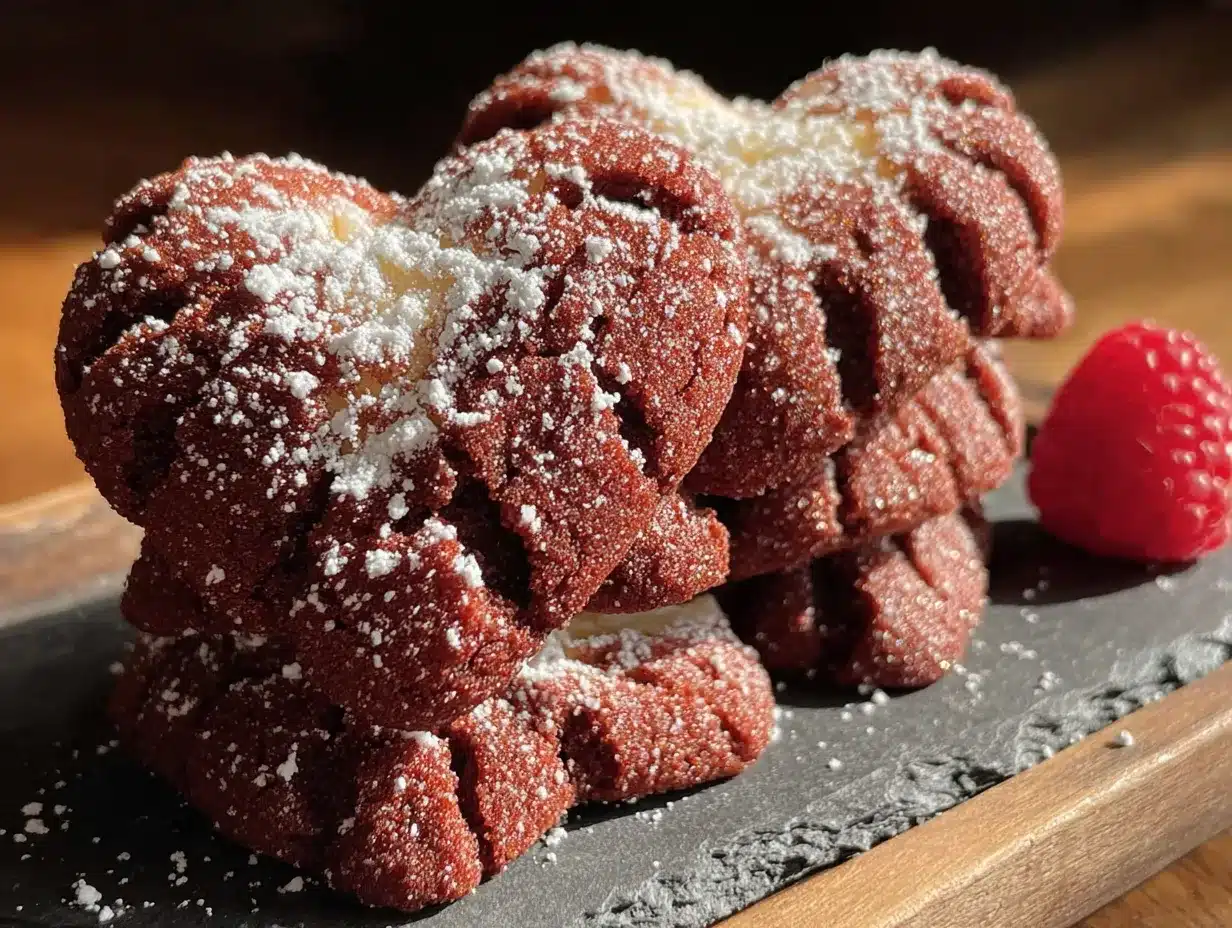
There used to be a tiny bakery tucked inside a converted gas station on the corner of Maple and Third, run by a woman named Gloria who wore flour-dusted aprons and called everyone “sugar.” When she retired last spring and the place became a vape shop, I genuinely mourned. Not just for the loss of a neighborhood fixture, but for her red velvet crinkle cookies — those impossibly soft, crackled little hearts she only made for two weeks around Valentine’s Day. After eleven tries — including one batch that looked like sad, flat hamburger patties — I finally cracked the code. And let me tell you, my kids have declared these “better than Gloria’s,” which is the highest praise I’ve ever gotten in this kitchen.
The secret, honestly, is a combination of things I learned the hard way. Too much cocoa powder and they turn dry. Not enough chilling time and the cracks don’t form properly. But when you get it right? These cookies are everything — tender, fudgy, with that signature red velvet tang and a snowy powdered sugar coating that makes them look like little love notes. My daughter asked if we could make them for her entire class, and my son — who normally bypasses anything red that isn’t ketchup — ate three before I could get them onto the cooling rack. Maybe you’ve been there, searching for that one recipe that makes everyone at the table happy without breaking the bank. This is that recipe.
Why You’ll Love This Recipe
Let’s be real — finding a cookie recipe that checks every box for both kids and adults feels like winning the lottery. These red velvet heart crinkle cookies do exactly that, and I’ve tested them enough times to stake my reputation on it.
- Budget-Friendly Ingredients — Everything comes from the regular grocery store, and you probably already have most of it in your pantry. No specialty extracts or hard-to-find cocoa powders here.
- Kid-Approved Through Rigorous Testing — My kids have been my official taste testers through all eleven attempts. The final version got two thumbs up and requests for “the whole batch for my lunchbox.”
- Perfect for Valentine’s Day or Anytime — The heart shape makes them special for February 14th, but honestly? We’ve made them for birthday parties, bake sales, and random Tuesday afternoons when someone needed cheering up.
- Freezes Beautifully — Make a double batch and stash some in the freezer. They thaw in about 15 minutes, which means you’re never more than a quarter-hour away from a warm, powdered-sugar-dusted cookie.
- That Texture Though — The outside is slightly crisp from the powdered sugar coating, while the inside stays soft and almost brownie-like. It’s the kind of contrast that makes you close your eyes after the first bite.
What sets this recipe apart from the dozens of red velvet cookies floating around the internet is the technique. Most versions skip the vinegar-acid reaction that gives red velvet its signature tang, or they use way too much cocoa powder, making the cookies taste more like chocolate than red velvet. I spent a solid week perfecting the balance — just enough cocoa for depth, but not so much that it overpowers the buttermilk tang. This isn’t just another red velvet cookie. It’s the one that’ll have people asking for the recipe before they finish the first one.
What Ingredients You Will Need
This recipe uses simple, everyday ingredients to create something that tastes like it came from a fancy bakery. Most of these are pantry staples, which means you can whip up a batch whenever the mood strikes — no special trip required.
For the Cookie Dough:
- 1 ½ cups all-purpose flour (spooned and leveled — don’t scoop straight from the bag or you’ll pack in too much)
- ¼ cup unsweetened cocoa powder (I prefer Hershey’s Special Dark for a richer color, but regular works fine)
- 1 teaspoon baking powder (make sure it’s fresh — test by dropping a bit in hot water; it should fizz)
- ¼ teaspoon salt (fine sea salt or table salt, not kosher flakes)
- ½ cup unsalted butter, softened to room temperature (leave it out for about an hour — microwaving makes it too soft)
- ¾ cup granulated sugar (regular white sugar, nothing fancy)
- 1 large egg, room temperature (if you forgot to take it out, place it in a bowl of warm water for 5 minutes)
- 2 teaspoons vanilla extract (pure vanilla, not imitation — it really does make a difference)
- 1 tablespoon buttermilk (or substitute: 1 tablespoon milk + ½ teaspoon white vinegar, let sit 5 minutes)
- 1 teaspoon white vinegar (this reacts with the cocoa to create that classic red velvet tang)
- 1 tablespoon red food coloring (gel food coloring works best — liquid is fine but you might need a bit more)
For the Coating:
- ½ cup powdered sugar (confectioners’ sugar — sift it if it’s clumpy)
A few notes from my testing: The buttermilk and vinegar combination is non-negotiable for authentic red velvet flavor. I tried skipping the vinegar once thinking it wouldn’t matter, and the cookies tasted flat — like chocolate sugar cookies with red dye. Not good. Also, if you’re using natural cocoa powder (which most of us keep in the pantry), the vinegar helps it bloom and deepen in color. Dutch-process cocoa won’t react the same way, so stick with natural unless you’re experienced with substitutions.
For the food coloring, I’ve used both liquid and gel. Gel gives a more vibrant red with less liquid, which means the dough stays thicker. If you only have liquid, reduce the buttermilk by a teaspoon to compensate. And if you’re worried about artificial colors, there are natural red food colorings made from beet juice or vegetable extracts — they work, though the color will be more of a deep pink than true red.
Equipment Needed
You don’t need a professional bakery setup for these cookies. Here’s what I used during my eleven-test journey, including the budget-friendly options that work just as well.
- Large mixing bowl — Any medium-to-large bowl works. I use a glass Pyrex bowl because I can see when the butter and sugar are fully creamed.
- Electric hand mixer or stand mixer — You can cream the butter and sugar by hand with a wooden spoon, but it takes about 8 minutes of solid elbow grease. A hand mixer cuts that to 2 minutes. I use a KitchenAid stand mixer when I’m making double batches.
- Whisk — For combining the dry ingredients. A fork works in a pinch, but a whisk is faster and more thorough.
- Rubber spatula — For scraping down the sides of the bowl and folding in the dry ingredients. The silicone ones are cheap and don’t scratch your bowls.
- Baking sheets — Two standard half-sheet pans work perfectly. If you only have one, let it cool completely between batches or the dough will spread too much on a hot pan.
- Parchment paper or silicone baking mat — Parchment paper is cheaper and disposable. Silicone mats are reusable and give slightly more even browning. Either works.
- Heart-shaped cookie cutter — About 2 inches wide. I found a set of three at the dollar store for, well, a dollar. You can also use a round cutter and call them “crinkle rounds” — they taste the same.
- Cooling rack — Wire racks let air circulate so the cookies don’t get soggy on the bottom. If you don’t have one, transfer the cookies to a clean cutting board after 5 minutes.
- Small fine-mesh sieve — For dusting the powdered sugar evenly. A tea strainer works too, or you can use a fork to sprinkle it manually (it just won’t be as even).
One thing I learned the hard way: don’t use nonstick baking sheets without parchment. The sugar in the dough can stick to nonstick surfaces, and you’ll end up scraping half the cookie off the pan. Parchment paper is your friend here.
Preparation Method
Alright, let’s make some cookies. I’ve broken this down into steps that even my 9-year-old can follow (with supervision, of course). Take your time — rushing is what leads to flat, sad cookies.
- Cream the butter and sugar. In your large mixing bowl, beat the softened butter and granulated sugar together on medium speed until light and fluffy — about 2-3 minutes with an electric mixer. You’re looking for a pale yellow color and a texture that looks like wet sand. Scrape down the sides of the bowl with your rubber spatula halfway through.
- Add the wet ingredients. Beat in the egg, vanilla extract, buttermilk, and white vinegar until well combined. The mixture might look slightly curdled at this point — that’s normal, don’t panic. Add the red food coloring and mix until the color is uniform. If you’re using gel coloring, you might need to scrape the beaters to get all the color incorporated.
- Combine the dry ingredients. In a separate bowl, whisk together the flour, cocoa powder, baking powder, and salt. Make sure there are no lumps — cocoa powder loves to hide clumps that’ll give you bitter pockets in your cookies.
- Mix dry into wet. Gradually add the dry ingredients to the wet mixture, mixing on low speed or folding with your spatula. Stop as soon as the flour disappears — overmixing develops gluten and makes the cookies tough. The dough should be soft, slightly sticky, and a gorgeous deep red color.
- Chill the dough. This step is crucial. Cover the bowl with plastic wrap and refrigerate for at least 2 hours, or up to 24 hours. The dough needs to be firm enough to roll out and cut into shapes. I’ve tried skipping this step exactly once — the cookies spread into red puddles. Don’t be like me. Chill the dough.
- Preheat and prepare. When you’re ready to bake, preheat your oven to 350°F (175°C). Line your baking sheets with parchment paper. Place the powdered sugar in a shallow bowl.
- Roll and cut. Lightly flour your work surface and rolling pin. Roll the chilled dough to about ¼-inch thickness. If the dough cracks at the edges, let it sit at room temperature for 5 minutes to soften slightly. Use your heart-shaped cookie cutter to cut out cookies, re-rolling the scraps as needed. You should get about 24-30 cookies depending on the size of your cutter.
- Coat in powdered sugar. Gently press each cookie shape into the powdered sugar, coating both sides generously. Shake off any excess — you want a nice even coating, not a thick crust. Place the coated cookies on the prepared baking sheets, spacing them about 2 inches apart.
- Bake. Bake for 8-10 minutes. The cookies should look set around the edges but still soft in the center. They’ll continue to set as they cool. The powdered sugar will crack and spread, creating that beautiful crinkle effect. If you bake them until they look fully done, they’ll be overbaked and dry.
- Cool. Let the cookies rest on the baking sheet for 5 minutes — this is important because they’re fragile right out of the oven. Then transfer them to a wire rack to cool completely. The crinkles will become more pronounced as they cool.
A few sensory cues to watch for: The dough should feel cool and slightly firm when you take it out of the fridge, like cold Play-Doh. When you press a coated cookie before baking, your finger should leave a slight indent but not stick. The baked cookies should smell faintly of chocolate and vanilla, and the edges should look slightly cracked and matte while the centers still look a bit shiny.
Cooking Tips & Techniques
After making these cookies more times than I care to count, I’ve collected a few tricks that make the difference between good cookies and “please make these for my birthday” cookies.
Don’t skip the chilling time. I know, I know — you’re impatient, the kids are hungry, and the dough looks fine. But warm dough spreads. Chilled dough holds its shape. The crinkle effect happens because the cold dough expands faster than the powdered sugar coating can stretch, causing those beautiful cracks. Warm dough just melts into a flat, crack-less disc. Trust me on this one — I learned it the hard way during attempt number four, which yielded cookies that looked like red tortillas.
Use a light hand with the rolling pin. If you press too hard, the dough becomes thin and the cookies bake up crispy instead of soft. Aim for an even ¼-inch thickness. I use wooden guide rings on my rolling pin, but you can also place two popsicle sticks on either side of the dough as a thickness guide. It sounds silly, but it works.
Work in batches. Keep half the dough in the fridge while you roll and cut the other half. The dough warms up quickly from the heat of your hands and the rolling process. If it starts getting sticky, pop it back in the fridge for 15 minutes. I keep a small bowl of flour nearby to dust my hands and the rolling pin as needed.
Powdered sugar timing matters. Coat the cookies right before baking, not earlier. If the powdered sugar sits on the dough for too long, it absorbs moisture from the dough and dissolves, leaving you with sticky, blotchy cookies instead of snowy white ones. I coat one batch, bake it, then coat and bake the next batch.
The overbaking trap. These cookies look underdone when you pull them out of the oven. That’s the goal. They continue to bake on the hot pan during the 5-minute rest. If you wait until they look done, they’ll be dry and crumbly. The centers should still look slightly soft and puffy when you take them out.
Variations & Adaptations
One of the best things about this recipe is how flexible it is. Here are some variations I’ve tried and loved.
Gluten-Free Version: Substitute the all-purpose flour with a 1:1 gluten-free baking flour blend (I use Bob’s Red Mill). The dough will be slightly more delicate, so handle it gently and chill it for an extra 30 minutes. The texture won’t be exactly the same — slightly more cake-like than fudgy — but they’re still delicious. My gluten-sensitive friend couldn’t tell the difference until I told her.
Dairy-Free Adaptation: Use vegan butter (I like Earth Balance) and replace the buttermilk with 1 tablespoon of unsweetened almond milk mixed with ½ teaspoon of vinegar. The cookies will be a tiny bit less tender, but the flavor holds up beautifully. My daughter’s friend with a dairy allergy ate six of them at the school Valentine’s party.
Different Shapes: Who says hearts are only for February? Use star cutters for the Fourth of July, circles for everyday cookies, or gingerbread men for a red velvet twist on Christmas. The crinkle effect works with any shape, though simple shapes are easier to coat evenly. I made a batch of red velvet Christmas trees last December and they were a hit.
Extra Chocolatey: Fold in ½ cup of mini chocolate chips after mixing the dough. They add little pockets of melted chocolate that make the cookies even more decadent. Just be careful not to overmix — fold them in by hand with your spatula.
Natural Coloring Option: If you want to avoid artificial food coloring, use 2 tablespoons of beet powder mixed with 1 tablespoon of water to create a natural red paste. The color will be more of a deep pinkish-red, and the cookies will have a subtle earthy sweetness. They won’t be as vibrant as the classic version, but they’re still pretty and taste great.
Serving & Storage Suggestions
These cookies are at their absolute best the day they’re made, when the outside is still slightly crisp and the inside is soft and tender. But let’s be realistic — you’re probably not eating all 30 cookies in one sitting. Here’s how to keep them fresh.
Serving: Serve at room temperature with a cold glass of milk or a warm cup of coffee. For an extra-special presentation, arrange them on a heart-shaped platter or in a decorative tin lined with parchment paper. They make fantastic lunchbox surprises — my kids say they’re the best thing to find tucked next to their sandwich.
Room Temperature Storage: Store in an airtight container at room temperature for up to 5 days. Place a piece of bread in the container — it absorbs excess moisture and keeps the cookies soft. Replace the bread every other day. I learned this trick from my grandmother, and it works like magic.
Freezer Instructions: These cookies freeze beautifully for up to 3 months. Place them in a single layer on a baking sheet and freeze until solid (about 1 hour), then transfer to a freezer-safe bag or container. To thaw, let them sit at room temperature for 15-20 minutes. You can also freeze the unbaked, coated cookie dough — just arrange the coated hearts on a baking sheet, freeze until solid, then transfer to a freezer bag. Bake from frozen, adding 2-3 minutes to the baking time.
Reheating: If you like your cookies warm, pop them in a 300°F (150°C) oven for 3-4 minutes. Don’t use the microwave — it makes them rubbery. The oven brings back that slightly crisp exterior and soft, warm center.
One thing I love about these cookies is how the flavor develops over time. Day one, they’re bright and tangy from the buttermilk and vinegar. By day three, the flavors have mellowed and melded together, and the cookies are even softer. They rarely last that long in my house, though.
Nutritional Information & Benefits
Let’s be honest — these are cookies, not health food. But knowing what’s in them helps you enjoy them mindfully.
Per cookie (based on 30 cookies): Approximately 95 calories, 4g fat, 14g carbohydrates, 1g protein, 8g sugar. These values will vary based on exact ingredients and cookie size.
The cocoa powder provides a small amount of antioxidants and flavonoids, which are the same compounds found in dark chocolate that support heart health. The buttermilk adds calcium and probiotics (if using real cultured buttermilk), though the baking process kills most of the live cultures. The butter provides vitamin A and healthy fats that help your body absorb fat-soluble vitamins.
Dietary Considerations: These cookies contain gluten, dairy, and eggs. See the variations section for gluten-free and dairy-free adaptations. They are nut-free as written, making them a safe choice for school bake sales and parties where nut allergies are a concern. The red food coloring is artificial — if you’re sensitive to food dyes, try the beet powder option mentioned above.
From a wellness perspective, I believe in the power of treats made with love. These cookies bring joy to my family, and that has value beyond the nutritional numbers. One cookie with a glass of milk after school? That’s a moment of connection, and you can’t measure that in calories.
Conclusion
These red velvet heart-shaped crinkle cookies are more than just a Valentine’s Day treat. They’re the kind of recipe that becomes a family tradition — the one your kids will remember making with you, the one they’ll request for birthdays and holidays, the one that makes people smile the moment they see that snowy powdered sugar coating and those beautiful red cracks.
I’ve poured my heart into perfecting this recipe, and I’m so excited for you to try it. Don’t be afraid to make it your own — swap the shapes, adjust the color, experiment with add-ins. That’s the beauty of home baking. You get to put your own stamp on every batch.
When you make these cookies — and I hope you do — I’d love to hear about it. Drop a comment below and tell me how they turned out, what shapes you used, or how many your kids managed to sneak before they cooled. And if you have a favorite cookie memory, share that too. This little corner of the internet is better when we’re all baking together.
Now go preheat your oven. Those cookies aren’t going to bake themselves!
Frequently Asked Questions
Can I make the dough ahead of time?
Absolutely. The dough can be refrigerated for up to 24 hours before rolling and baking. In fact, letting it rest overnight often improves the flavor and makes the dough easier to handle. Just wrap it tightly in plastic wrap so it doesn’t dry out or pick up fridge odors.
My cookies didn’t crack — what went wrong?
This usually happens for one of three reasons: the dough wasn’t chilled enough, the oven wasn’t hot enough, or the powdered sugar coating was too thick. Make sure your dough is thoroughly chilled (at least 2 hours), your oven is fully preheated to 350°F, and you’re coating the cookies with a thin, even layer of powdered sugar — not a thick crust.
Can I use a different type of cocoa powder?
Natural unsweetened cocoa powder works best because it reacts with the vinegar and buttermilk to create the classic red velvet tang. Dutch-process cocoa has been alkalized and won’t react the same way, which can affect both the flavor and the rise. If you only have Dutch-process, add an extra ¼ teaspoon of baking powder to help with lift.
How do I get a more vibrant red color?
Use gel food coloring instead of liquid — it’s more concentrated and won’t add extra moisture to the dough. Start with 1 tablespoon and add more drop by drop until you reach your desired shade. Some bakers also add a tiny pinch of baking soda to help the red color develop during baking, but be careful — too much will affect the flavor.
Can I make these cookies without a cookie cutter?
Yes! Roll the dough into 1-inch balls instead of rolling it out, then coat them in powdered sugar and bake. They’ll spread into round crinkle cookies — no heart shape, but just as delicious. If you go this route, skip the chilling step after rolling and bake the balls immediately after coating them in sugar.
Pin This Recipe!

Kid-Approved Red Velvet Heart Crinkle Cookies

These impossibly soft, fudgy red velvet crinkle cookies have a snowy powdered sugar coating and a signature tang. Perfect for Valentine’s Day or any day, they’re kid-approved and made with simple, budget-friendly ingredients.
- Prep Time: 15 minutes
- Cook Time: 10 minutes
- Total Time: 2 hours 25 minutes (includes 2 hours chilling)
- Yield: 24-30 cookies 1x
- Category: Dessert
- Cuisine: American
Ingredients
- 1 ½ cups all-purpose flour (spooned and leveled)
- ¼ cup unsweetened cocoa powder
- 1 teaspoon baking powder
- ¼ teaspoon salt (fine sea salt or table salt)
- ½ cup unsalted butter, softened to room temperature
- ¾ cup granulated sugar
- 1 large egg, room temperature
- 2 teaspoons vanilla extract (pure vanilla)
- 1 tablespoon buttermilk
- 1 teaspoon white vinegar
- 1 tablespoon red food coloring (gel preferred)
- ½ cup powdered sugar (for coating)
Instructions
- Cream the butter and sugar: In a large mixing bowl, beat the softened butter and granulated sugar together on medium speed until light and fluffy, about 2-3 minutes. Scrape down the sides halfway through.
- Add the wet ingredients: Beat in the egg, vanilla extract, buttermilk, and white vinegar until well combined. The mixture may look slightly curdled. Add the red food coloring and mix until uniform.
- Combine the dry ingredients: In a separate bowl, whisk together the flour, cocoa powder, baking powder, and salt until no lumps remain.
- Mix dry into wet: Gradually add the dry ingredients to the wet mixture, mixing on low speed or folding with a spatula until just combined. Do not overmix.
- Chill the dough: Cover the bowl with plastic wrap and refrigerate for at least 2 hours, or up to 24 hours.
- Preheat and prepare: Preheat oven to 350°F (175°C). Line baking sheets with parchment paper. Place powdered sugar in a shallow bowl.
- Roll and cut: Lightly flour your work surface and rolling pin. Roll the chilled dough to about ¼-inch thickness. Use a heart-shaped cookie cutter (about 2 inches) to cut out cookies, re-rolling scraps as needed.
- Coat in powdered sugar: Gently press each cookie shape into the powdered sugar, coating both sides generously. Shake off excess. Place on prepared baking sheets, spacing about 2 inches apart.
- Bake: Bake for 8-10 minutes. The cookies should look set around the edges but still soft in the center.
- Cool: Let the cookies rest on the baking sheet for 5 minutes, then transfer to a wire rack to cool completely.
Notes
Chilling the dough is crucial for proper crinkle effect. Do not overbake; cookies should look underdone when removed from oven. For best results, coat cookies in powdered sugar right before baking. The dough can be refrigerated for up to 24 hours.
Nutrition
- Serving Size: 1 cookie
- Calories: 95
- Sugar: 8
- Sodium: 55
- Fat: 4
- Saturated Fat: 2.5
- Carbohydrates: 14
- Fiber: 0.5
- Protein: 1
Keywords: red velvet cookies, crinkle cookies, heart cookies, Valentine's Day cookies, kid-friendly cookies, easy cookie recipe


