It was 11:47 PM on a random Tuesday in early October, and I had a very specific, very weird craving. I wanted buffalo chicken dip—that creamy, spicy, tangy bowl of game-day glory—but I also wanted it to look like a tiny pumpkin. I didn’t have any of the usual party platters or fancy serving bowls, but I had a bag of mini sweet peppers from the farmers’ market, a block of cream cheese that was about to expire, and the half-baked idea that if I stuffed them just right, they’d look like little jack-o’-lanterns. Honestly, I was half-asleep and running on caffeine and stubbornness, but something about the late hour made the idea feel like genius rather than nonsense.
I stood there in my quiet kitchen, the only light coming from the open fridge, and started cutting the tops off those little peppers. My dog watched me from his bed, probably wondering why I wasn’t in bed myself. I scraped out the seeds with a tiny spoon—my hands were clumsy, and I dropped one on the floor, which the dog happily took care of. But as I mixed the cream cheese with the shredded chicken and a splash of hot sauce (the mild stuff, obviously, because my kids would be eating these tomorrow), I started to feel that familiar late-night thrill. This was going to work. Maybe you’ve been there—that moment when you’re too tired to overthink, so you just trust your instincts and see what happens.
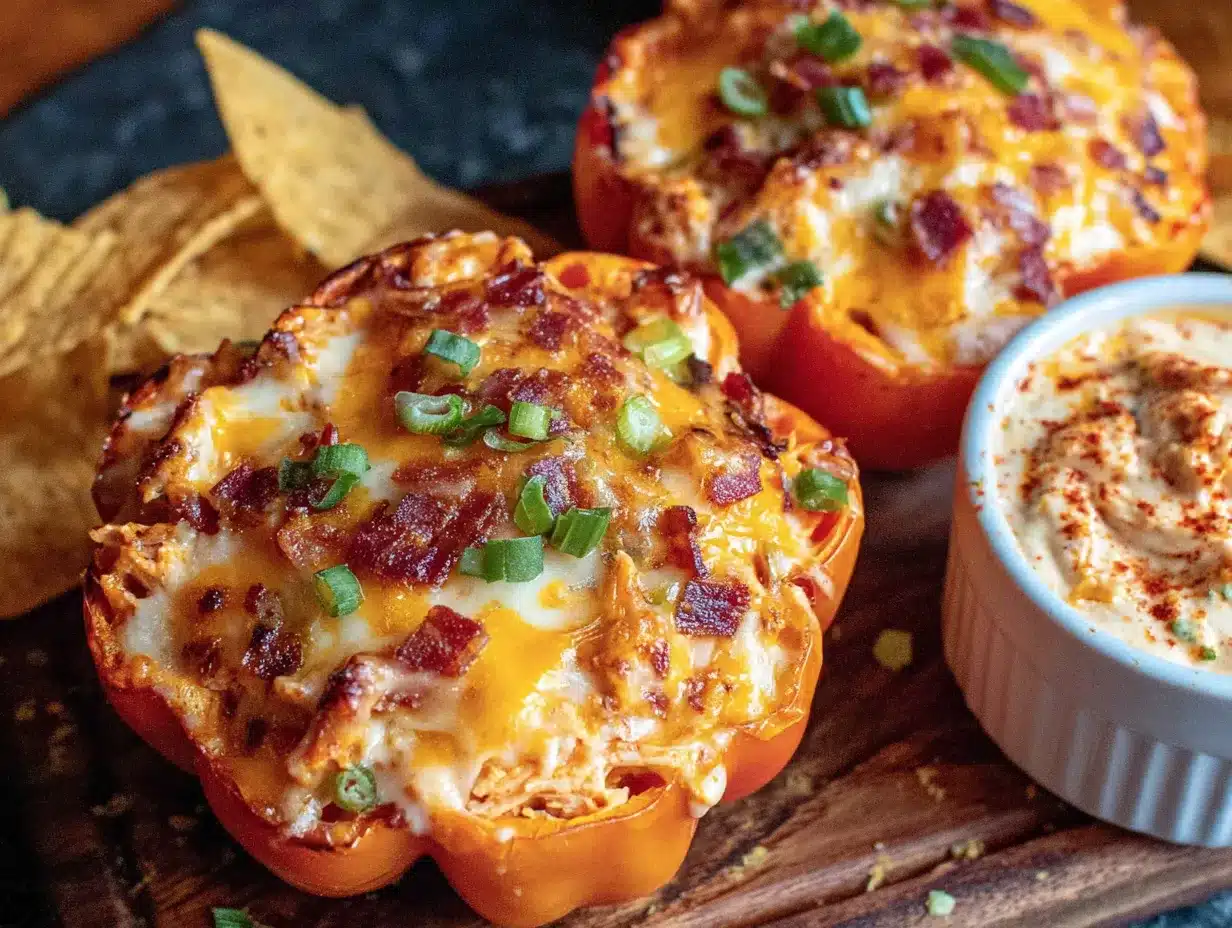
By the time I pulled the tray out of the oven, the peppers had softened into these adorable little orange cups, the cheese was bubbly, and the whole kitchen smelled like a cozy fall party. I ate one standing at the counter, and let me tell you, it was better than any dip I’d ever made in a bowl. The sweetness of the pepper balanced the heat, and the creamy filling was just perfect. That’s the thing about late-night cooking—you’re not trying to impress anyone, so you end up impressing yourself. And that’s why I keep making these Kid-Friendly Buffalo Chicken Dip Stuffed Peppers for Halloween every year. They’re not just cute; they’re genuinely, unexpectedly delicious.
Why You’ll Love This Recipe
I’ve tested this recipe about seven times now—not because it’s hard, but because I kept tweaking it to make sure it was absolutely perfect for families. As a mom who’s been cooking on a budget for over a decade, I know the struggle of finding Halloween snacks that are both festive and actually filling. These little peppers check every box.
- Quick & Easy: From start to table in under 30 minutes. Seriously, you can make these after school pickup and still have time to carve pumpkins.
- Simple Ingredients: Everything comes from your regular grocery run. No fancy stores, no weird ingredients you’ll never use again.
- Perfect for Halloween Parties: They look like mini jack-o’-lanterns, which means zero extra decoration needed. Just arrange them on a plate and watch the kids light up.
- Crowd-Pleaser: My kids are picky eaters—the kind who inspect their food before eating it—and they devoured these. The buffalo flavor is mild enough for little taste buds but still has that grown-up appeal.
- Unbelievably Delicious: The combination of creamy, tangy filling with sweet roasted pepper is honestly next-level. It’s comfort food that feels a little bit fancy.
What makes this recipe different from every other buffalo chicken dip out there? It’s the pepper itself. Instead of serving dip with chips or veggies on the side, you’re turning the pepper into an edible bowl. The sweetness of the roasted mini pepper acts as a natural counterbalance to the spicy, creamy filling. It’s not just another version of the same old recipe—it’s a complete reimagining. And because it’s baked, the flavors meld together in a way that stovetop dips just can’t match.
This is the kind of recipe that makes you close your eyes after the first bite. It’s comfort food reimagined—healthier, faster, but with the same soul-soothing satisfaction. Perfect for impressing other parents at the Halloween block party without spending hours in the kitchen, or turning a simple weeknight dinner into something the kids will actually remember.
What Ingredients You Will Need
This recipe uses simple, wholesome ingredients to deliver bold flavor and satisfying texture without the fuss. Most of these are pantry staples or easy to find at any grocery store, which is exactly what you need when you’re feeding a family on a sensible budget.
For the Filling
- 2 cups cooked, shredded chicken (rotisserie chicken works great—I grab one from Costco and shred it while watching TV the night before)
- 8 ounces cream cheese, softened (adds that creamy richness; let it sit out for 20 minutes so it mixes smoothly)
- 1/2 cup buffalo wing sauce (I use Frank’s RedHot Original—it’s got the perfect balance of heat and tang, and it’s mild enough for kids if you don’t go overboard)
- 1/2 cup shredded cheddar cheese (sharp cheddar gives the best flavor, but mild works too if your kids are sensitive)
- 1/4 cup ranch dressing (helps cool down the heat and adds creaminess; use dairy-free ranch if needed)
- 1/4 cup sour cream (optional, but I love the extra tang it brings)
For the Peppers
- 12 mini sweet peppers (look for ones that are round and sturdy—they’ll hold their shape better during baking)
- 1 tablespoon olive oil (for coating the peppers before baking)
- Salt and pepper to taste
For Topping (Optional but Recommended)
- Additional shredded cheddar cheese (for that golden, bubbly top)
- Chopped green onions or chives (adds color and freshness)
- Blue cheese crumbles (if you’re feeding adults who love that pungent kick)
Let me share a quick tip about the peppers: not all mini sweet peppers are created equal. I’ve found that the ones from the farmers’ market or the organic section tend to be sturdier and more uniform in size. The bagged ones from the regular produce aisle work fine, but try to pick out the ones that are more round than elongated—they look more like pumpkins and hold more filling. Also, if you have a Trader Joe’s nearby, their mini sweet peppers are consistently great for this recipe.
For the chicken, I really recommend using rotisserie chicken. It’s already seasoned and cooked perfectly, and it saves you a solid 20 minutes of cooking and shredding time. If you’re cooking chicken from scratch, poach two boneless, skinless chicken breasts in simmering water for about 15 minutes, then shred them with two forks. It’s easy, but it does add a step. On busy days, I just grab the rotisserie chicken—it costs about the same as raw chicken and saves so much effort.
Equipment Needed
You don’t need a lot of fancy equipment for this recipe, which is exactly how I like it. Here’s what you’ll need:
- Baking sheet or casserole dish (a 9×13-inch baking dish works perfectly, or a rimmed baking sheet if you want them to brown a bit more)
- Mixing bowl (medium-sized, for combining the filling)
- Small spoon or melon baller (for scooping out the pepper seeds—a regular teaspoon works fine, but a melon baller makes it faster)
- Sharp knife (for cutting the tops off the peppers)
- Cutting board
- Fork or electric mixer (for shredding the chicken and mixing the cream cheese until smooth)
If you don’t have a melon baller, don’t worry—I used a regular teaspoon for years before I found one at a thrift store for a dollar. The key is just getting those seeds out without tearing the pepper walls. Also, if you’re making these for a party and want to keep them warm, a slow cooker on the “warm” setting works great. Just arrange the stuffed peppers in the slow cooker after baking and they’ll stay perfect for hours.
Preparation Method
Let me walk you through this step by step. I’ve made these so many times that I’ve got the process down to a science, and I’ll share all my little tricks along the way.
- Preheat your oven to 375°F (190°C). While it’s heating up, line your baking sheet with parchment paper or aluminum foil for easy cleanup. Trust me on this—the cheese that bubbles over can be a pain to scrub off.
- Prepare the peppers. Wash the mini sweet peppers and pat them dry. Using a sharp knife, cut off the top quarter of each pepper—this is where the “lid” would be if they were actual jack-o’-lanterns. Gently scoop out the seeds and membranes with your small spoon or melon baller. Be careful not to tear the pepper walls, especially near the bottom. If you do accidentally tear one, don’t panic—just use that pepper for the filling and serve it on the side. I’ve done this more times than I’d like to admit, and it’s never ruined the whole batch.
- Make the filling. In a medium mixing bowl, combine the softened cream cheese, buffalo wing sauce, ranch dressing, and sour cream (if using). Mix until smooth and well combined. I use a fork for this, but an electric mixer on low speed works faster if you’re in a hurry. Fold in the shredded chicken and 1/2 cup of shredded cheddar cheese. Stir until everything is evenly distributed. The mixture should be thick and creamy—if it seems too stiff, add a tablespoon of milk or extra ranch dressing.
- Stuff the peppers. Using a small spoon, fill each pepper with the chicken mixture. Pack it in gently but firmly—you want the filling to reach the top but not overflow. Don’t overstuff, or the filling will spill out during baking. I usually aim for about 2 tablespoons of filling per pepper, depending on the size. Arrange the stuffed peppers on your prepared baking sheet, standing upright. If some of them wobble, you can nestle them together so they support each other.
- Add the topping. Sprinkle the remaining shredded cheddar cheese over the tops of the stuffed peppers. This is optional, but it makes them look so much more appetizing—that golden, bubbly cheese crust is what gets everyone excited. If you’re using green onions or blue cheese crumbles, wait until after baking to add them.
- Bake. Place the baking sheet in the preheated oven and bake for 15-18 minutes, or until the peppers are tender and the cheese is melted and bubbly. The peppers should be slightly wrinkled and soft to the touch, but not collapsing. If you want a bit more browning on the cheese, switch the oven to broil for the last 1-2 minutes—but watch them closely, because broiling can go from perfect to burnt in seconds.
- Rest and serve. Let the stuffed peppers cool on the baking sheet for 5 minutes before serving. This resting time is important—the filling will be molten hot straight out of the oven, and letting it cool slightly prevents burned mouths and helps the flavors settle. Arrange them on a platter with the cut side facing up, and if you want to get extra festive, you can draw little jack-o’-lantern faces on the peppers with a toothpick dipped in black food coloring or black sesame seeds.
One thing I learned the hard way: don’t skip the step of softening the cream cheese. I’ve made these with cold cream cheese straight from the fridge, and the filling ends up lumpy and uneven. It still tastes fine, but it doesn’t have that smooth, luxurious texture that makes this recipe special. Let the cream cheese sit on the counter for at least 20 minutes, or if you’re in a rush, microwave it for 10-15 seconds on low power.
Cooking Tips & Techniques
After making these Kid-Friendly Buffalo Chicken Dip Stuffed Peppers for Halloween about a dozen times, I’ve collected a few tricks that make the process smoother and the results better. Let me share the ones that matter most.
Don’t overcook the peppers. This was my biggest mistake the first few times. I thought the peppers needed to be super soft like roasted bell peppers, but they actually taste best when they still have a bit of bite. You want them tender enough to eat easily, but firm enough to hold their shape. When they’re done, they should be slightly wrinkled and the cheese should be melted, but the peppers shouldn’t be collapsing. Aim for 15-18 minutes at 375°F, and check them at the 15-minute mark.
Make the filling ahead of time. This is a game-changer for party prep. You can mix the filling up to two days in advance and store it in the refrigerator. When you’re ready to serve, just stuff the peppers and bake. The filling actually gets more flavorful as it sits—the buffalo sauce and ranch dressing meld together beautifully overnight. I’ve even frozen the filling (without the peppers) for up to a month, and it thaws perfectly.
Use a piping bag for neat filling. If you’re making these for a Halloween party and want them to look extra polished, spoon the filling into a piping bag or a zip-top bag with the corner snipped off. Then pipe the filling into the peppers—it’s faster and much cleaner than using a spoon. I learned this trick after making about 30 of these for my daughter’s class party, and it saved me at least 15 minutes.
Balance the heat for kids. The key to making these kid-friendly is using a mild buffalo sauce and balancing it with plenty of cream cheese and ranch dressing. Frank’s RedHot Original is my go-to because it has that classic buffalo flavor without being overwhelming. If your kids are really sensitive to spice, you can cut the buffalo sauce with extra ranch dressing or even use a mix of buffalo sauce and melted butter—the butter mellows out the heat significantly. I’ve also made a version using just ranch dressing and a pinch of cayenne pepper for a very mild, kid-approved version.
Variations & Adaptations
One of the best things about this recipe is how flexible it is. I’ve tried several variations over the years, and here are my favorites:
Dairy-Free Version: Use dairy-free cream cheese (I like Kite Hill or Violife), dairy-free shredded cheese, and a dairy-free ranch dressing. The texture will be slightly different—dairy-free cream cheese doesn’t get as creamy—but the flavor is still fantastic. I made this for a friend with a dairy allergy, and she said it was the best Halloween snack she’d had in years.
Extra Spicy Version for Adults: If you’re making these for a grown-up gathering, use a hot buffalo sauce like Frank’s RedHot Extra Hot, add a teaspoon of cayenne pepper to the filling, and top with blue cheese crumbles and fresh jalapeño slices. The combination of spicy, tangy, and creamy is absolutely addictive. I served these at a Halloween party last year, and the adults kept coming back for more while the kids happily munched on the milder version.
Vegetarian Option: Swap the shredded chicken for canned or cooked chickpeas (mashed slightly) or shredded jackfruit. The texture won’t be exactly the same, but the creamy, spicy filling is so flavorful that you won’t miss the meat. I’ve also used crumbled tofu seasoned with poultry seasoning, and it worked surprisingly well. For a truly plant-based version, use vegan cream cheese and vegan ranch dressing.
Air Fryer Method: If you want these done even faster, you can cook them in an air fryer. Preheat the air fryer to 350°F (175°C), arrange the stuffed peppers in the basket in a single layer, and cook for 8-10 minutes. The peppers get a bit more charred and crispy, which adds a nice smoky flavor. Just be careful not to overcrowd the basket—work in batches if needed.
Make It a Meal: Serve these stuffed peppers with a side of rice or quinoa, a simple green salad, and extra ranch dressing for dipping. They’re hearty enough to be a main course, especially if you use larger peppers. I’ve done this for a casual weeknight dinner, and my family loved it—it felt like a fun twist on a classic comfort food meal.
Serving & Storage Suggestions
These Kid-Friendly Buffalo Chicken Dip Stuffed Peppers for Halloween are best served warm, straight from the oven. The peppers are tender, the filling is creamy and melty, and the cheese on top is perfectly bubbly. Arrange them on a platter with the cut side facing up so everyone can see the filling. If you want to get extra festive for Halloween, you can serve them on a black platter or a plate decorated with spider webs made from sour cream or ranch dressing.
For a party, I like to set up a dipping station with extra ranch dressing, blue cheese dressing, and celery sticks. The crunch of the celery is a perfect contrast to the creamy filling. You can also serve them alongside other Halloween-themed snacks like mummy hot dogs or ghost-shaped cheese crackers. And if you’re feeling really creative, arrange the peppers in the shape of a pumpkin on the platter—use a small bowl of ranch dressing in the center as the stem.
Storage: Leftover stuffed peppers can be stored in an airtight container in the refrigerator for up to 4 days. The peppers will soften a bit more as they sit, but the flavor actually improves—the buffalo sauce and ranch dressing continue to meld together. To reheat, place them in a 350°F oven for 8-10 minutes, or microwave them for 30-60 seconds. If you’re reheating a large batch, the oven method is better because it helps the peppers retain their texture.
Freezing: You can freeze the stuffed peppers either before or after baking. To freeze before baking, assemble the peppers, place them on a baking sheet in the freezer until solid, then transfer to a freezer-safe bag or container. They’ll keep for up to 3 months. To bake from frozen, add 5-10 minutes to the baking time. To freeze after baking, let them cool completely, then wrap each pepper individually in plastic wrap and place in a freezer bag. Reheat in the oven at 350°F for 10-12 minutes.
One thing I love about this recipe is that the flavors get even better after a day in the fridge. The peppers absorb some of the creamy filling, and the buffalo sauce mellows into a more rounded heat. If you’re making these for a party, you can absolutely make them a day ahead and reheat them just before serving—your guests won’t know the difference, and you’ll save yourself a lot of stress on the day of the event.
Nutritional Information & Benefits
Each stuffed pepper (based on the recipe as written, using 12 peppers) contains approximately:
- Calories: 145
- Protein: 11g
- Fat: 9g
- Carbohydrates: 4g
- Fiber: 1g
- Sugar: 2g
These numbers will vary depending on the specific brands you use and whether you add the optional toppings. But overall, these are a relatively balanced snack or light meal—they’ve got protein from the chicken and cheese, healthy fats from the dairy, and fiber from the peppers.
The mini sweet peppers themselves are a great source of vitamin C—one pepper provides about 50% of your daily needs. They’re also rich in vitamin A and antioxidants, which support immune health and eye health. For a Halloween treat that’s usually dominated by candy and sugar, these stuffed peppers are a welcome nutritional boost. And because they’re baked instead of fried, you’re avoiding the extra oil and calories that come with traditional game-day snacks.
If you’re watching your sodium intake, you can use low-sodium buffalo sauce and reduced-fat cream cheese to cut down on both salt and fat. I’ve also made these with Greek yogurt in place of the sour cream for an extra protein boost. The texture is slightly tangier, but it’s still delicious and kid-approved.
Conclusion
These Kid-Friendly Buffalo Chicken Dip Stuffed Peppers for Halloween are the kind of recipe that makes you feel like a kitchen genius without actually having to do much work. They’re cute enough to impress at a party, simple enough to make on a busy weeknight, and delicious enough that everyone—from the pickiest kid to the most discerning adult—will go back for seconds. Honestly, I make these year-round now, not just for Halloween. They’ve become a staple in my house for game days, birthday parties, and even lazy Sunday dinners when I want something that feels special without a lot of effort.
I hope you give these a try and make them your own. Maybe you’ll add extra spice, swap in a different cheese, or serve them with a dipping sauce your family loves. That’s the beauty of this recipe—it’s a starting point, not a strict rulebook. And if you come up with a variation that blows your mind, I’d love to hear about it. Drop a comment below and let me know how yours turned out, or tag me in your photos on social media. There’s nothing that makes my day quite like seeing someone else fall in love with a recipe I created in my kitchen at 11:47 PM on a random Tuesday.
Happy Halloween, and happy cooking!
Frequently Asked Questions
Can I make these stuffed peppers ahead of time for a party?
Absolutely! You can assemble the stuffed peppers up to 24 hours in advance and keep them covered in the refrigerator. When you’re ready to serve, just pop them in the oven and add 5 minutes to the baking time since they’ll be starting from cold. This is my go-to strategy for Halloween parties—I do all the prep work the night before, so on the day of the party, I just have to bake and serve.
What if my kids don’t like spicy food?
No problem at all! The recipe as written is already quite mild, but you can make it even more kid-friendly by using just 1/4 cup of buffalo sauce and increasing the ranch dressing to 1/2 cup. You can also use a mild buffalo sauce or even mix the buffalo sauce with melted butter (equal parts) to mellow out the heat. I’ve served these to toddlers who happily ate them without any issues.
Can I use regular bell peppers instead of mini sweet peppers?
Yes, you can! If you use regular bell peppers, cut them into quarters or halves (depending on size) and remove the seeds and membranes. The baking time will be slightly longer—about 20-25 minutes—since the pepper walls are thicker. You’ll also need to increase the filling amount, so I recommend doubling the recipe if you’re using large bell peppers. The presentation won’t be as cute for Halloween, but the flavor will still be fantastic.
How do I prevent the peppers from tipping over during baking?
This is a common issue, but there’s an easy fix. If your peppers are wobbly, you can nestle them together on the baking sheet so they support each other. Alternatively, you can place them in a muffin tin—the cups will hold them upright perfectly. I use a mini muffin tin for smaller peppers and a regular muffin tin for larger ones. Just make sure to grease the tin lightly so the peppers don’t stick.
Can I use canned chicken instead of cooked shredded chicken?
You can, but I don’t recommend it. Canned chicken has a different texture—it’s softer and more mushy—and it doesn’t shred as nicely as rotisserie or poached chicken. The flavor is also less pronounced. If you’re in a pinch and canned chicken is all you have, drain it well and flake it with a fork before mixing it into the filling. But honestly, grabbing a rotisserie chicken from the store is worth the minimal extra effort.
Pin This Recipe!

Kid-Friendly Buffalo Chicken Dip Stuffed Peppers for Halloween

These adorable mini sweet peppers are stuffed with a creamy, spicy buffalo chicken dip and baked until bubbly. They look like tiny jack-o’-lanterns, making them the perfect festive and delicious Halloween snack or appetizer.
- Prep Time: 15 minutes
- Cook Time: 18 minutes
- Total Time: 33 minutes
- Yield: 12 servings 1x
- Category: Appetizer
- Cuisine: American
Ingredients
- 2 cups cooked, shredded chicken (rotisserie chicken works great)
- 8 ounces cream cheese, softened
- 1/2 cup buffalo wing sauce (e.g., Frank’s RedHot Original)
- 1/2 cup shredded cheddar cheese
- 1/4 cup ranch dressing
- 1/4 cup sour cream (optional)
- 12 mini sweet peppers
- 1 tablespoon olive oil
- Salt and pepper to taste
- Additional shredded cheddar cheese for topping (optional)
- Chopped green onions or chives for garnish (optional)
- Blue cheese crumbles for topping (optional)
Instructions
- Preheat your oven to 375°F (190°C). Line a baking sheet with parchment paper or aluminum foil.
- Wash and dry the mini sweet peppers. Cut off the top quarter of each pepper and gently scoop out the seeds and membranes with a small spoon or melon baller.
- In a medium mixing bowl, combine the softened cream cheese, buffalo wing sauce, ranch dressing, and sour cream (if using). Mix until smooth. Fold in the shredded chicken and 1/2 cup of shredded cheddar cheese until evenly distributed.
- Using a small spoon, fill each pepper with the chicken mixture, packing gently but firmly. Arrange the stuffed peppers upright on the prepared baking sheet.
- Sprinkle the remaining shredded cheddar cheese over the tops of the stuffed peppers (optional).
- Bake for 15-18 minutes, or until the peppers are tender and the cheese is melted and bubbly. For extra browning, broil for the last 1-2 minutes, watching closely.
- Let the stuffed peppers cool on the baking sheet for 5 minutes before serving. Arrange on a platter and garnish with green onions or blue cheese crumbles if desired.
Notes
For a milder version, reduce buffalo sauce to 1/4 cup and increase ranch dressing to 1/2 cup. You can also mix buffalo sauce with melted butter to mellow the heat. To prevent peppers from tipping, nestle them together on the baking sheet or place them in a muffin tin. The filling can be made up to 2 days ahead and stored in the refrigerator.
Nutrition
- Serving Size: 1 stuffed pepper
- Calories: 145
- Sugar: 2
- Sodium: 350
- Fat: 9
- Saturated Fat: 4
- Carbohydrates: 4
- Fiber: 1
- Protein: 11
Keywords: buffalo chicken dip, stuffed peppers, Halloween appetizer, kid-friendly, game day snack, mini peppers, jack-o-lantern peppers


