By the fourth time I made this salted caramel pumpkin cheesecake in a single week, I started wondering if I had a problem. Or maybe this was just what normal people did when they stumbled onto something that actually worked. The first attempt came out fine. Good, even. But it wasn’t the thing. You know the thing—the one where you take a bite and go quiet because your brain is too busy processing what just happened in your mouth.
The second time I swapped the crust. Then I messed with the caramel ratio. By attempt number three, my kitchen looked like a pumpkin spice factory had exploded, and I was licking a spatula at 11 p.m. on a Tuesday. That’s when I knew. The cream cheese was softening on the counter, the caramel was bubbling in a small saucepan, and I had already planned my next grocery run around heavy cream and canned pumpkin.
Here’s the thing nobody tells you about combining salted caramel with pumpkin cheesecake: it shouldn’t work this well. Pumpkin is earthy and mild. Caramel is loud and buttery. Together they do this weird little dance where the caramel doesn’t overpower the pumpkin—it just makes it feel more like itself. The salt pulls everything into focus. And the cheesecake part? It’s the quiet anchor that holds the whole thing together.
I’m not saying this is the only fall dessert you’ll ever need. But I made it four times in seven days, and I’m not even sorry.
Why You’ll Love This Recipe
This isn’t just another pumpkin cheesecake recipe you’ll bookmark and forget about. I’ve tested this thing into the ground, and here’s what makes it different.
- No water bath required. I know, right? Most cheesecake recipes make you wrestle with boiling water and foil wraps. This one bakes low and slow with a simple trick that prevents cracking without the hassle.
- The caramel is made from scratch. But it comes together in under 10 minutes with ingredients you already have. No candy thermometer. No stressing.
- Perfect make-ahead dessert. Cheesecake actually tastes better after a day in the fridge. Make it Wednesday for your Saturday dinner party, and thank me later.
- That salted caramel-pumpkin balance. Most pumpkin cheesecakes are either too pumpkin-forward or too sweet. This one hits that sweet spot where every bite tastes intentional.
- Crowd-pleaser status. I brought this to a Friendsgiving last year, and three people asked for the recipe before I even finished my first slice. Two of them don’t even like pumpkin.
This is the kind of dessert that makes people close their eyes while they’re eating. It’s comfort food reimagined—familiar enough to feel nostalgic, but elevated just enough to feel special. Perfect for Thanksgiving, fall gatherings, or honestly any Tuesday when you need a little extra joy.
What Ingredients You Will Need
This recipe uses simple, honest ingredients to build layers of flavor that work together beautifully. Most of these are pantry staples or easy to find at any grocery store.
For the Graham Cracker Crust
- Graham cracker crumbs – 1 ½ cups (about 12 full sheets). You can pulse them in a food processor or crush them in a bag with a rolling pin. Both work fine.
- Granulated sugar – ¼ cup. Just enough to add a little sweetness without making the crust candy-like.
- Unsalted butter – 6 tablespoons, melted. I use Land O’Lakes because it’s consistent. Let it cool slightly before mixing so it doesn’t steam the crumbs.
- Pinch of salt – A small pinch balances the sweetness. Trust me on this one.
For the Pumpkin Cheesecake Filling
- Full-fat cream cheese – 24 ounces (three 8-ounce blocks), softened to room temperature. This is non-negotiable. Low-fat cream cheese has too much water and will make your cheesecake runny. I recommend Philadelphia.
- Granulated sugar – 1 cup.
- Light brown sugar – ¼ cup, packed. Adds a subtle molasses note that plays nicely with the pumpkin.
- Pumpkin purée – 1 ½ cups. Not pumpkin pie filling. Make sure it’s 100% pumpkin. Libby’s is my go-to for consistent texture.
- Sour cream – ¼ cup, room temperature. Adds tanginess and keeps the texture silky.
- Vanilla extract – 2 teaspoons. Pure vanilla, not imitation.
- Large eggs – 3, room temperature. Cold eggs will seize the batter and create lumps.
- Pumpkin pie spice – 2 teaspoons. Or make your own with 1 teaspoon cinnamon, ½ teaspoon ginger, ¼ teaspoon nutmeg, ¼ teaspoon cloves.
- Ground cinnamon – 1 teaspoon. Extra warmth.
- Salt – ½ teaspoon. Brings out the pumpkin flavor.
For the Salted Caramel Sauce
- Granulated sugar – 1 cup.
- Unsalted butter – 6 tablespoons, cut into cubes, room temperature.
- Heavy cream – ½ cup, room temperature. Cold cream will cause the caramel to seize and splatter.
- Flaky sea salt – 1 teaspoon. Maldon is my favorite for this. You’ll also want extra for sprinkling on top.
- Vanilla extract – 1 teaspoon.
For the Garnish (Optional but Recommended)
- Whipped cream – Homemade or store-bought.
- Extra flaky sea salt – For that final pop of salty goodness.
- Caramel drizzle – Reserved from your homemade batch.
Equipment Needed
You don’t need a fancy kitchen to pull this off. Here’s what you’ll actually use:
- 9-inch springform pan – Essential for easy release. I’ve used the same OXO brand one for years, and it still works perfectly.
- Electric hand mixer or stand mixer – A hand mixer works great. Just make sure your cream cheese is actually softened so you don’t burn out the motor.
- Large mixing bowls – At least two. One for the filling, one for the caramel.
- Small saucepan – For the caramel. Light-colored metal is best so you can see the sugar color change.
- Rubber spatula – For scraping every last bit of filling into the pan.
- Measuring cups and spoons – Standard set.
- Parchment paper – For lining the bottom of the pan. Makes cleanup so much easier.
- Cooling rack – For letting the cheesecake cool gradually.
If you don’t have a springform pan, you can use a deep 9-inch cake pan lined with parchment paper, but removing the cheesecake will be trickier. I’d recommend investing in a springform pan—they’re around $15 and make cheesecake baking infinitely easier.
Preparation Method
Step 1: Make the Crust
Preheat your oven to 325°F (163°C). Wrap the outside of your springform pan with a double layer of heavy-duty aluminum foil, covering the bottom and up the sides. This isn’t for a water bath—it’s just extra protection in case of leaks.
In a medium bowl, combine the graham cracker crumbs, sugar, and salt. Pour in the melted butter and stir until every crumb is moistened. The mixture should look like wet sand and hold together when you squeeze it. Press the mixture firmly into the bottom of your prepared pan. Use the bottom of a measuring cup to really pack it down. Bake for 10 minutes, then set aside to cool while you make the filling.
Step 2: Prepare the Cheesecake Filling
Reduce the oven temperature to 300°F (149°C). In a large bowl, beat the softened cream cheese with an electric mixer on medium speed until smooth and creamy—about 2 minutes. Scrape down the sides and bottom of the bowl. Add both sugars and beat until combined, about 1 more minute. Don’t overmix at this stage; too much air will cause cracks later.
Add the pumpkin purée, sour cream, and vanilla. Beat on low until just combined. In a small bowl, whisk together the pumpkin pie spice, cinnamon, and salt. Sprinkle this over the batter and mix on low until incorporated.
Add the eggs one at a time, mixing on low after each addition until just combined. Stop and scrape the bowl between each egg. The batter should be smooth and uniform, with no streaks of cream cheese. Pour the filling over the cooled crust and spread it into an even layer.
Step 3: Bake the Cheesecake
Place the springform pan on a baking sheet (this catches any drips). Bake at 300°F (149°C) for 55-65 minutes. The edges should look set and slightly puffed, but the center should still jiggle slightly when you gently shake the pan. It will continue to set as it cools.
Turn off the oven, crack the door open, and let the cheesecake sit inside for 1 full hour. This slow cooling is the secret to a crack-free top. After an hour, remove the cheesecake from the oven and run a thin knife around the edge of the pan to loosen it. Let it cool completely on a wire rack, about 2 hours. Then refrigerate uncovered for at least 4 hours, preferably overnight.
Step 4: Make the Salted Caramel
While the cheesecake chills, make the caramel. Place a small saucepan over medium heat and add the sugar in an even layer. Let it melt undisturbed for about 3-4 minutes. Once the edges start turning amber, gently swirl the pan (don’t stir) to help the sugar melt evenly. Watch closely—sugar burns fast.
When the sugar is a deep amber color (think the color of a copper penny), remove the pan from heat and immediately add the butter cubes. Whisk vigorously until the butter is fully melted and incorporated. The mixture will bubble up—that’s normal. Slowly drizzle in the heavy cream while whisking constantly. The caramel will steam and bubble again. Keep whisking until smooth. Stir in the vanilla and flaky sea salt. Let it cool for 10 minutes, then transfer to a jar. It will thicken as it cools.
Step 5: Assemble and Serve
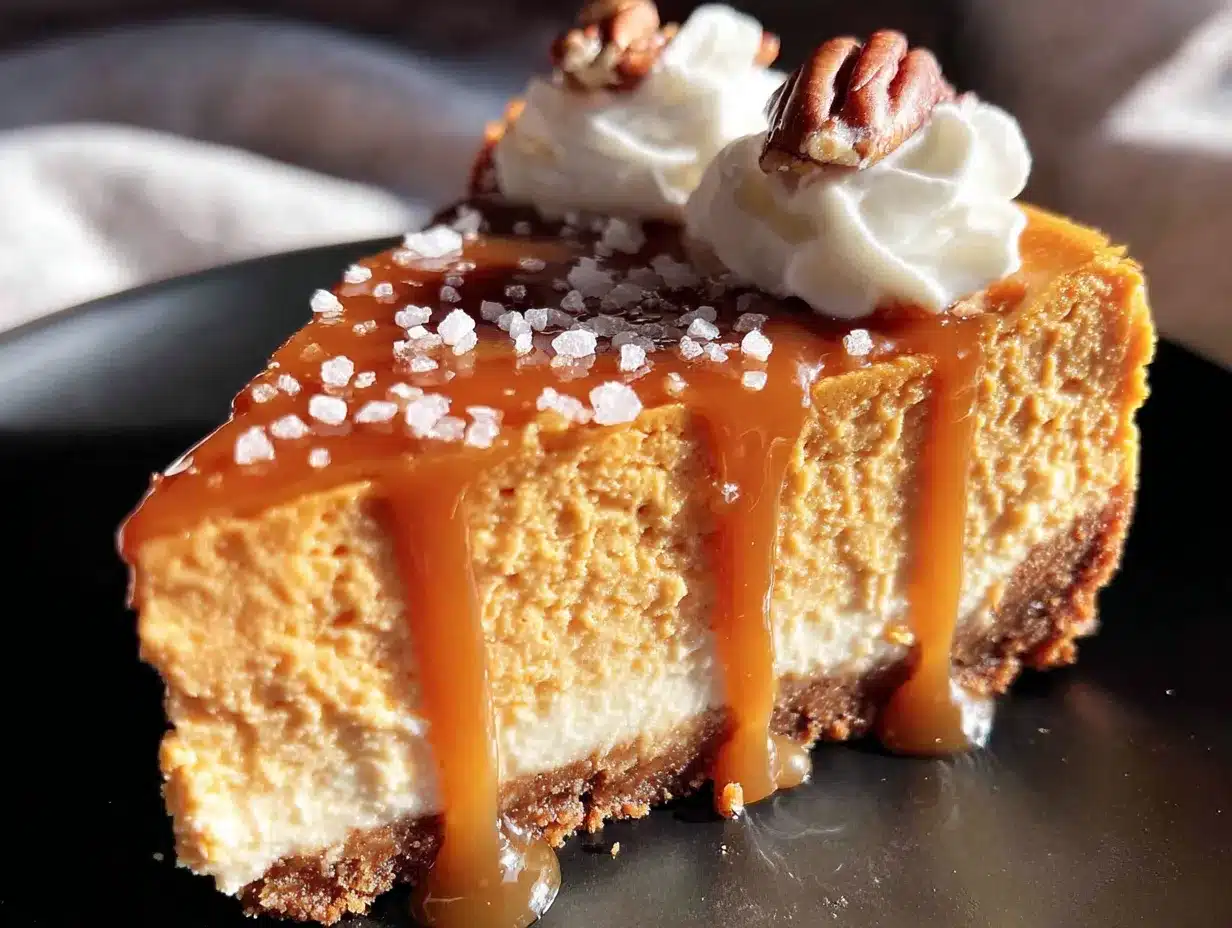
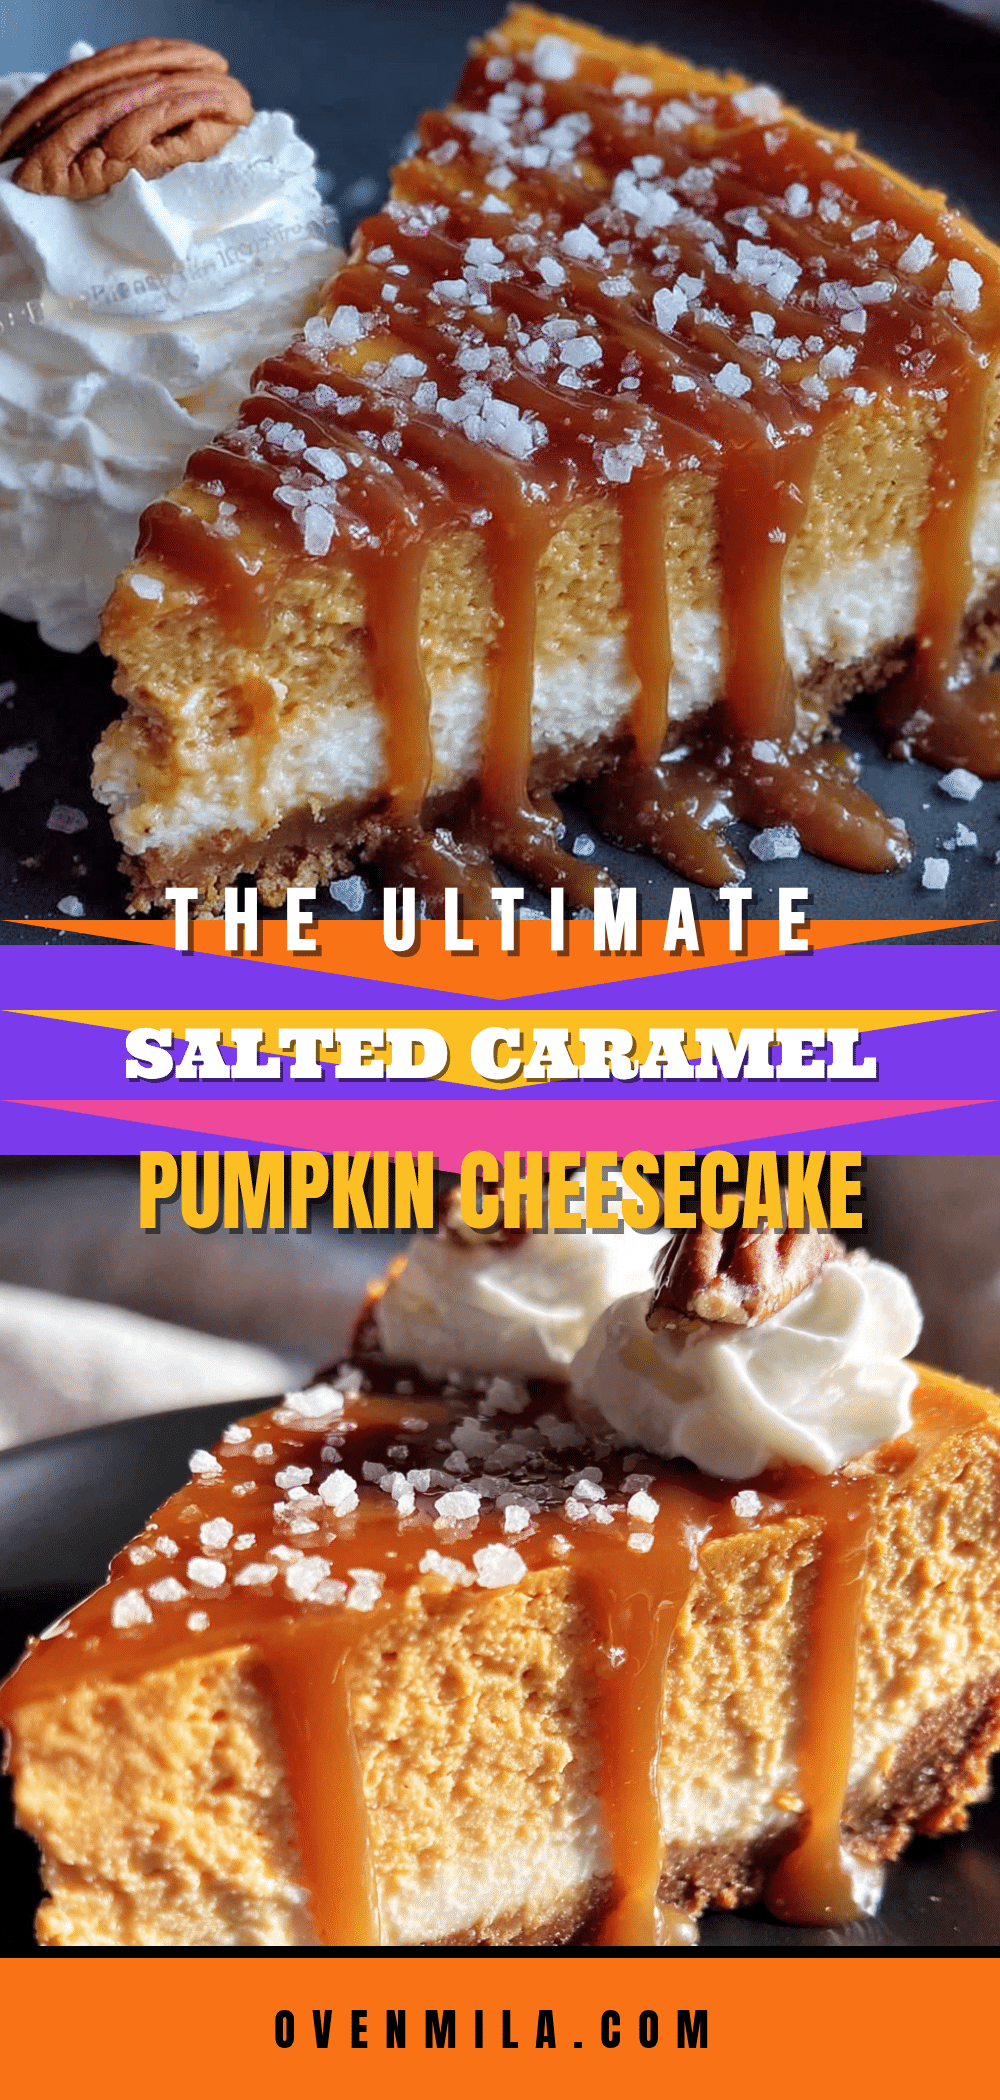
Once the cheesecake is fully chilled, remove it from the springform pan. Drizzle the salted caramel over the top, letting it drip down the sides naturally. Sprinkle with extra flaky sea salt. Slice with a sharp knife dipped in hot water and wiped clean between cuts. Serve chilled or at room temperature.
Cooking Tips & Techniques
I’ve made enough cheesecakes to know exactly where things can go wrong. Here’s what I’ve learned the hard way so you don’t have to.
Room temperature ingredients matter. I cannot stress this enough. Cold cream cheese creates lumps that no amount of mixing will fix. Leave your cream cheese, eggs, and sour cream on the counter for at least 2 hours before starting. If you’re in a hurry, cut the cream cheese into cubes and microwave it in 10-second bursts until softened but not warm.
Don’t overmix the batter. Once the eggs go in, mix on low and stop as soon as everything comes together. Overmixing incorporates too much air, which creates bubbles that rise and crack the surface during baking.
The caramel will scare you the first time. When you add the butter and cream, the mixture bubbles up aggressively. Don’t panic. Just keep whisking. It will calm down and come together into a smooth, glossy sauce. If it seizes into hard chunks, you can gently rewarm it over low heat while whisking constantly.
Use a hot knife for clean slices. Dip your knife in hot water, wipe it dry, and make one clean cut. Repeat for each slice. This gives you those beautiful, bakery-style pieces without dragging the filling.
If you love make-ahead desserts, you’ll also enjoy this easy no-bake strawberry cheesecake icebox cake for those warmer months when you don’t want to turn on the oven.
Variations & Adaptations
One of the best things about this recipe is how flexible it is. Here are some ways to make it your own.
Gluten-free version: Swap the graham crackers for gluten-free graham crackers or crushed gluten-free shortbread cookies. Everything else in the recipe is naturally gluten-free.
Dairy-free adaptation: Use dairy-free cream cheese (Kite Hill or Violife work well), coconut cream instead of sour cream, and vegan butter. The texture will be slightly softer but still delicious. Use full-fat canned coconut milk in place of heavy cream for the caramel.
Bourbon caramel twist: Add 2 tablespoons of bourbon to the caramel along with the vanilla. The warmth of the bourbon pairs beautifully with the pumpkin and brown sugar notes. I tried this for a grown-up dinner party, and it was gone in 20 minutes.
Chocolate drizzle version: Melt ½ cup of dark chocolate chips with 2 tablespoons of coconut oil and drizzle it over the cheesecake before adding the caramel. The chocolate-pumpkin-caramel combo is next-level.
Mini cheesecake option: Use a muffin tin lined with paper liners. Press the crust into the bottom of each liner, fill with batter, and bake for 18-22 minutes at 300°F. Perfect for portion control or parties.
For another pumpkin-inspired treat that’s perfect for fall mornings, try these brown butter pumpkin cream cheese muffins with cinnamon streusel.
Serving & Storage Suggestions
This cheesecake is best served chilled or at room temperature. If it’s been in the fridge overnight, let it sit on the counter for 20-30 minutes before slicing to take the chill off. This brings out the flavors and gives you a creamier texture.
For presentation, I like to drizzle the caramel in concentric circles starting from the center, then use a toothpick to drag lines outward for a decorative pattern. Top with a dollop of whipped cream, a sprinkle of flaky sea salt, and maybe a few candied pecans if I’m feeling fancy.
Storage: Cover the cheesecake loosely with plastic wrap or store it in an airtight container in the refrigerator for up to 5 days. The caramel can be stored separately in a jar in the fridge for up to 2 weeks.
Freezing: This cheesecake freezes beautifully. Chill it completely, then wrap it tightly in plastic wrap, followed by a layer of aluminum foil. Freeze for up to 3 months. Thaw overnight in the refrigerator before serving. Add fresh caramel and salt after thawing.
Flavor development: Honestly, this cheesecake tastes even better on day two. The flavors meld together, the texture firms up perfectly, and the pumpkin-caramel combo deepens overnight. So don’t stress about making it ahead—it’s actually better that way.
Nutritional Information & Benefits
Let’s be real—this is a decadent dessert, not a health food. But here’s the estimated nutritional breakdown per slice (based on 12 servings):
- Calories: 480
- Fat: 32g
- Carbohydrates: 42g
- Protein: 8g
- Sugar: 34g
- Sodium: 320mg
On the upside, pumpkin is packed with vitamin A, fiber, and antioxidants. It’s great for eye health and immune support. The cream cheese provides calcium and protein, and the caramel? Well, it provides joy. And sometimes that’s exactly what you need.
This recipe contains dairy, gluten, and eggs. For a gluten-free option, see the variations section above. If you’re watching your sugar intake, you can reduce the sugar in the filling by ¼ cup without affecting the texture too much, but the caramel needs the full amount to set properly.
If you’re looking for a lighter fall dessert option, these creamy pumpkin chocolate chip cheesecake bars are slightly more manageable for portion control.
Conclusion
Look, I’m not going to tell you this salted caramel pumpkin cheesecake will change your life. But I will tell you this: the first time you pull that springform pan off, drizzle the caramel over the top, and watch it cascade down the sides in golden ribbons, you’re going to feel something. Pride, probably. Maybe a little disbelief that you made something that looks this good.
And then you’ll take a bite. The crust will crackle. The filling will melt across your tongue. The caramel will hit that perfect sweet-salty note that makes you close your eyes. And you’ll realize that making this wasn’t just about the dessert—it was about the moment. The quiet satisfaction of creating something beautiful and delicious with your own two hands.
I’d love to hear how yours turns out. Did you try a variation? Add something unexpected? Drizzle extra caramel on top because you couldn’t help yourself? Drop a comment below and tell me about it. And if you share a photo on Pinterest, tag me—I want to see your masterpiece.
Now go make some caramel. Your cheesecake is waiting.
Frequently Asked Questions
Can I use store-bought caramel sauce instead of making it from scratch?
You can, but honestly, homemade caramel is so much better and takes less than 10 minutes. Store-bought sauces are often thinner and sweeter, and they don’t have that deep, toasted flavor you get from making it yourself. If you’re short on time, use a high-quality jarred caramel like Trader Joe’s or Stonewall Kitchen.
Why did my cheesecake crack on top?
Cracks usually happen from overmixing the batter, overbaking, or cooling too quickly. Make sure you’re mixing on low speed after adding the eggs, pulling the cheesecake out while the center still jiggles, and letting it cool slowly in the oven with the door cracked. That said, a cracked cheesecake still tastes amazing—and the caramel drizzle covers a multitude of sins!
Can I make this cheesecake without a springform pan?
Technically yes, but it’s tricky. You can use a deep 9-inch cake pan lined with parchment paper, but getting the cheesecake out in one piece is challenging. A springform pan is really the best tool for the job. They’re inexpensive and worth the investment if you plan to make cheesecakes regularly.
How do I know when the cheesecake is done baking?
The edges should look set and slightly puffed, but the center should still wobble when you gently shake the pan. It should jiggle like Jell-O, not slosh like liquid. The internal temperature should reach 150°F (65°C) if you’re using an instant-read thermometer. Don’t wait for the center to be completely firm—it will continue to set as it cools.
Can I use fresh pumpkin instead of canned?
You can, but you’ll need to roast and purée the pumpkin first, then drain it in a cheesecloth-lined strainer overnight to remove excess moisture. Fresh pumpkin purée has a higher water content than canned, which can make your cheesecake watery and prone to cracking. Canned pumpkin is actually more consistent and reliable for baking. Libby’s is my top recommendation.
Pin This Recipe!
Perfect Salted Caramel Pumpkin Cheesecake: Easy Fall Dessert
This salted caramel pumpkin cheesecake combines earthy pumpkin with buttery caramel for a decadent fall dessert. No water bath required, and the homemade caramel comes together in under 10 minutes.
- Prep Time: 30 minutes
- Cook Time: 1 hour 5 minutes
- Total Time: 8 hours (includes chilling)
- Yield: 12 servings 1x
- Category: Dessert
- Cuisine: American
Ingredients
- 1 ½ cups graham cracker crumbs (about 12 full sheets)
- ¼ cup granulated sugar
- 6 tablespoons unsalted butter, melted
- Pinch of salt
- 24 ounces full-fat cream cheese, softened to room temperature
- 1 cup granulated sugar
- ¼ cup light brown sugar, packed
- 1 ½ cups pumpkin purée (not pumpkin pie filling)
- ¼ cup sour cream, room temperature
- 2 teaspoons vanilla extract
- 3 large eggs, room temperature
- 2 teaspoons pumpkin pie spice
- 1 teaspoon ground cinnamon
- ½ teaspoon salt
- 1 cup granulated sugar (for caramel)
- 6 tablespoons unsalted butter, cut into cubes, room temperature (for caramel)
- ½ cup heavy cream, room temperature (for caramel)
- 1 teaspoon flaky sea salt (for caramel)
- 1 teaspoon vanilla extract (for caramel)
- Whipped cream (for garnish, optional)
- Extra flaky sea salt (for garnish, optional)
Instructions
- Preheat oven to 325°F (163°C). Wrap the outside of a 9-inch springform pan with a double layer of heavy-duty aluminum foil.
- In a medium bowl, combine graham cracker crumbs, ¼ cup sugar, and a pinch of salt. Pour in melted butter and stir until moistened. Press firmly into the bottom of the prepared pan. Bake for 10 minutes, then set aside to cool.
- Reduce oven temperature to 300°F (149°C). In a large bowl, beat softened cream cheese with an electric mixer on medium speed until smooth, about 2 minutes. Scrape down the bowl.
- Add 1 cup granulated sugar and brown sugar; beat until combined, about 1 minute. Do not overmix.
- Add pumpkin purée, sour cream, and vanilla; beat on low until just combined.
- In a small bowl, whisk together pumpkin pie spice, cinnamon, and ½ teaspoon salt. Sprinkle over batter and mix on low until incorporated.
- Add eggs one at a time, mixing on low after each addition until just combined. Scrape the bowl between eggs.
- Pour filling over cooled crust and spread evenly. Place springform pan on a baking sheet.
- Bake at 300°F (149°C) for 55-65 minutes, until edges are set and center jiggles slightly. Turn off oven, crack the door, and let cheesecake sit inside for 1 hour.
- Remove from oven, run a thin knife around the edge, and cool completely on a wire rack (about 2 hours). Refrigerate uncovered for at least 4 hours, preferably overnight.
- To make caramel: Place 1 cup sugar in a small saucepan over medium heat. Let melt undisturbed for 3-4 minutes until edges turn amber. Swirl pan gently until deep amber. Remove from heat and whisk in butter cubes until melted. Slowly drizzle in heavy cream while whisking. Stir in vanilla and 1 teaspoon flaky sea salt. Cool for 10 minutes.
- Once cheesecake is fully chilled, remove from springform pan. Drizzle caramel over top, sprinkle with extra flaky sea salt, and garnish with whipped cream if desired. Slice with a hot knife.
Notes
Room temperature ingredients are crucial for a smooth batter. Do not overmix after adding eggs to prevent cracks. The caramel may bubble vigorously when adding butter and cream; keep whisking. For clean slices, dip knife in hot water and wipe dry between cuts. Cheesecake tastes even better on day two.
Nutrition
- Serving Size: 1 slice
- Calories: 480
- Sugar: 34
- Sodium: 320
- Fat: 32
- Saturated Fat: 18
- Carbohydrates: 42
- Fiber: 2
- Protein: 8
Keywords: salted caramel pumpkin cheesecake, pumpkin cheesecake, fall dessert, Thanksgiving dessert, no water bath cheesecake