This was supposed to be a batch of perfectly uniform star-shaped sugar cookies. I had the cookie cutters out, the butter was perfectly softened, and I was feeling pretty smug about my organizational skills for once. Then my three-year-old nephew appeared, grabbed a handful of dough, and announced he was making a “turkey handprint.” I watched him press his sticky, flour-covered hand onto a flattened piece of dough, and my first thought was panic—there went my neat little stars. But when I baked that lopsided, five-fingered shape, something clicked. It looked exactly like a turkey, and he was so proud of himself that he nearly vibrated off his stool. Honestly, I have not used a star cookie cutter since. These Wholesome Hand Turkey Sugar Cookies for Kids have become our official Thanksgiving tradition, and they started with a tiny handprint and a complete loss of control over my own kitchen. Maybe you have been there—trying to make something picture-perfect while reality has other plans. This recipe is for those moments. It is forgiving, it is fun, and it tastes way better than anything that comes out of a rigid mold.
Why You Will Love This Recipe
Let me tell you why this recipe has earned a permanent spot in my rotation. I have tested it with three different types of flour, two different sweeteners, and one very disastrous batch where I forgot the baking powder entirely (they came out like hockey pucks, do not recommend). Through it all, this version emerged as the clear winner.
- Kid-Friendly & Mess-Approved: No fancy piping bags or steady hands required. Little fingers are the only tools you need.
- Made with Wholesome Ingredients: We swap some of the white flour for whole wheat pastry flour and cut the sugar slightly without losing sweetness. You can feel good about serving these.
- Naturally Sweetened Option: Use coconut sugar for a lower-glycemic version that still tastes like a treat.
- Perfect for Thanksgiving or Anytime: These are not just for November. We make them for playdates, rainy afternoons, and “I am bored” emergencies.
- No Special Equipment: Your hands, a rolling pin, and a baking sheet are all you need. No cookie cutters required.
- Freezes Beautifully: Bake a double batch and stash some in the freezer for last-minute school events or surprise guests.
What makes these different from every other sugar cookie recipe? It is the texture. By blending whole wheat pastry flour with all-purpose flour, you get a cookie that is sturdy enough to hold the handprint shape but tender enough to melt in your mouth. Plus, the dough is forgiving—if your kid smashes it too thin, you just roll it up and start again. No tears, no waste. I mean, how many recipes can you say that about?
What Ingredients You Will Need
This recipe uses simple, wholesome ingredients that you probably already have in your pantry. The combination creates a cookie that is both sturdy for little hands to decorate and tender enough to be truly satisfying.
For the Cookie Dough
- 1 cup unsalted butter, softened (I prefer Kerrygold for its rich flavor, but any good-quality butter works)
- 3/4 cup granulated sugar (or coconut sugar for a less refined option)
- 1 large egg, room temperature
- 1 teaspoon vanilla extract (use pure vanilla, not imitation—it makes a real difference)
- 1 1/2 cups all-purpose flour
- 1 cup whole wheat pastry flour (this is the secret to the wholesome texture; regular whole wheat is too dense)
- 1/2 teaspoon baking powder
- 1/4 teaspoon salt (fine sea salt is best)
For the Royal Icing
- 2 cups powdered sugar
- 2 tablespoons meringue powder (this gives the icing a nice sheen and dries hard, perfect for little hands)
- 3-4 tablespoons water, plus more as needed
- 1/2 teaspoon vanilla extract
- Food coloring (gel colors work better than liquid for vibrant shades without thinning the icing)
For Decoration
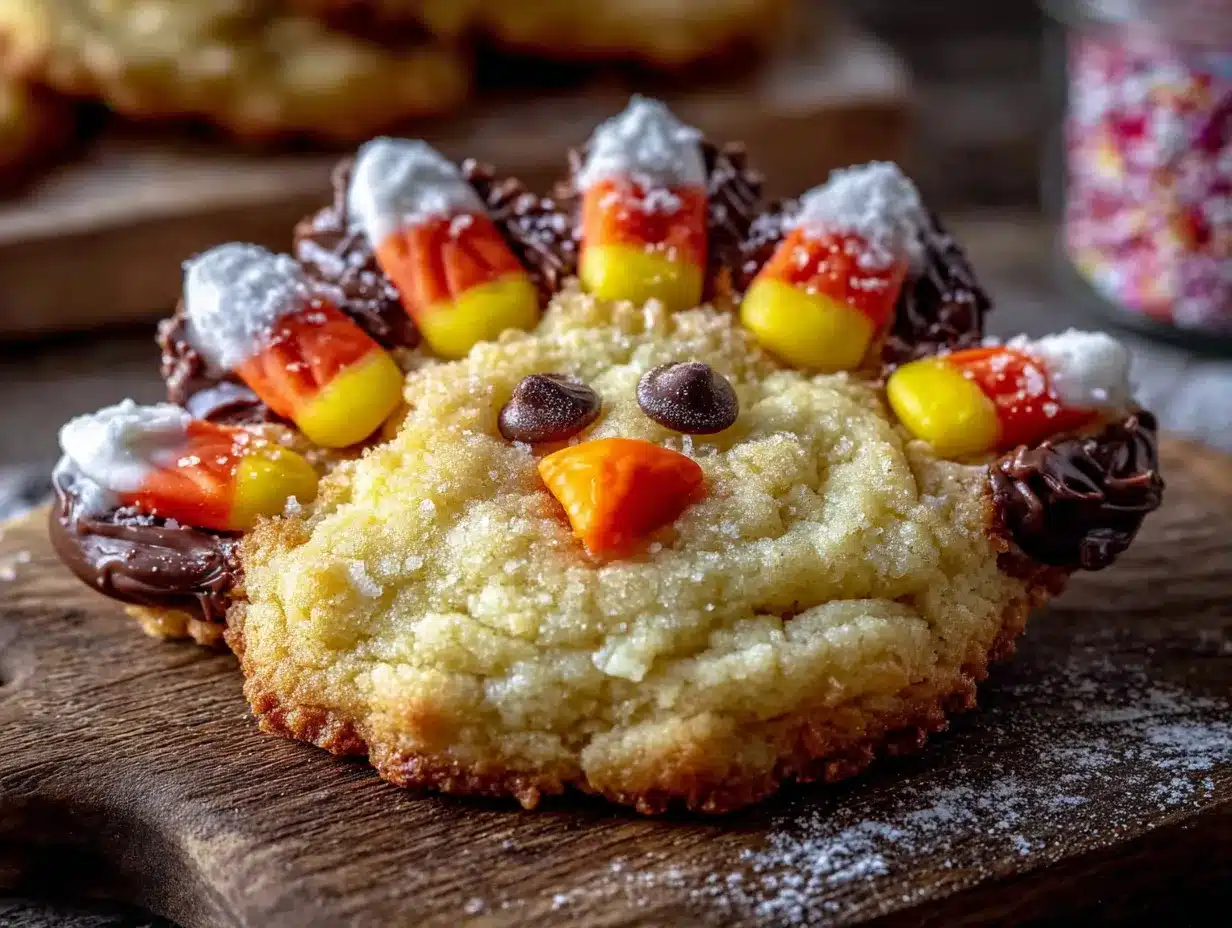
- Candy corn (for the turkey feathers—classic and kid-approved)
- Mini chocolate chips (for eyes)
- Orange sprinkles or small orange candies (for the beak and wattle)
- Red frosting or red gel (for the wattle, if not using candies)
A quick note on substitutions: If you are dairy-free, you can use a plant-based butter stick (not the spreadable kind in a tub). For a gluten-free version, substitute a 1:1 gluten-free flour blend that contains xanthan gum. I have tested this with Bob’s Red Mill 1:1 and it worked well, though the cookies were slightly more crumbly. For the egg, a flax egg (1 tablespoon ground flaxseed mixed with 3 tablespoons water) works, but the dough will be a bit stickier.
Equipment Needed
You do not need a lot of fancy tools for this recipe, which is part of the beauty of it. Here is what you will need:
- Baking sheets (two is ideal so you can rotate batches)
- Parchment paper or silicone baking mats (silicone mats are a game-changer for even baking)
- Rolling pin (if you do not have one, a wine bottle works in a pinch—I have done it)
- Mixing bowls (one large, one medium)
- Electric mixer (handheld or stand mixer; a whisk and some elbow grease will also work, but your arm will get tired)
- Plastic wrap (for chilling the dough)
- Piping bags or small zip-top bags (for the royal icing)
- Cooling rack (essential for getting that perfect icing set)
I have made these cookies with nothing but a bowl, a fork, and my hands when I was visiting my sister’s house and forgot my tools. The dough was a little lumpy, but the kids did not care one bit. So do not stress if you are missing something—improvisation is part of the fun.
Preparation Method
- Cream the butter and sugar: In a large mixing bowl, beat the softened butter and sugar together until light and fluffy, about 3-4 minutes. You want it to look pale and airy. Scrape down the sides of the bowl halfway through.
- Add the egg and vanilla: Beat in the egg and vanilla extract until fully combined. The mixture might look slightly curdled at this point—do not panic, that is normal. It will come together when you add the dry ingredients.
- Mix the dry ingredients: In a separate bowl, whisk together the all-purpose flour, whole wheat pastry flour, baking powder, and salt. This ensures the baking powder is evenly distributed.
- Combine wet and dry: Gradually add the dry ingredients to the wet mixture, mixing on low speed until just combined. Do not overmix, or the cookies will be tough. The dough should be soft but not sticky.
- Chill the dough: Divide the dough into two disks, wrap each in plastic wrap, and refrigerate for at least 1 hour. This step is crucial—chilled dough is much easier to roll and holds the handprint shape better. I have skipped this step before and ended up with blobby, unrecognizable turkeys.
- Preheat and prepare: Preheat your oven to 350°F (175°C). Line your baking sheets with parchment paper or silicone mats.
- Roll out the dough: On a lightly floured surface, roll one disk of dough to about 1/4-inch thickness. If the dough sticks, dust your rolling pin with a little flour. Keep the other disk in the fridge until you are ready.
- Make the handprints: Have your child press their hand firmly into the dough to create an imprint. For younger kids, you might need to gently guide their hand to get an even impression. For older kids, let them go wild. Use a sharp knife or a bench scraper to cut around the handprint, leaving about a 1/2-inch border. Carefully transfer the shape to the prepared baking sheet.
- Bake: Bake for 8-10 minutes, or until the edges are just barely golden. The centers should still look slightly soft. Let them cool on the baking sheet for 5 minutes, then transfer to a cooling rack to cool completely. Do not skip this cooling step—warm cookies will melt your royal icing into a puddle.
- Prepare the royal icing: In a medium bowl, whisk together the powdered sugar, meringue powder, and 3 tablespoons of water. Add the vanilla and whisk until smooth. The icing should be thick but flow slowly from a spoon. If it is too thick, add water a teaspoon at a time. If it is too thin, add more powdered sugar.
- Color the icing: Divide the icing into separate bowls for each color you want. Use gel food coloring to achieve vibrant shades. For turkey feathers, I usually make orange, yellow, and red. For the body, leave some white or tint it a light brown.
- Decorate: Transfer the icing to piping bags or small zip-top bags with the corner snipped off. Outline the handprint with the body color, then fill it in. While the icing is still wet, press candy corn onto the fingers for feathers, add mini chocolate chips for eyes, and use orange sprinkles for the beak. Let the icing set for at least 2 hours before serving.
One thing I have learned the hard way: do not let kids decorate cookies that are still warm. I made that mistake once, and the icing slid right off, creating a sad, sticky mess. Patience is not my strong suit either, but trust me on this one.
Cooking Tips & Techniques
After making these cookies more times than I can count, I have picked up a few tricks that make the process smoother and the results more consistent.
Chill the dough thoroughly: I cannot stress this enough. If the dough is even slightly warm, the handprint will blur and lose definition. I have had to re-roll dough mid-session because my kitchen was too warm and the dough got sticky. Pop it back in the fridge for 15 minutes if that happens.
Use a light touch with the rolling pin: You want the dough to be an even thickness, but do not press too hard or the dough will stick to the counter. If you are using a silicone mat, you can roll directly on it without extra flour.
Bake one sheet at a time: I know it is tempting to cram two sheets in the oven to save time, but the cookies will bake unevenly. The bottom sheet will get too dark while the top sheet stays pale. Bake them in the center of the oven for best results.
Let the icing set completely: This is the part where I usually lose patience. But if you stack or store the cookies before the icing is fully dry, they will smudge and stick together. Give them at least 2 hours, or overnight if you can wait.
Make-ahead tip: You can prepare the dough up to 3 days in advance and keep it wrapped in the fridge. You can also freeze the baked, undecorated cookies for up to 3 months. Just thaw them at room temperature before icing.
Variations & Adaptations
One of the best things about this recipe is how easily it adapts to different tastes, diets, and occasions. Here are some variations I have tried and loved:
Gluten-Free Version: Substitute the all-purpose and whole wheat flours with 2 1/2 cups of a good 1:1 gluten-free flour blend. I have used King Arthur’s Measure for Measure with great results. The cookies will be slightly more delicate, so handle them gently when transferring to the baking sheet.
Vegan Version: Use plant-based butter and replace the egg with a flax egg (1 tablespoon ground flaxseed mixed with 3 tablespoons water, let sit for 5 minutes). For the royal icing, use aquafaba (the liquid from a can of chickpeas) instead of meringue powder. Whip it until frothy before adding the powdered sugar.
Lower-Sugar Version: Reduce the granulated sugar to 1/2 cup and use a sugar substitute like monk fruit sweetener for the remaining 1/4 cup. The cookies will be slightly less tender but still delicious. For the icing, use a sugar-free powdered sweetener.
Seasonal Variations: For Christmas, turn the handprints into reindeer by adding antlers (pretzel sticks) and a red nose (candy). For Easter, make them into bunnies by adding long ears (marshmallows cut in half). For a birthday party, use rainbow sprinkles and colorful icing.
Spiced Version: Add 1 teaspoon of cinnamon and 1/2 teaspoon of nutmeg to the dry ingredients for a warm, cozy flavor that screams fall. This pairs beautifully with the candy corn feathers.
Serving & Storage Suggestions
These cookies are best served at room temperature, ideally within 24 hours of decorating. The royal icing needs time to set, but the cookies themselves are at their peak freshness the day they are baked.
For a Thanksgiving party, arrange the cookies on a platter with the handprints facing outward so everyone can see the “feathers.” They make a great centerpiece that kids can snack on while waiting for the main meal. I like to serve them with a side of warm apple cider or a glass of cold milk.
Storage: Store the decorated cookies in an airtight container at room temperature for up to 5 days. Place a sheet of parchment paper between layers to prevent the icing from sticking. Do not refrigerate them—the humidity can cause the icing to become sticky and the cookies to soften.
Freezing: You can freeze the undecorated baked cookies for up to 3 months. Wrap them tightly in plastic wrap and then in foil, or use a freezer-safe container. When you are ready to decorate, thaw them at room temperature for about an hour. I have done this for school events and it works perfectly.
Flavor Development: Interestingly, the cookies taste even better the day after baking. The flavors meld together, and the texture becomes slightly more tender. So do not worry if you bake them a day ahead—they might actually be better.
Nutritional Information & Benefits
While these are still a treat, using whole wheat pastry flour and reducing the sugar slightly makes them a more wholesome option than standard sugar cookies. Here is the approximate nutritional breakdown per cookie (based on 24 cookies):
- Calories: 145
- Fat: 7g
- Carbohydrates: 20g
- Fiber: 1g
- Sugar: 12g
- Protein: 2g
The whole wheat pastry flour adds a small amount of fiber and nutrients like iron and B vitamins compared to all-purpose flour alone. The butter provides vitamin A, and the egg adds protein. Of course, the candy corn and icing are mostly sugar, but the portion size is small enough that these can fit into a balanced diet without guilt.
For parents looking to reduce sugar even further, skip the candy corn and use dried fruit for the feathers—dried cranberries or apricots work well and add natural sweetness along with fiber.
Conclusion
These Wholesome Hand Turkey Sugar Cookies for Kids have become so much more than a recipe in my house. They are a memory-making tradition that started with a messy handprint and a moment of surrender. Every time I make them, I am reminded that the best things in the kitchen are rarely the ones I planned perfectly. The kids love them because they get to use their own hands. I love them because they are forgiving, delicious, and just a little bit healthier than the alternative.
I would love to hear how your hand turkeys turn out. Did your kids add extra sprinkles? Did you try a different color scheme? Share your creations in the comments below, and do not forget to tag me on Pinterest so I can see your beautiful, imperfect, wonderful cookies.
Frequently Asked Questions
Can I make the dough ahead of time?
Absolutely. You can prepare the dough up to 3 days in advance and keep it wrapped tightly in the refrigerator. You can also freeze the dough disks for up to 3 months. Just thaw them in the fridge overnight before rolling.
My dough is too sticky. What should I do?
If the dough is sticky, it likely needs more chilling time. Pop it back in the fridge for 30 minutes. If it is still sticky after chilling, dust your work surface and rolling pin with a little extra flour.
Can I use a different type of flour?
Yes, but the texture will change. You can use all-purpose flour exclusively, but the cookies will be less tender and have less fiber. You can also use spelt flour for a nuttier flavor. Avoid using only whole wheat flour as it will make the cookies dense and dry.
How do I get clean handprints?
Make sure the dough is well-chilled. Press the hand firmly and evenly into the dough, then lift straight up without wiggling. If the edges are ragged, use a small knife to smooth them out before baking.
Can I skip the royal icing?
Yes, you can use store-bought frosting or a simple glaze made from powdered sugar and milk. However, royal icing dries hard, which makes the cookies easier to stack and store. If you use a different icing, let it set fully before stacking.
Pin This Recipe!

Wholesome Hand Turkey Sugar Cookies for Kids

These Wholesome Hand Turkey Sugar Cookies for Kids are a fun, forgiving Thanksgiving tradition that uses little hands to create edible turkey shapes. Made with a blend of whole wheat pastry flour and all-purpose flour, they are sturdy enough to hold the handprint shape but tender enough to melt in your mouth.
- Prep Time: 20 minutes
- Cook Time: 10 minutes
- Total Time: 1 hour 30 minutes (includes chilling and cooling)
- Yield: 24 cookies 1x
- Category: Dessert
- Cuisine: American
Ingredients
- 1 cup unsalted butter, softened
- 3/4 cup granulated sugar (or coconut sugar)
- 1 large egg, room temperature
- 1 teaspoon vanilla extract
- 1 1/2 cups all-purpose flour
- 1 cup whole wheat pastry flour
- 1/2 teaspoon baking powder
- 1/4 teaspoon fine sea salt
- 2 cups powdered sugar
- 2 tablespoons meringue powder
- 3–4 tablespoons water
- 1/2 teaspoon vanilla extract
- Food coloring (gel colors preferred)
- Candy corn (for turkey feathers)
- Mini chocolate chips (for eyes)
- Orange sprinkles or small orange candies (for beak and wattle)
- Red frosting or red gel (for wattle, if not using candies)
Instructions
- Cream the butter and sugar: In a large mixing bowl, beat the softened butter and sugar together until light and fluffy, about 3-4 minutes. Scrape down the sides of the bowl halfway through.
- Add the egg and vanilla: Beat in the egg and vanilla extract until fully combined. The mixture might look slightly curdled; this is normal.
- Mix the dry ingredients: In a separate bowl, whisk together the all-purpose flour, whole wheat pastry flour, baking powder, and salt.
- Combine wet and dry: Gradually add the dry ingredients to the wet mixture, mixing on low speed until just combined. Do not overmix. The dough should be soft but not sticky.
- Chill the dough: Divide the dough into two disks, wrap each in plastic wrap, and refrigerate for at least 1 hour.
- Preheat and prepare: Preheat your oven to 350°F (175°C). Line baking sheets with parchment paper or silicone mats.
- Roll out the dough: On a lightly floured surface, roll one disk of dough to about 1/4-inch thickness. Keep the other disk in the fridge.
- Make the handprints: Have your child press their hand firmly into the dough to create an imprint. Use a sharp knife or bench scraper to cut around the handprint, leaving about a 1/2-inch border. Carefully transfer to the prepared baking sheet.
- Bake: Bake for 8-10 minutes, or until the edges are just barely golden. Let cool on the baking sheet for 5 minutes, then transfer to a cooling rack to cool completely.
- Prepare the royal icing: In a medium bowl, whisk together the powdered sugar, meringue powder, and 3 tablespoons of water. Add the vanilla and whisk until smooth. Adjust consistency with additional water or powdered sugar as needed.
- Color the icing: Divide the icing into separate bowls for each color. Use gel food coloring to achieve vibrant shades.
- Decorate: Transfer the icing to piping bags or small zip-top bags with the corner snipped off. Outline the handprint with the body color, then fill it in. While the icing is still wet, press candy corn onto the fingers for feathers, add mini chocolate chips for eyes, and use orange sprinkles for the beak. Let the icing set for at least 2 hours before serving.
Notes
Chill the dough thoroughly for clean handprints. Bake one sheet at a time for even baking. Let the icing set completely before stacking or storing. The dough can be made up to 3 days in advance and kept in the fridge. Baked, undecorated cookies can be frozen for up to 3 months.
Nutrition
- Serving Size: 1 cookie
- Calories: 145
- Sugar: 12
- Sodium: 60
- Fat: 7
- Saturated Fat: 4
- Carbohydrates: 20
- Fiber: 1
- Protein: 2
Keywords: hand turkey cookies, sugar cookies, Thanksgiving cookies, kid-friendly cookies, whole wheat sugar cookies, handprint cookies


