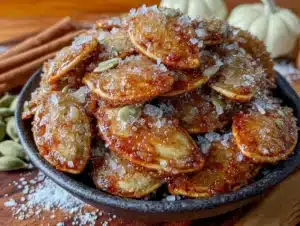
Marta, the lady who runs the little spice shop two blocks from my apartment, watched me staring at her display of cinnamon sticks one afternoon. I was in a panic, honestly—my nephew’s birthday party was the next day, and I had promised to bring something snacky, something that would stand out next to the usual chips and dip. She didn’t say anything at first. Then she reached under the counter, pulled out a brown paper bag, and tipped a handful of pumpkin seeds onto the counter. “Roast these with something sweet,” she said, “and watch them disappear.” She didn’t give me a recipe—she just smiled and went back to grinding cumin for another customer. That exchange stuck with me. It felt like she was handing me a secret, not just an ingredient. I went home, grabbed my biggest baking sheet, and started experimenting. The first batch was a little burnt—let’s be honest, I got distracted texting my sister about party decorations. But the second batch? That was the one. The cinnamon sugar coating turned into this brittle, crunchy shell that shattered when you bit into it. I brought them to the party, and people kept circling back to the bowl like they were hypnotized. Someone asked if I’d bought them at a fancy bakery. I just smiled and thought of Marta.
These crispy cinnamon sugar pumpkin seeds have become my go-to party trick. They are ridiculously easy to make, but they taste like you spent hours in the kitchen. The combination of warm cinnamon, sweet sugar, and that nutty, toasty pumpkin seed flavor is honestly addictive. Maybe you’ve been there—you want to bring something to a gathering that feels special but doesn’t require you to stress out. This is that recipe. It is the kind of snack that makes people stop mid-conversation and ask, “Wait, what is this?” I mean, it’s just pumpkin seeds, but the way they transform in the oven is almost magical. You get that satisfying crunch, that warm spice, and just enough sweetness to keep you reaching for one more handful. It’s the perfect party snack—simple to make, impossible to resist, and guaranteed to make you look like a kitchen genius.
Why You’ll Love This Recipe
I have tested this recipe more times than I care to admit. I burnt batches, I under-seasoned batches, I tried different oven temperatures and different soaking methods. Through all that trial and error, I landed on a method that works every single time. Here is why this version stands out from the usual roasted pumpkin seed recipes you find online.
- Quick & Easy: From start to finish, these come together in about 45 minutes. Most of that time is hands-off baking, so you can prep other party snacks while they roast.
- Simple Ingredients: You need pumpkin seeds, sugar, cinnamon, butter, and a pinch of salt. That is it. No fancy extracts, no hard-to-find spices, nothing you have to order online.
- Perfect for Parties: These are made for gatherings. They are easy to eat standing up, they don’t leave sticky residue on fingers, and they pair beautifully with everything from cocktails to coffee.
- Crowd-Pleaser: I have brought these to potlucks, game nights, holiday parties, and casual get-togethers. Every single time, the bowl empties first. Kids love them, adults love them, even people who say they don’t usually like pumpkin seeds get hooked.
- Unbelievably Delicious: The texture is what gets people. The sugar and cinnamon create a coating that bakes into a thin, crispy shell around each seed. It is sweet, warm, and crunchy—like a miniature dessert that you can eat by the handful.
What makes this recipe different from others is the technique. Most recipes just toss seeds with sugar and bake, but that often leaves you with a grainy coating that falls off. I use a simple method where the butter and sugar create a syrup-like coating that adheres to each seed perfectly. The result is a uniform, crispy shell that stays put. This isn’t just another version of roasted pumpkin seeds—it is the version that will ruin you for all others.
What Ingredients You Will Need
This recipe uses simple, everyday ingredients to create something surprisingly special. You probably have most of these in your pantry already, which makes this perfect for last-minute party prep. Here is what you need and why each ingredient matters.
- Pumpkin seeds, raw and unshelled (2 cups / about 240 grams): You want the green seeds inside the white hull, not the whole hulled seeds you sometimes find in the bulk bin. Look for raw, unsalted seeds. I prefer the ones from Go Raw or Terrasoul—they are consistently fresh and roast evenly.
- Granulated sugar (1/4 cup / 50 grams): Regular white sugar works best here. It melts into the butter and creates that crispy coating. You can use coconut sugar, but the texture will be slightly different and the color will be darker.
- Ground cinnamon (1 tablespoon / 8 grams): Use a good quality cinnamon here. I like Saigon cinnamon from Penzeys—it has a warmer, more intense flavor than standard grocery store cinnamon. If you only have regular cinnamon, it will still work, just add an extra teaspoon.
- Unsalted butter (2 tablespoons / 28 grams): Butter adds richness and helps the sugar coating stick. Salted butter works in a pinch, but reduce the added salt. I use Kerrygold because it has a higher fat content, which means less water and a better coating.
- Salt (1/2 teaspoon / 3 grams): A little salt balances the sweetness and brings out the nutty flavor of the seeds. Use fine sea salt for even distribution.
- Vanilla extract (1 teaspoon / 5 ml, optional): This is not strictly necessary, but it adds a lovely depth to the sweetness. I add it about half the time, depending on my mood.
Ingredient Tips: If you are carving a pumpkin and saving the seeds, rinse them well in a colander to remove the stringy pulp. Pat them completely dry with a clean kitchen towel—any moisture will make the coating slide off. For the best texture, let the cleaned seeds sit on a baking sheet for an hour or two to air dry before you start. If you are buying seeds from the store, check the package date. Fresh seeds taste noticeably better and roast more evenly.
Substitution Guidance: For a dairy-free version, use coconut oil or vegan butter instead of regular butter. The flavor will be slightly different, but the texture holds up well. For a lower-sugar option, try using monk fruit sweetener or erythritol, though the coating will be less crispy and more powdery. If you want to skip the cinnamon, pumpkin pie spice makes an excellent substitute—use the same amount.
Equipment Needed
You do not need any fancy equipment for this recipe, which is part of why I love it so much. Here is what you will need.
- Baking sheet (half-sheet size, 18×13 inches): A rimmed baking sheet works best to keep the seeds contained. I use a Nordic Ware half-sheet pan—it is sturdy, heats evenly, and has never warped on me.
- Parchment paper or a silicone baking mat: This prevents sticking and makes cleanup effortless. If you use parchment, go for the unbleached kind.
- Mixing bowl (medium size): For tossing the seeds with the coating ingredients. A glass or stainless steel bowl works fine.
- Small saucepan (1-quart size): For melting the butter and sugar together. You can also do this in the microwave, but a saucepan gives you more control.
- Spatula or wooden spoon: For stirring the seeds and spreading them on the baking sheet. A silicone spatula is my favorite because it scrapes every bit of the butter-sugar mixture out of the bowl.
- Measuring cups and spoons: Accuracy matters here, especially with the sugar and cinnamon. I use metal measuring spoons for dry ingredients.
If you do not have a silicone baking mat, no worries. Parchment paper works perfectly. If you do not have a half-sheet pan, use whatever baking sheet you have—just make sure the seeds are in a single layer. Overcrowding leads to steaming instead of roasting, and you lose that crispy texture. If your pan is smaller, bake the seeds in two batches. It takes a little more time, but the results are worth it.
Preparation Method
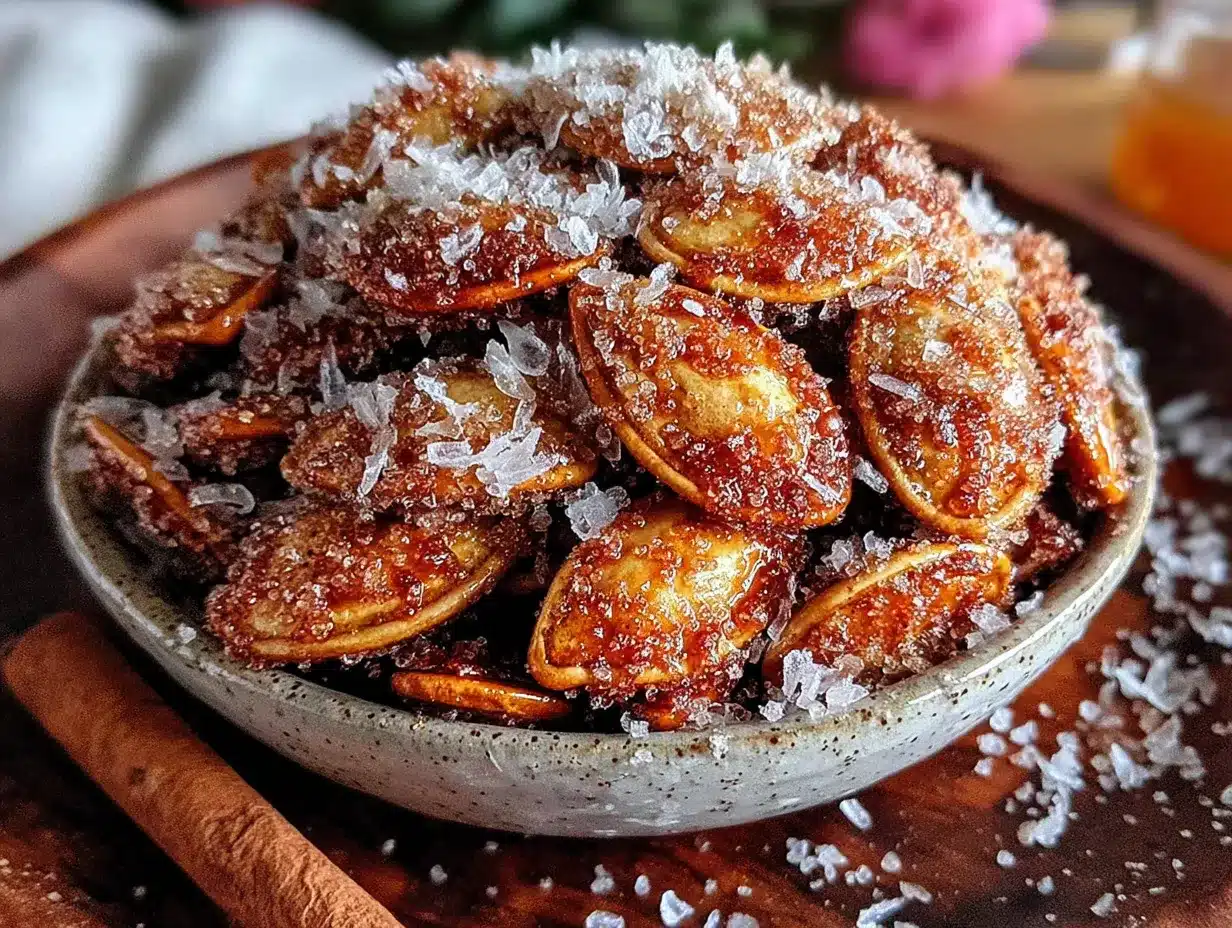
This method is straightforward, but a few small details make a big difference. Follow these steps, and you will get perfectly crispy, cinnamon-sugar-coated seeds every time.
- Preheat your oven to 325°F (163°C). Line a baking sheet with parchment paper or a silicone mat. Getting the oven to the right temperature is important—too hot and the sugar burns, too cool and the seeds turn chewy instead of crispy.
- Prepare the pumpkin seeds. If you are using seeds from a fresh pumpkin, rinse them in a colander under cool water, picking out the biggest pieces of pulp. Spread them on a clean kitchen towel and pat them dry. Let them air dry for about 10 minutes while you do the next step. If you are using store-bought raw seeds, they are ready to go straight from the bag.
- Make the coating. In a small saucepan over medium-low heat, melt 2 tablespoons of unsalted butter. Add 1/4 cup of granulated sugar, 1 tablespoon of ground cinnamon, and 1/2 teaspoon of fine sea salt. Stir constantly with a spatula until the sugar dissolves and the mixture is smooth and bubbling slightly—about 2 to 3 minutes. The mixture will look like a thin syrup. If you are using vanilla extract, stir it in at this point. Remove the pan from the heat.
- Coat the seeds. Place the 2 cups of pumpkin seeds in a medium mixing bowl. Pour the warm butter-sugar mixture over the seeds. Stir with a spatula until every seed is coated. The mixture will start to thicken as it cools, so work quickly. You want each seed to have a thin, even layer of the coating.
- Spread the seeds on the baking sheet. Pour the coated seeds onto the prepared baking sheet. Use the spatula to spread them into a single, even layer. Try not to let seeds pile on top of each other—this is the most common mistake. If they overlap, they steam instead of roast, and you lose the crunch.
- Bake for 25 to 30 minutes. Place the baking sheet on the middle rack of the oven. Bake for 10 minutes, then remove the sheet and stir the seeds gently with a spatula. This helps them roast evenly. Return the sheet to the oven and bake for another 10 minutes. Stir again. Bake for the final 5 to 10 minutes. The seeds are done when they are golden brown and the coating looks dry and slightly crackled. Your kitchen will smell amazing at this point—like a bakery and a fall festival combined.
- Cool completely. Remove the baking sheet from the oven and let the seeds cool on the pan for at least 15 minutes. Do not skip this step. As they cool, the coating hardens and becomes that signature crispy shell. If you try to move them too soon, the coating will be soft and sticky. I learned this the hard way—my first batch was a sticky, delicious mess.
- Break apart any clusters. Once the seeds are completely cool, use your fingers to break apart any clumps that formed during baking. They should separate easily into individual seeds. If some are stubborn, that is fine—little clusters are actually nice for snacking.
Sensory Cues: When the seeds are done, they should look deeply golden, not pale. The coating should look matte, not glossy. If you pick one up and it feels slightly firm, it is ready. If it feels soft or bends, give it another 2 to 3 minutes in the oven. The sound is also a giveaway—cooled seeds make a distinct clicking sound when you drop them onto a plate.
Cooking Tips & Techniques
I have made this recipe probably thirty times by now, and I have made every mistake in the book. Here is what I have learned so you do not have to repeat my errors.
Dry seeds are non-negotiable. The number one reason this recipe fails is wet seeds. If you are using fresh pumpkin seeds, dry them thoroughly. I once rushed through this step and ended up with soggy, chewy seeds that never crisped up. Now I spread them on a towel and let them sit for a full hour before I start. Patience pays off here.
Watch the oven like a hawk. Sugar burns fast. In the last five minutes of baking, the difference between perfect and burnt is about 30 seconds. I set a timer for the minimum time and start checking at the 25-minute mark. If the edges of the coating start to look dark brown, pull the seeds out immediately. Burnt sugar tastes bitter, and there is no saving that batch.
Stirring matters. I know it feels like an extra step, but stirring the seeds halfway through baking ensures even coating and prevents the sugar from pooling in one spot. The first time I made these, I skipped the stir and ended up with some seeds that were barely coated and others that were practically candied. Now I set a timer for every 10 minutes.
Let them cool completely. This is the hardest part because they smell incredible and you want to eat them right away. But the coating needs time to set. If you eat them warm, the sugar is still soft and the texture is more like a chewy candy than a crispy snack. I usually make these a few hours before the party so they have plenty of time to cool.
Double the batch if you are serving a crowd. Seriously. I made a single batch for a gathering of twelve people once, and they were gone in fifteen minutes. People hovered around the bowl like seagulls. Now I always make at least two batches for parties. They keep well, so leftovers are never a problem.
Variations & Adaptations
Once you have mastered the basic recipe, there are so many ways to play with it. Here are some of my favorite variations.
Spiced Pumpkin Seeds: Add 1/2 teaspoon of ground ginger and 1/4 teaspoon of ground cloves to the cinnamon-sugar mixture. This gives the seeds a warm, chai-like flavor that is perfect for fall parties. I tried this version for a Thanksgiving gathering and people kept asking if there was a secret ingredient.
Maple Cinnamon Seeds: Replace the granulated sugar with 3 tablespoons of maple syrup. Reduce the butter to 1 tablespoon. The coating will be slightly less crispy but has a deeper, more complex sweetness. This version is great for brunch parties or as a topping for yogurt bowls.
Spicy Sweet Seeds: Add 1/4 teaspoon of cayenne pepper or 1/2 teaspoon of chili powder to the sugar mixture. The heat sneaks up on you after the initial sweetness, which makes for a fun party snack. I brought these to a game night once and they were a hit with the spicy food lovers in the group.
Dairy-Free Version: Use coconut oil instead of butter. The coconut flavor is subtle and pairs surprisingly well with cinnamon. Use a 1:1 swap—2 tablespoons of coconut oil for the butter. The texture is slightly different—a little less rich—but still very good.
Chocolate-Cinnamon Seeds: After the seeds have cooled completely, drizzle them with melted dark chocolate. Let the chocolate set before serving. This turns them into a dessert snack that is dangerously addictive. I made these for a holiday cookie exchange and they disappeared faster than the actual cookies.
Serving & Storage Suggestions
These seeds are best served at room temperature, straight from the cooling sheet or from a bowl on the snack table. They do not need any fancy presentation—a simple ceramic bowl or a wooden serving tray works perfectly. For parties, I like to set them out in small bowls around the room so people can grab a handful wherever they are. They pair beautifully with cocktails, especially anything with bourbon or apple cider. They are also fantastic alongside a cheese board—the sweetness cuts through the richness of aged cheddar or brie.
If you are making these ahead of time, store them in an airtight container at room temperature. They will stay crispy for up to five days. Do not refrigerate them—the moisture in the fridge will soften the coating. If you live in a humid climate, add a food-safe silica gel packet to the container to absorb excess moisture. I learned this trick from a friend who lives in Florida, and it really works.
For longer storage, you can freeze these seeds. Place them in a freezer-safe bag or container, squeeze out as much air as possible, and freeze for up to three months. To serve, let them come to room temperature on the counter for about 30 minutes. They will crisp back up as they warm. Do not microwave them to thaw—the moisture from the microwave will ruin the texture.
One thing I love about this recipe is that the flavors actually develop over time. The cinnamon and sugar meld together after a day or two, making the seeds taste even better on day two than they did on day one. So do not be afraid to make them a day ahead of your party. Your future self will thank you.
Nutritional Information & Benefits
Pumpkin seeds are a nutritional powerhouse, and this recipe lets you enjoy them as a treat without feeling guilty. Here is a rough estimate of the nutritional values per serving (about 1/4 cup of finished seeds).
| Nutrient | Amount |
|---|---|
| Calories | 180 |
| Total Fat | 12g |
| Saturated Fat | 3g |
| Carbohydrates | 14g |
| Fiber | 2g |
| Sugar | 10g |
| Protein | 6g |
| Iron | 10% DV |
| Magnesium | 18% DV |
Pumpkin seeds are packed with magnesium, zinc, and healthy fats. Magnesium supports muscle function and sleep quality—perfect for winding down after a party. Zinc is great for immune health, which is always a bonus during cold and flu season. The fiber and protein in the seeds help balance out the sugar, so you get a satisfying snack that does not send your blood sugar on a roller coaster.
This recipe is naturally gluten-free and can be made dairy-free with a simple swap. It is also nut-free, making it a safe option for parties where allergies are a concern. If you are watching your sugar intake, you can reduce the sugar to 2 tablespoons—the coating will be less crispy, but the flavor will still be delicious.
Conclusion
I keep coming back to this recipe because it is the kind of thing that makes you look like a hero with almost no effort. You take a humble ingredient—pumpkin seeds, which most people either throw away or ignore at the store—and turn it into the star of the snack table. There is something deeply satisfying about watching people discover them for the first time. That moment when someone takes a tentative bite, then their eyes go wide, and they reach for another handful—that never gets old.
This recipe is also forgiving. If you want more cinnamon, add it. If you want them extra sweet, sprinkle a little more sugar on top before baking. Make them your own. That is the beauty of cooking—you take a basic idea and shape it to fit your taste, your party, your people.
I would love to hear how these turn out for you. Did you try a variation? Did they disappear at your party? Drop a comment below and let me know. And if you have a friend who always brings the same boring chips to gatherings, share this recipe with them. Spread the crispy, cinnamon-sugar love.
Frequently Asked Questions
Can I use salted pumpkin seeds for this recipe?
You can, but reduce the added salt to 1/4 teaspoon or skip it entirely. Salted seeds will make the final snack noticeably saltier, which is not necessarily a bad thing if you like the sweet-salty combination. Just taste the coating mixture before adding the seeds to gauge the salt level.
Why did my seeds turn out chewy instead of crispy?
This usually happens for one of two reasons: the seeds were not dry enough before coating, or they did not bake long enough. Make sure your seeds are thoroughly dried before you start. Also, check your oven temperature—an oven that runs cool will not crisp the coating properly. Use an oven thermometer to be sure.
Can I use pumpkin pie spice instead of cinnamon?
Absolutely. Use the same amount—1 tablespoon—and the seeds will have a warm, spiced flavor that is perfect for fall. Pumpkin pie spice usually contains cinnamon, nutmeg, ginger, and allspice, so the flavor profile is similar but more complex.
How far in advance can I make these for a party?
You can make them up to five days in advance. Store them in an airtight container at room temperature. The flavor actually improves after a day or two as the cinnamon and sugar meld together. Just make sure they are completely cool before you seal the container, or condensation will soften the coating.
Can I double this recipe?
Yes, but bake the seeds in batches. Do not crowd the baking sheet—the seeds need to be in a single layer to crisp up properly. If you double the recipe, use two baking sheets and rotate them halfway through baking. The baking time may increase by a few minutes because of the extra moisture from the coating.
Pin This Recipe!
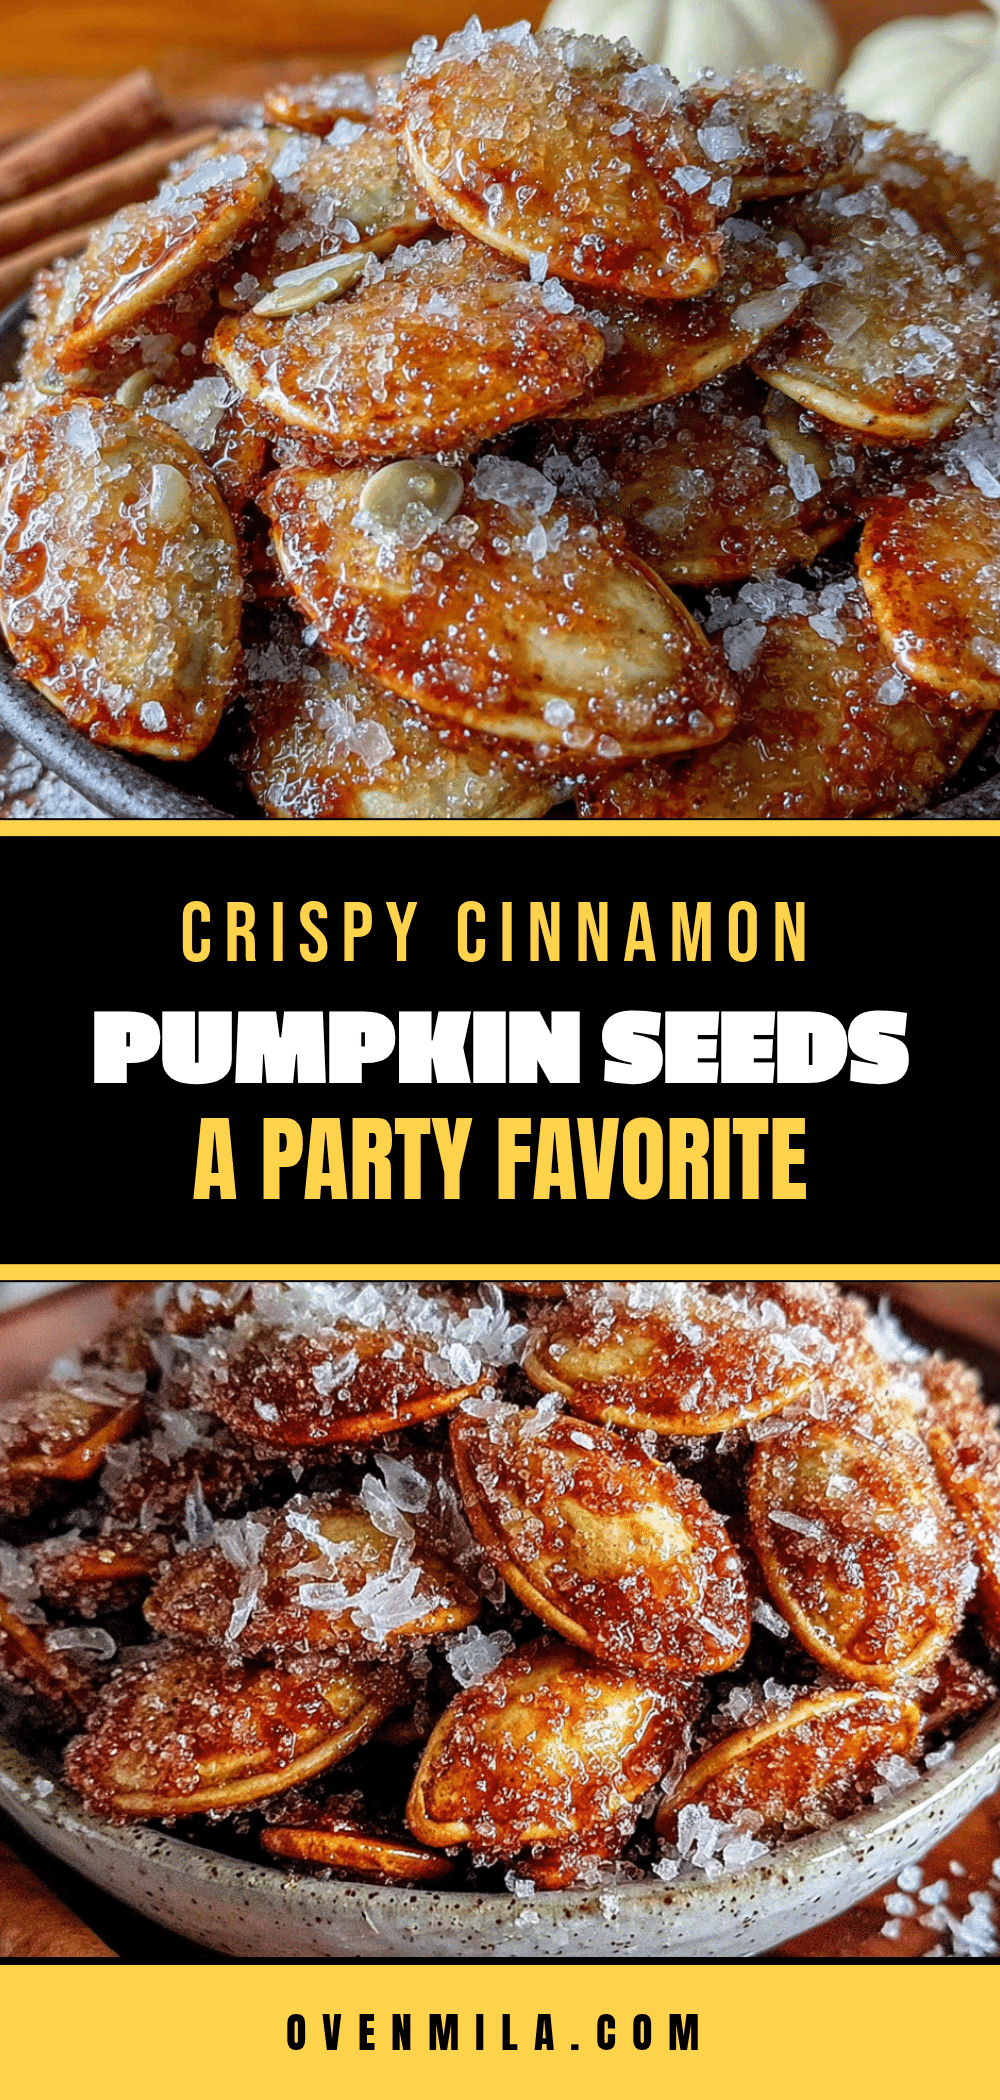
Crispy Cinnamon Sugar Pumpkin Seeds – Best Party Snack Recipe
These crispy cinnamon sugar pumpkin seeds are ridiculously easy to make but taste like you spent hours in the kitchen. The combination of warm cinnamon, sweet sugar, and nutty pumpkin seeds creates an addictive party snack that will disappear in minutes.
- Prep Time: 15 minutes
- Cook Time: 30 minutes
- Total Time: 45 minutes
- Yield: 8 servings 1x
- Category: Snack
- Cuisine: American
Ingredients
- 2 cups (240 g) raw unshelled pumpkin seeds
- 1/4 cup (50 g) granulated sugar
- 1 tablespoon (8 g) ground cinnamon
- 2 tablespoons (28 g) unsalted butter
- 1/2 teaspoon (3 g) fine sea salt
- 1 teaspoon (5 ml) vanilla extract (optional)
Instructions
- Preheat oven to 325°F (163°C). Line a baking sheet with parchment paper or a silicone mat.
- If using fresh pumpkin seeds, rinse and dry thoroughly. Pat dry with a towel and let air dry for 10 minutes. Store-bought raw seeds can be used directly.
- In a small saucepan over medium-low heat, melt butter. Add sugar, cinnamon, and salt. Stir constantly until sugar dissolves and mixture is smooth and bubbling (2-3 minutes). Stir in vanilla extract if using. Remove from heat.
- Place pumpkin seeds in a medium bowl. Pour warm butter-sugar mixture over seeds and stir until every seed is evenly coated.
- Spread coated seeds in a single layer on the prepared baking sheet. Avoid overlapping.
- Bake for 25-30 minutes, stirring every 10 minutes. Seeds are done when golden brown and coating looks dry and slightly crackled.
- Cool completely on the baking sheet for at least 15 minutes. The coating will harden as it cools.
- Break apart any clusters with your fingers. Serve at room temperature.
Notes
Dry seeds are essential for crispiness. Watch the oven closely in the last 5 minutes to prevent burning. Let seeds cool completely before serving to allow the coating to harden. For a dairy-free version, substitute coconut oil for butter. For a lower-sugar option, use monk fruit sweetener or erythritol, though the coating will be less crispy.
Nutrition
- Serving Size: 1/4 cup
- Calories: 180
- Sugar: 10
- Sodium: 150
- Fat: 12
- Saturated Fat: 3
- Carbohydrates: 14
- Fiber: 2
- Protein: 6
Keywords: pumpkin seeds, cinnamon sugar, party snack, roasted pumpkin seeds, easy snack, fall recipe