The power went out halfway through my daughter’s Halloween party prep. I’m not kidding. I had grand plans for an elaborate spread—homemade spiderweb dip, jack-o’-lantern stuffed peppers, the whole Pinterest-worthy deal. And there I stood, in a dark kitchen at 4 PM, with a package of hot dogs and a can of crescent rolls that had somehow survived the fridge apocalypse. I grabbed them out of pure desperation, honestly. I mean, what else was I supposed to do? Tell ten six-year-olds that the party was canceled? No chance.
So I rolled those hot dogs in strips of dough, pinched on little eyes with mustard, and threw them in the oven before the power could come back and ruin my momentum. What came out was nothing like the plan—and better. They looked ridiculous. They looked like tiny, lumpy, delicious ghosts wrapped in dough blankets. The kids went absolutely nuts. They called them “mummy dogs” before I even had a chance to name them, and I knew right then I’d stumbled onto something. Maybe you’ve been there—that moment when you’re convinced everything is falling apart, and somehow the simplest, most imperfect thing you throw together becomes the star of the show.
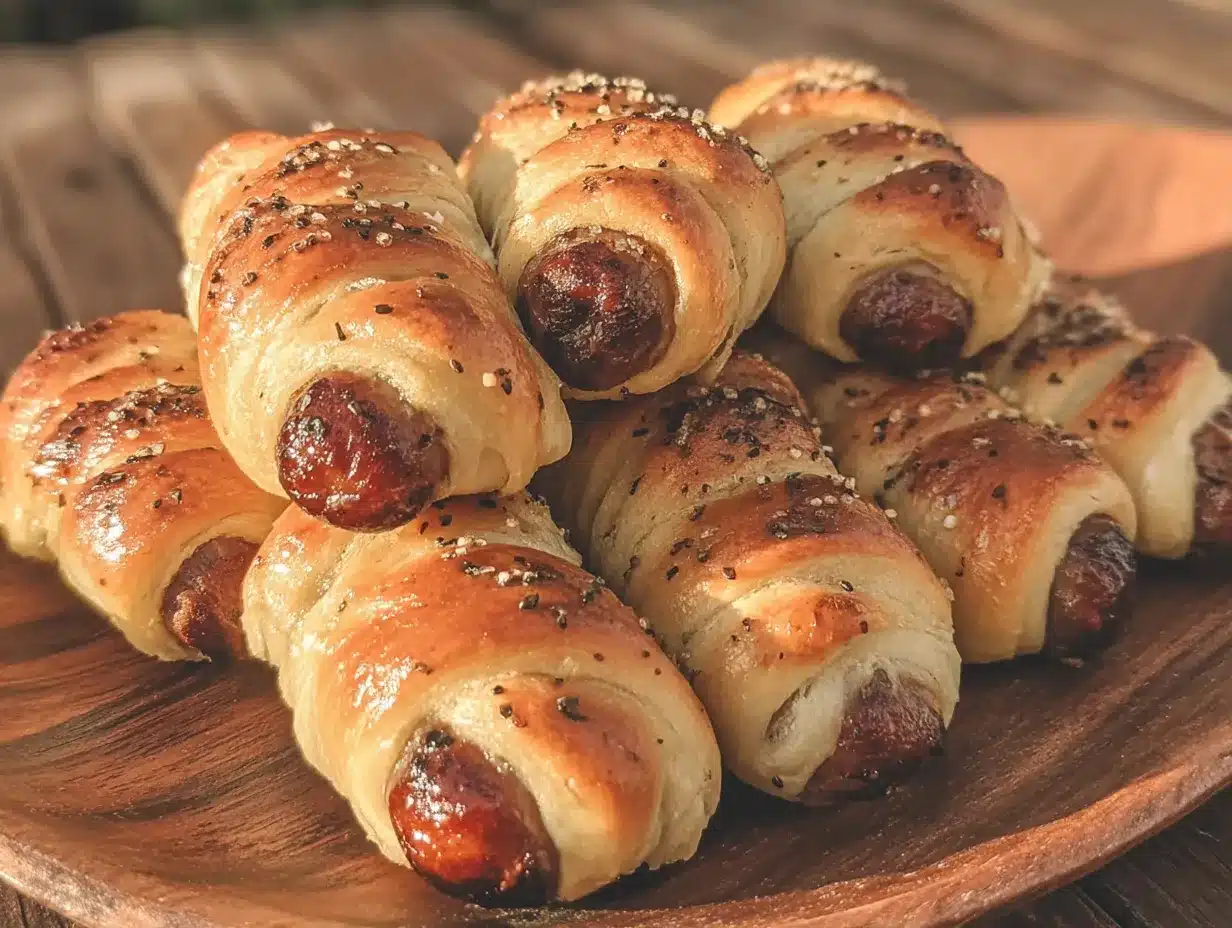
That’s this recipe. It’s not fancy. It’s not complicated. But let me tell you, I’ve made these Easy Halloween Mummy Pigs in a Blanket for every Halloween party since, and they never last more than ten minutes. The crispy, golden dough wrapped around juicy hot dogs, with those googly mustard eyes staring up at you—it’s impossible not to smile. And honestly? I’m a little glad the power went out that day. It taught me something: sometimes the best recipes come from a total mess. These mummy pigs in a blanket are proof.
Why You’ll Love This Recipe
Let’s be real—Halloween food can be a pain. You spend hours carving, shaping, and decorating, and half the time the kids just want the candy. These Easy Halloween Mummy Pigs in a Blanket are the exception. They’re fun, they’re fast, and they actually taste amazing. Here’s why they work so well:
- Quick & Easy: You can have these assembled and in the oven in under 10 minutes. No complicated steps, no fancy tools, no stress. Perfect for when you’re juggling costumes, decorations, and a dozen other party tasks.
- Simple Ingredients: Hot dogs, crescent roll dough, and a squirt of mustard. That’s it. You probably already have everything in your fridge and pantry right now.
- Perfect for Halloween Parties: These little guys are the ultimate party food. They’re portable, they’re kid-friendly, and they look adorable on a platter. Great for classroom parties, trick-or-treat gatherings, or just a spooky movie night at home.
- Crowd-Pleaser: I’ve served these to kids, adults, picky eaters, and even a few Halloween skeptics. Every single person goes back for seconds. They’re that good.
- Unbelievably Delicious: The combination of buttery, flaky crescent dough wrapped around a salty, juicy hot dog is pure comfort food magic. Add the tangy mustard eyes, and you’ve got a flavor and texture combo that’s next-level satisfying.
What makes this recipe different from every other pigs-in-a-blanket recipe out there? It’s the way the dough is wrapped. Instead of just rolling the hot dog up in a solid piece of dough, you cut the dough into thin strips and wrap them like bandages. This creates little gaps that brown up beautifully, giving you crispy edges and a lighter, flakier texture. Plus, it makes them look like actual mummies. It’s a small change that makes a huge difference, both visually and in taste. This isn’t just another version—it’s the best version. Trust me on this one.
What Ingredients You Will Need
This recipe uses simple, pantry-friendly ingredients to deliver maximum flavor and Halloween fun with minimal fuss. Here’s what you’ll need:
For the Mummy Pigs in a Blanket
- 1 can (8 oz) refrigerated crescent roll dough – I recommend Pillsbury for consistent results, but any brand works. The key is getting the dough cold so it’s easier to cut into strips.
- 8 cocktail sausages or mini hot dogs – Look for “little smokies” or mini hot dogs in the refrigerated section. Brands like Hillshire Farm or Johnsonville are great options. You can also use full-size hot dogs cut into thirds.
- Yellow mustard – For the eyes. You can use a squeeze bottle with a fine tip for precision, or just dab it on with a toothpick. Dijon or spicy brown mustard also work if you want a different flavor.
Optional Additions
- 1 egg, beaten – For an egg wash that gives the dough a beautiful golden-brown sheen. Not essential, but it makes them look bakery-worthy.
- Sesame seeds or poppy seeds – Sprinkle on top before baking for extra texture and a more “mummy” look. Black sesame seeds are especially fun for a spooky vibe.
- Ketchup or hot sauce – For dipping. Some people like to add a tiny dot of ketchup inside the “bandages” for a bloody effect. Totally optional, but the kids love it.
- Shredded cheese – A little cheddar or mozzarella tucked under the dough strips adds a gooey surprise. Just don’t overdo it, or the dough won’t stick properly.
Ingredient Selection Tips
When choosing your hot dogs, go for quality. I’ve found that all-beef or turkey hot dogs hold up better during baking and have a better flavor. The cheap ones can get rubbery. For the crescent dough, make sure it’s well-chilled. If it gets too warm, the strips will stick together and be impossible to separate. I usually pop the can in the fridge for 10-15 minutes before I start. And for the mustard, use a squeeze bottle with a thin nozzle. It makes the eyes so much easier to draw. You can find them at most grocery stores in the condiment aisle.
If you’re making these for a party with dietary restrictions, here are some easy swaps: Use gluten-free crescent roll dough (available at most health food stores) for a gluten-free option. For a lower-fat version, use turkey or chicken hot dogs. And if you’re feeding vegetarians, try veggie dogs or even cheese sticks wrapped in the dough. The process is exactly the same.
Equipment Needed
You don’t need much to make these mummy dogs, which is part of the beauty. Here’s what you’ll want to have on hand:
- Baking sheet – A standard half-sheet pan works perfectly. Line it with parchment paper or a silicone baking mat for easy cleanup.
- Sharp knife or pizza cutter – For cutting the crescent dough into strips. A pizza cutter makes straight, even lines much easier than a knife.
- Cutting board – A clean surface for working the dough. A silicone mat is great if you have one.
- Small bowl – For the egg wash, if you’re using it.
- Pastry brush – For applying the egg wash. A silicone brush is easiest to clean.
- Toothpicks – For dabbing on the mustard eyes if you don’t have a squeeze bottle.
- Cooling rack – Optional, but it helps the mummy dogs stay crispy after baking instead of getting soggy on the pan.
Honestly, I’ve made these with just a butter knife and a fork before, and they still turned out great. The pizza cutter is a nice-to-have, not a must. And if you don’t have a pastry brush, just use a paper towel to dab on the egg wash. No need to overcomplicate things. The one thing I do recommend investing in is a good baking sheet—the cheap ones can warp in the oven and cause uneven browning. I use Nordic Ware, and they’ve lasted me years.
Preparation Method
Ready to make some adorable, delicious mummy dogs? Let’s get started. This whole process takes about 20 minutes from start to finish, including baking time.
- Preheat your oven to 375°F (190°C). Line a baking sheet with parchment paper or a silicone mat. This prevents sticking and makes cleanup a breeze. If you don’t have parchment, lightly grease the pan with cooking spray.
- Prepare the crescent dough. Open the can of crescent roll dough carefully—it can pop open with a start, so point it away from your face. Unroll the dough and separate it along the perforated lines into 8 triangles. If you’re using a solid sheet of dough, just cut it into 8 equal rectangles. Place the triangles or rectangles on your cutting board.
- Cut the dough into strips. Using a sharp knife or pizza cutter, cut each triangle lengthwise into 3-4 thin strips, about 1/4 to 1/2 inch wide. The strips don’t have to be perfectly even—a little variation adds to the “mummy” look. If the dough gets too soft and sticky, pop it in the fridge for 5 minutes to firm up.
- Wrap the hot dogs. Take one cocktail sausage or mini hot dog and place it at the wide end of one strip of dough. Wrap the strip around the hot dog, slightly overlapping as you go, leaving a small gap near the top for the face. You want the strips to look like bandages, so don’t cover the entire hot dog. Use 2-3 strips per hot dog, depending on how “wrapped” you want them. Press the ends of the dough gently to seal.
- Place on the baking sheet. Arrange the wrapped mummy dogs on the prepared baking sheet, leaving about an inch of space between each one. They won’t spread much, so you can fit all 8 on a standard sheet pan.
- Apply the egg wash (optional). In a small bowl, beat one egg with a tablespoon of water. Using a pastry brush, lightly brush the tops of the dough strips. This gives them a beautiful golden-brown color and a slight sheen. If you’re skipping the egg wash, just leave them as is—they’ll still brown nicely.
- Bake for 10-12 minutes. Place the baking sheet in the preheated oven and bake until the dough is puffed and golden brown, about 10-12 minutes. Keep an eye on them toward the end—you want them golden, not burnt. The hot dogs should be heated through and slightly sizzling.
- Add the eyes. Remove the baking sheet from the oven and let the mummy dogs cool for 2-3 minutes. While they’re still warm, use a squeeze bottle or toothpick to add two small dots of yellow mustard for the eyes. You can make them look silly, scared, or sleepy—whatever fits your mood. The mustard will set slightly as they cool.
- Serve immediately. Transfer the mummy dogs to a serving platter. They’re best served warm, when the dough is still flaky and the hot dog is juicy. If you’re making them ahead, keep them warm in a low oven (200°F) for up to 30 minutes.
One thing I learned the hard way: don’t over-wrap the hot dogs. I got a little carried away the first time and used like five strips per dog. They came out looking like doughy blobs instead of mummies. Three strips is the sweet spot—enough to look wrapped, but with plenty of gaps so you can see the hot dog peeking through. Also, make sure the ends of the dough are tucked under the hot dog so they don’t uncurl during baking. A little press with your finger is all it takes.
Cooking Tips & Techniques
I’ve made these Easy Halloween Mummy Pigs in a Blanket about a dozen times now, and I’ve picked up a few tricks along the way. Here’s what I wish I’d known from the start:
Keep the dough cold. This is the number one tip. Crescent roll dough gets sticky and hard to work with when it’s warm. If you’re struggling to separate the strips, just pop the whole thing in the fridge for 5-10 minutes. It makes a world of difference. I once tried to rush through this step and ended up with a sticky, tangled mess that looked more like a horror movie than a Halloween party snack.
Don’t overbake. The difference between perfect mummy dogs and dry ones is about 90 seconds. Start checking at the 10-minute mark. The dough should be golden brown and puffed, but not dark. The hot dogs are already cooked, so you’re really just heating them through and browning the dough. Overbaking makes the hot dogs shrivel and the dough hard.
Use a timer. I know this sounds obvious, but I can’t tell you how many times I’ve gotten distracted by a costume emergency or a spilled bowl of candy and forgotten about the oven. Set a timer on your phone. Your mummy dogs will thank you.
Make the eyes fun. The mustard eyes are what make these mummy dogs special. You can do classic round dots, or get creative. Try making them look surprised (bigger dots), grumpy (slanted dots), or silly (one big, one small). I once made a whole platter with different expressions and the kids spent five minutes picking out their favorites. It’s a small detail that adds a lot of personality.
Double the batch. Seriously. These disappear fast. I made a single batch for a party of 12 once and they were gone in five minutes. Now I always make at least two batches. They’re so easy to assemble that doubling up barely adds any extra time.
Prep ahead. You can assemble the mummy dogs up to a day in advance. Just wrap them, place them on the baking sheet, cover with plastic wrap, and refrigerate. When you’re ready to bake, just pop them in the oven straight from the fridge—you might need to add an extra minute or two to the baking time. This is a lifesaver for party day.
Variations & Adaptations
One of the best things about this recipe is how easy it is to customize. Here are a few variations I’ve tried and loved:
Spicy Mummy Dogs
Use spicy sausage or chorizo-style mini links instead of regular hot dogs. Add a tiny dot of sriracha or hot sauce under the dough before wrapping for an extra kick. My husband loves these—he says they have way more personality than the original. Just be careful not to use too much hot sauce, or it can make the dough soggy.
Cheesy Mummy Dogs
Before wrapping the hot dog, tuck a thin strip of cheddar or mozzarella cheese under the dough. As it bakes, the cheese melts and oozes out through the gaps, giving the mummies a “gooey” effect. It’s messy but delicious. I recommend using a low-moisture cheese so it doesn’t make the dough too wet.
Veggie Mummy Dogs
For a vegetarian version, swap the hot dogs with vegan sausages or even cheese sticks. You can also use carrot sticks or asparagus spears for a lighter option. The wrapping technique is exactly the same. I’ve made these for a vegetarian friend’s Halloween party and they were a hit—even the meat-eaters snagged a few.
Breakfast Mummy Dogs
Use breakfast sausage links instead of hot dogs and wrap them in pancake batter or biscuit dough. Bake as directed and serve with maple syrup for dipping. It’s a fun twist for a Halloween morning breakfast. My kids request these every year on October 31st before school.
Gluten-Free Mummy Dogs
Use gluten-free crescent roll dough or puff pastry. The process is identical, but the baking time might be slightly longer. Check the package instructions for specific guidance. I’ve used the gluten-free dough from the brand Schar with great results—it’s flaky and buttery, just like the real thing.
Serving & Storage Suggestions
These Easy Halloween Mummy Pigs in a Blanket are best served warm, straight from the oven. The dough is at its flakiest and the hot dog is at its juiciest. Here’s how to serve and store them:
Serving Temperature: Serve them warm, but not piping hot. Let them cool for 2-3 minutes after baking so the mustard eyes set and nobody burns their tongue. They’re also great at room temperature if you’re setting up a buffet—just don’t leave them out for more than 2 hours.
Presentation Ideas: Arrange the mummy dogs on a black or orange platter for maximum Halloween vibes. You can add a few “spiderweb” lines of ketchup or hot sauce around the edges. A small bowl of mustard or ketchup for dipping on the side is always a good idea. I like to scatter a few candy corn or pumpkin candies around the platter for color contrast.
Complementary Dishes: These pair beautifully with other Halloween finger foods. Try serving them alongside mini pumpkin pies, witch hat cookies, or a bowl of popcorn “spiderwebs.” For drinks, apple cider or a Halloween punch (like a non-alcoholic “witches’ brew” with ginger ale and lime sherbet) is perfect.
Storage: If you have leftovers (unlikely, but possible), store them in an airtight container in the refrigerator for up to 3 days. The dough will soften, but they’ll still taste good. To reheat, pop them in a 350°F oven for 5-7 minutes, or until warmed through. Avoid the microwave—it makes the dough rubbery.
Freezing: You can freeze the assembled, unbaked mummy dogs. Place them on a baking sheet and freeze until solid, then transfer to a freezer bag. They’ll keep for up to 3 months. When you’re ready to bake, add 2-3 minutes to the baking time—no need to thaw first.
Flavor Development: Honestly, these are best fresh. The dough loses its crispness after a few hours, and the hot dogs can get a little dry. If you’re making them for a party, I recommend baking them just before serving. But if you’re making them ahead, the unbaked frozen option is your best bet.
Nutritional Information & Benefits
Let’s be honest—these are a treat, not a health food. But that doesn’t mean they can’t fit into a balanced diet. Here’s the estimated nutritional breakdown for one mummy dog (based on standard ingredients):
| Nutrient | Amount per Serving (1 mummy dog) |
|---|---|
| Calories | 180-220 |
| Total Fat | 12-15g |
| Saturated Fat | 4-6g |
| Cholesterol | 25-35mg |
| Sodium | 450-550mg |
| Total Carbohydrates | 14-18g |
| Dietary Fiber | 0-1g |
| Sugars | 3-5g |
| Protein | 6-8g |
Health Benefits: While these aren’t exactly superfoods, the hot dogs do provide a good amount of protein, which helps keep you full and satisfied. The crescent dough offers quick energy from carbohydrates—perfect for fueling a night of trick-or-treating. If you use turkey or chicken hot dogs, you’ll cut the fat and calories significantly. And the mustard is virtually calorie-free while adding a boost of flavor and a tiny amount of turmeric, which has anti-inflammatory properties.
Dietary Considerations: This recipe can be adapted for gluten-free diets (use gluten-free dough), lower-fat diets (use turkey hot dogs), and vegetarian diets (use veggie dogs). It is not suitable for vegan diets as-is, but you can use vegan crescent dough and vegan sausages. The main allergens to watch for are wheat (in the dough) and milk (in some dough brands). Always check the labels if you’re cooking for someone with allergies.
My Personal Perspective: I’m all about balance. I love that these mummy dogs let me enjoy Halloween food without spending hours in the kitchen. They’re a fun, indulgent treat that brings people together. And honestly, the joy on my daughter’s face when she saw them for the first time? Totally worth every calorie. Life’s too short not to enjoy a mummy dog every now and then.
Conclusion
So there you have it—Easy Halloween Mummy Pigs in a Blanket that are as fun to make as they are to eat. They started as a happy accident in a dark kitchen, and now they’re a non-negotiable part of our Halloween tradition. I love how something so simple can bring so much joy. The way the kids’ faces light up when they see those googly mustard eyes. The way the adults sneak one (or three) when they think nobody’s looking. It’s pure, uncomplicated happiness, and that’s what Halloween should be about.
I hope you give these a try, and I hope you make them your own. Play with the expressions. Add some cheese. Dip them in ketchup or hot sauce or ranch—whatever makes you happy. The beauty of this recipe is that it’s impossible to mess up. Even if your strips are uneven or your eyes are crooked, they’ll still be delicious. And honestly? The imperfect ones are the best. They’ve got character.
If you make these, I’d love to hear about it. Drop a comment below and tell me how your mummy dogs turned out. Did you try a fun variation? Did your kids name them? Did they disappear as fast as mine always do? Share your photos and tag me on social media—I can’t wait to see your creations. Until then, happy Halloween, and may your kitchen be filled with laughter, warmth, and a few perfectly wrapped mummy dogs!
Frequently Asked Questions
Can I use puff pastry instead of crescent roll dough?
Absolutely! Puff pastry works beautifully for these mummy dogs. It gives a flakier, more buttery texture. Just thaw the pastry according to the package directions, cut it into strips, and wrap as directed. The baking time might be slightly longer—around 12-15 minutes—so keep an eye on them.
How do I make the mustard eyes look neat?
Use a squeeze bottle with a fine tip for the cleanest results. If you don’t have one, dip a toothpick into the mustard and dab it on. You can also use a piping bag with a small round tip. Practice on a piece of parchment paper first if you’re nervous—but honestly, even messy eyes look cute on a mummy!
Can I make these ahead of time for a party?
Yes! You can assemble the mummy dogs up to 24 hours in advance. Place them on the baking sheet, cover with plastic wrap, and refrigerate. Bake them just before serving for the best texture. You can also freeze the unbaked mummy dogs for up to 3 months—just add a few extra minutes to the baking time.
What can I use instead of mustard for the eyes?
If you’re not a mustard fan, try using ketchup, sriracha, or even a tiny dot of melted cheese. For a sweeter option, use icing or melted chocolate. You can also use black sesame seeds or poppy seeds pressed into the dough before baking for a no-mess option. The possibilities are endless!
How do I keep the dough from unraveling during baking?
Make sure you tuck the ends of the dough strips under the hot dog before baking. Press them gently to seal. If the dough is still unrolling, you can use a toothpick to hold it in place—just remember to remove it before serving. Chilling the assembled mummy dogs for 10 minutes before baking also helps the dough hold its shape.
PrintEasy Halloween Mummy Pigs in a Blanket Recipe
These adorable mummy dogs are made with hot dogs wrapped in crescent roll strips, baked until golden, and finished with mustard eyes. A quick, fun, and delicious Halloween party snack that kids and adults love.
- Prep Time: 10 minutes
- Cook Time: 12 minutes
- Total Time: 22 minutes
- Yield: 8 servings 1x
- Category: Appetizer
- Cuisine: American
Ingredients
- 1 can (8 oz) refrigerated crescent roll dough
- 8 cocktail sausages or mini hot dogs
- Yellow mustard (for eyes)
- 1 egg, beaten (optional, for egg wash)
- Sesame seeds or poppy seeds (optional, for topping)
- Ketchup or hot sauce (optional, for dipping)
- Shredded cheese (optional, for a gooey surprise)
Instructions
- Preheat your oven to 375°F (190°C). Line a baking sheet with parchment paper or a silicone mat.
- Open the can of crescent roll dough carefully. Unroll and separate along perforations into 8 triangles. If using a solid sheet, cut into 8 equal rectangles.
- Using a sharp knife or pizza cutter, cut each triangle lengthwise into 3-4 thin strips, about 1/4 to 1/2 inch wide.
- Take one cocktail sausage or mini hot dog and place it at the wide end of one strip of dough. Wrap the strip around the hot dog, slightly overlapping, leaving a small gap near the top for the face. Use 2-3 strips per hot dog. Press ends to seal.
- Place wrapped mummy dogs on the prepared baking sheet, leaving about an inch of space between each.
- If using egg wash, beat one egg with a tablespoon of water and lightly brush the tops of the dough strips.
- Bake for 10-12 minutes, until dough is puffed and golden brown.
- Remove from oven and let cool for 2-3 minutes. While still warm, add two small dots of yellow mustard for eyes using a squeeze bottle or toothpick.
- Serve immediately. Transfer to a platter and enjoy warm.
Notes
Keep the dough cold for easier handling. Don’t over-wrap the hot dogs; 3 strips per mummy is ideal. For best texture, serve warm. Can be assembled up to 24 hours ahead and refrigerated, or frozen unbaked for up to 3 months.
Nutrition
- Serving Size: 1 mummy dog
- Calories: 200
- Sugar: 4
- Sodium: 500
- Fat: 13.5
- Saturated Fat: 5
- Carbohydrates: 16
- Fiber: 0.5
- Protein: 7
Keywords: Halloween, mummy dogs, pigs in a blanket, hot dog appetizer, crescent roll, party food, kid-friendly, easy Halloween recipe


